JETData.AI Training - Advance 1
Final Assignment Write Up for Completing JETData.AI - Advance 1 Training.
What is JETData.AI and n8n?
Check out JETData.AI and n8n
JETData.AI is a platform that helps business manage, store, and use their data easily, all in one place. What makes it great? JETData.AI comes with built in automation and AI on their platform, so with stuff like that, can help with automating the manual process and hopefully minimize human error.
n8n is a tool to automate tasks by connecting several nodes/apps together. By using n8n we can build a fully working workflow.
Why I Make This Posts?
Hopefully by creating this post, people that see this and facing the same problem as me, can find some inspiration on how they might mitigate or at least minimize the issues they are experiencing.
Through this post, I also want to share the real results of the training.
JETData.AI Basics
A Quick explanation for JETData.AI Basics UI Navigation.
Login Page & Main Page
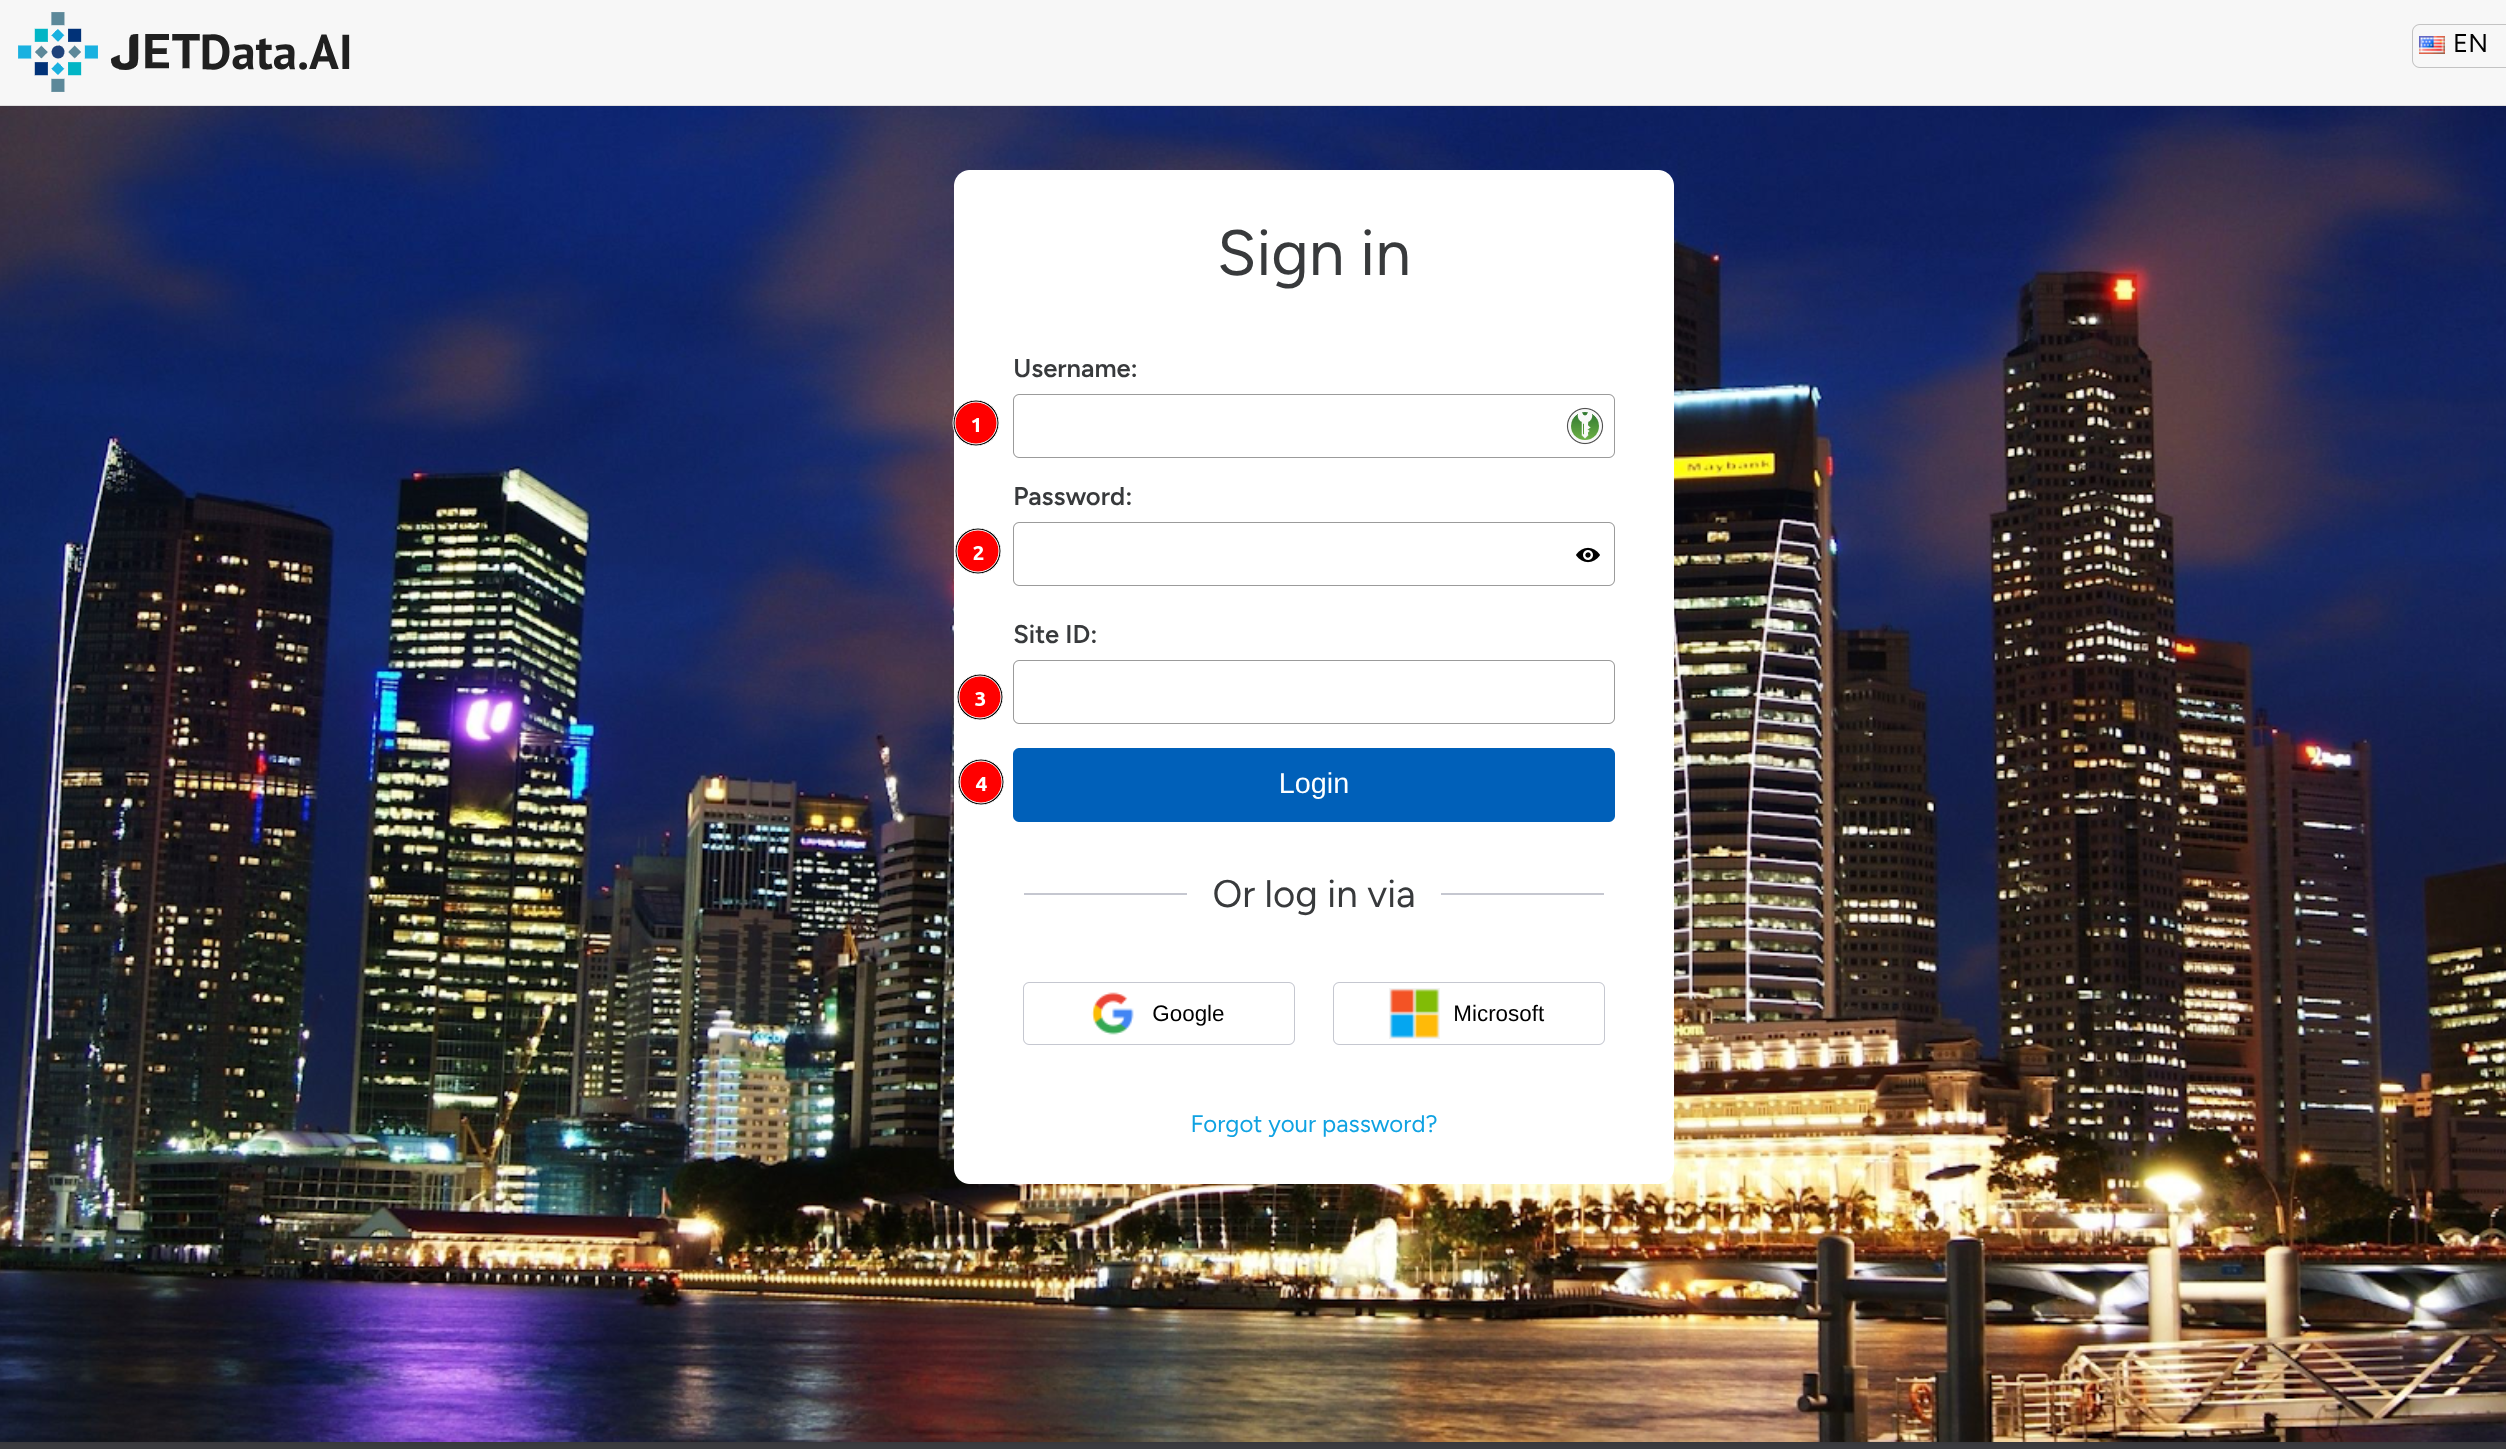 JETData.AI Login Page
You can login to JETData.AI using Google or Microsoft account, but I will login with Username, Password, and Site ID.
What is Site ID?, Site ID is a identification for login with your username and password, it can be like company name, or anything.
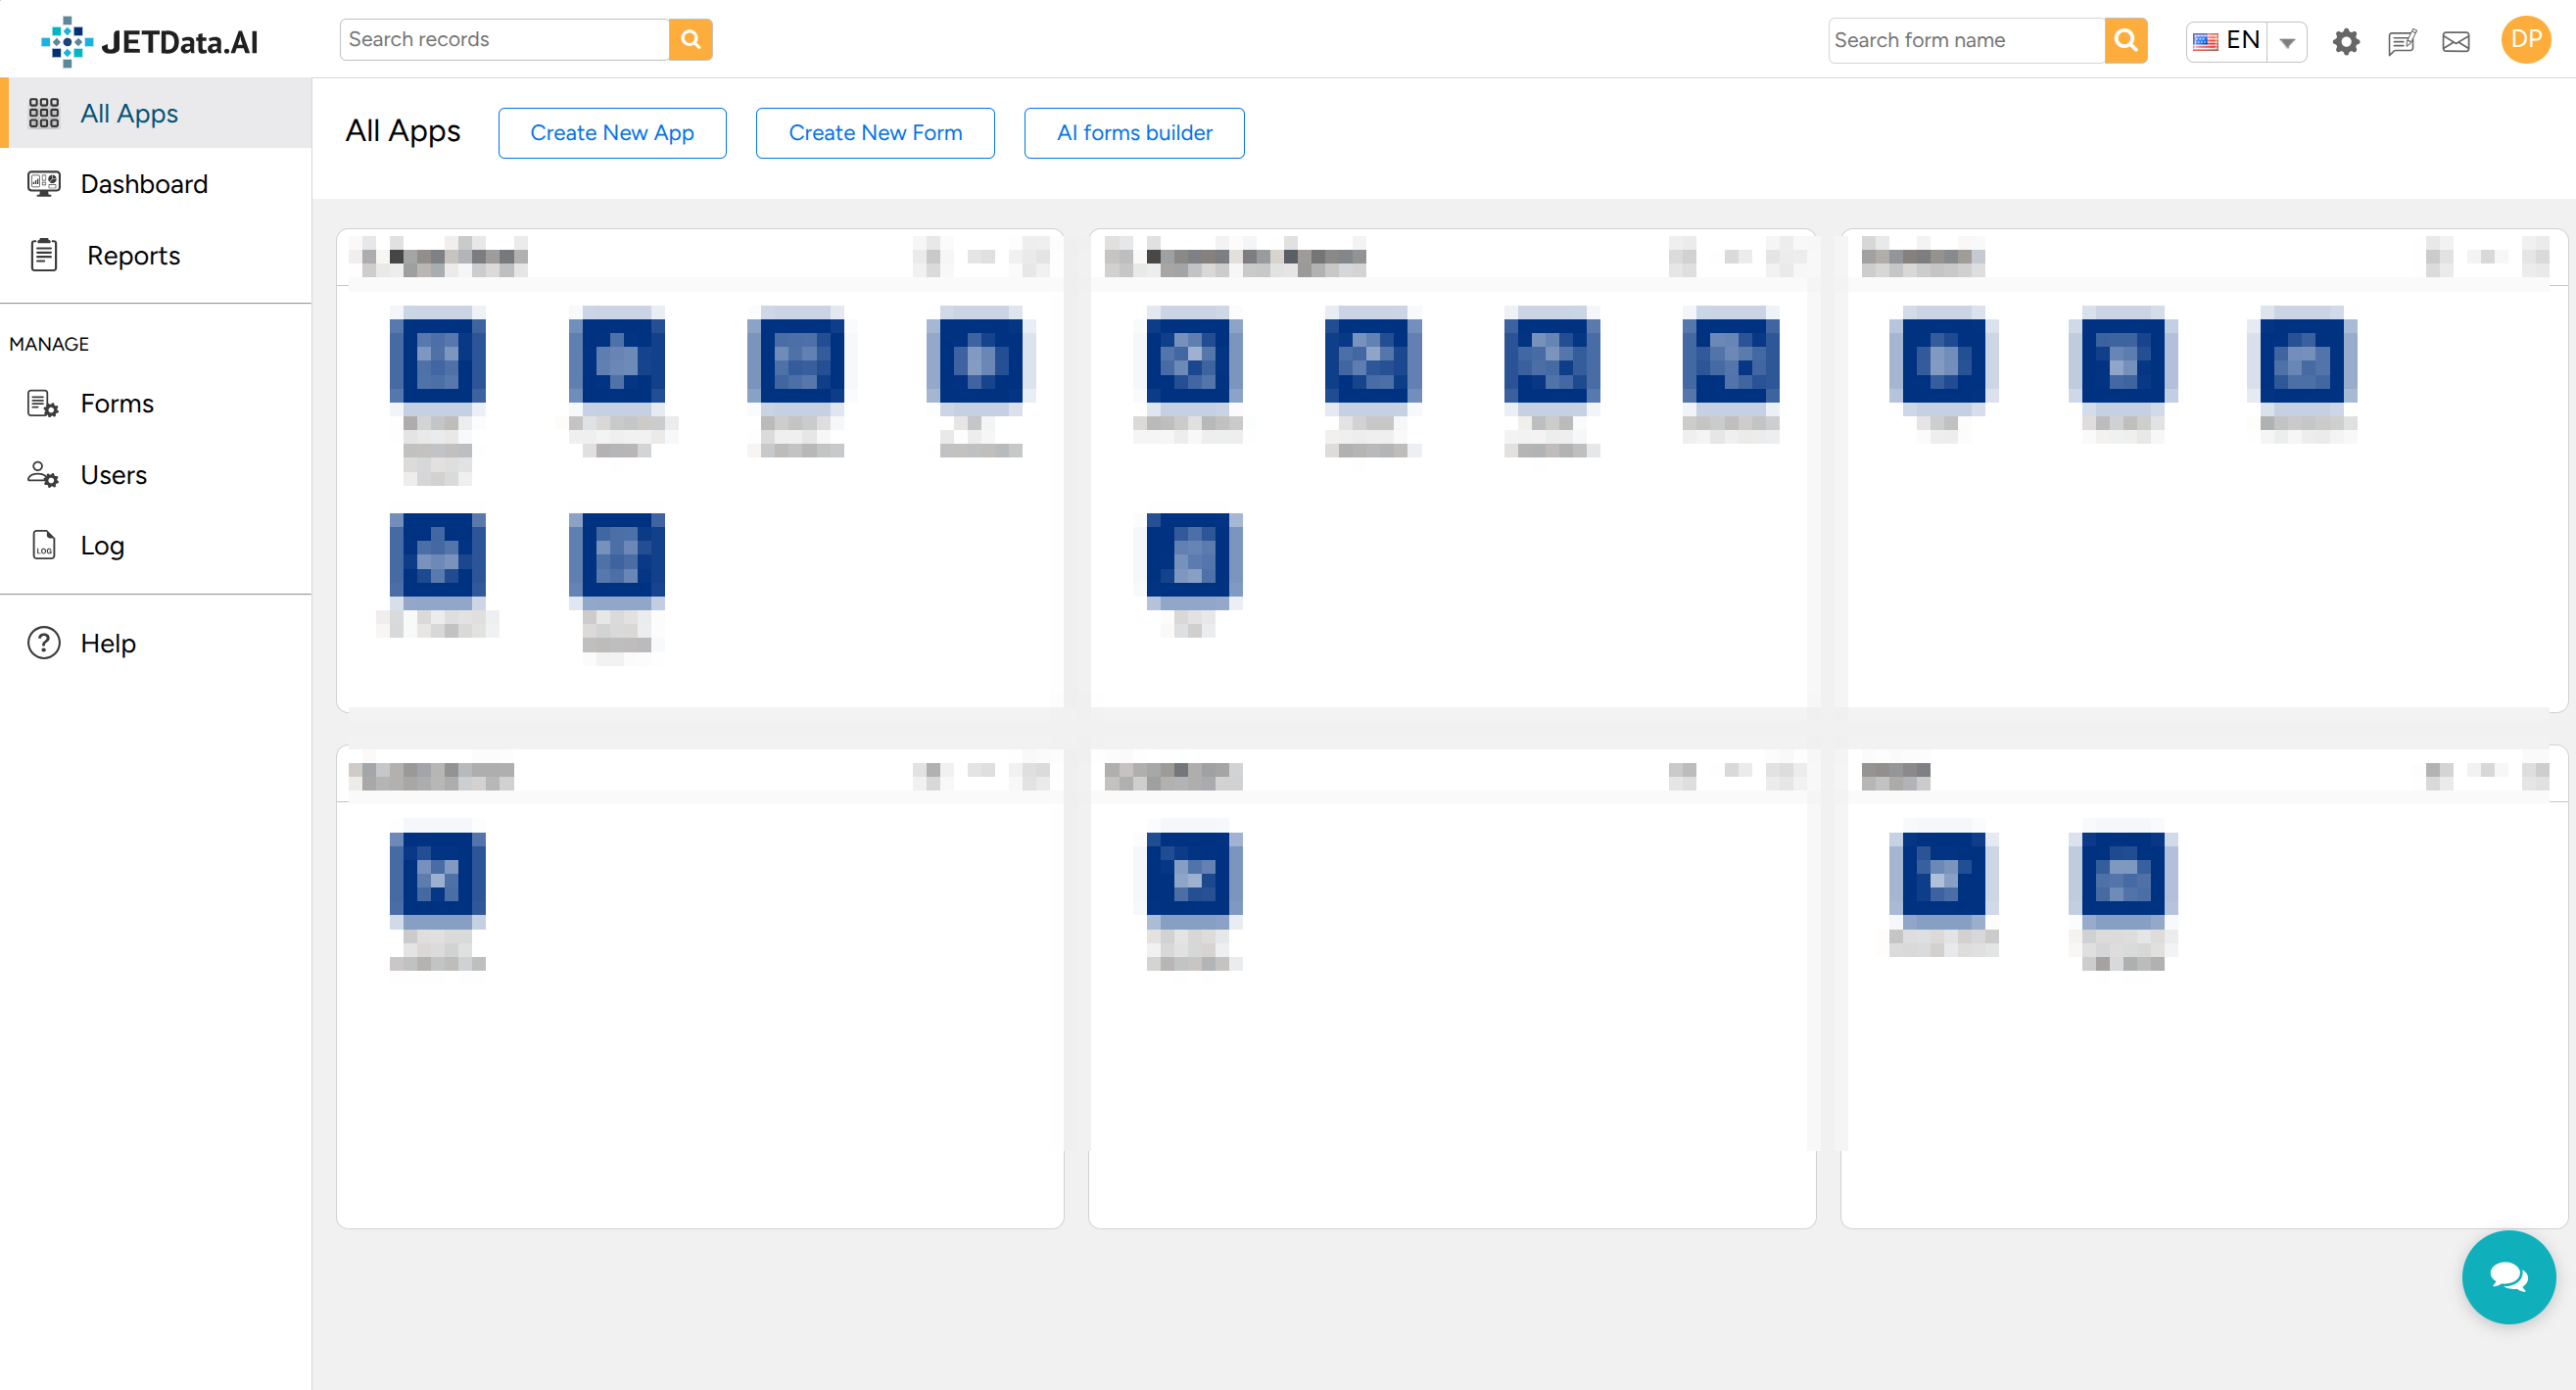 JETData.AI Main Page
After you login into JETData.AI, you will see the main page. This page contains several button like:
- Create New App
- Create New Form
- AI Forms Builder
- Settings
- User
and on the sidebar:
- All Apps
- Dashboard
- Reports
- Forms
- Users
- Log
- Help
Real World Application
Below are the 3 solution that I made using JETData.AI and n8n for the final of the training.
Activity Report OCR
The goal of this solution is to simplify the documentation of Activity Report for Engineer to Admin.
Demo Video
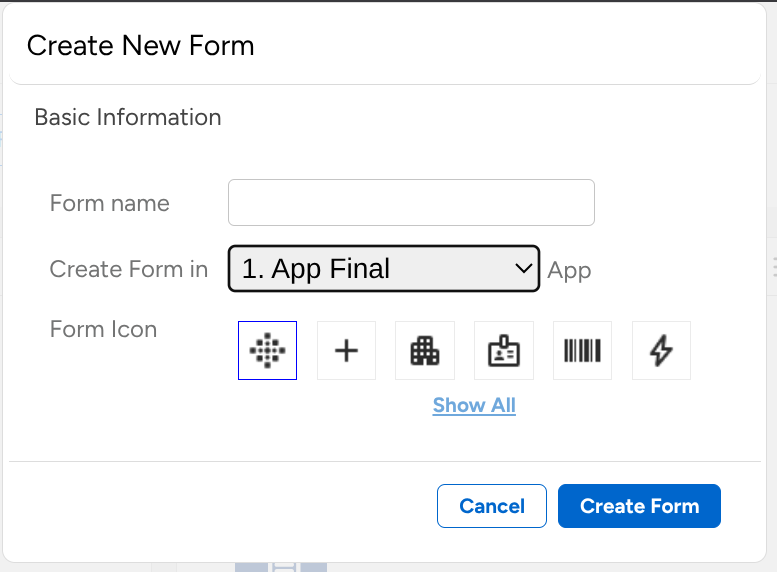
The very first steps to creating any form is creating new App. App in JetData is like a directory, where the inside of App is the form. So in short App, group Forms together
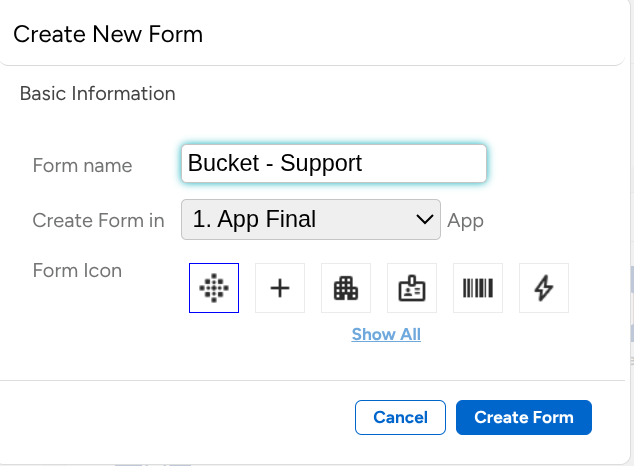
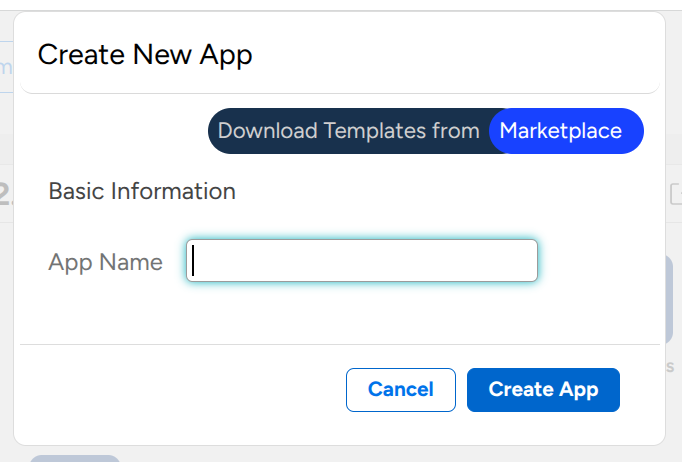 Create New App Window
After creating the App, we can continue with creating a new Forms, and we can choose the newly created App and create the form for that App.
 Create New Form Window
With the Form created inside the App, JETData will open a new windows to create a fields mapping. What is fields mapping?, fields mapping define how a field (Column) in one system or table to another field in other system.
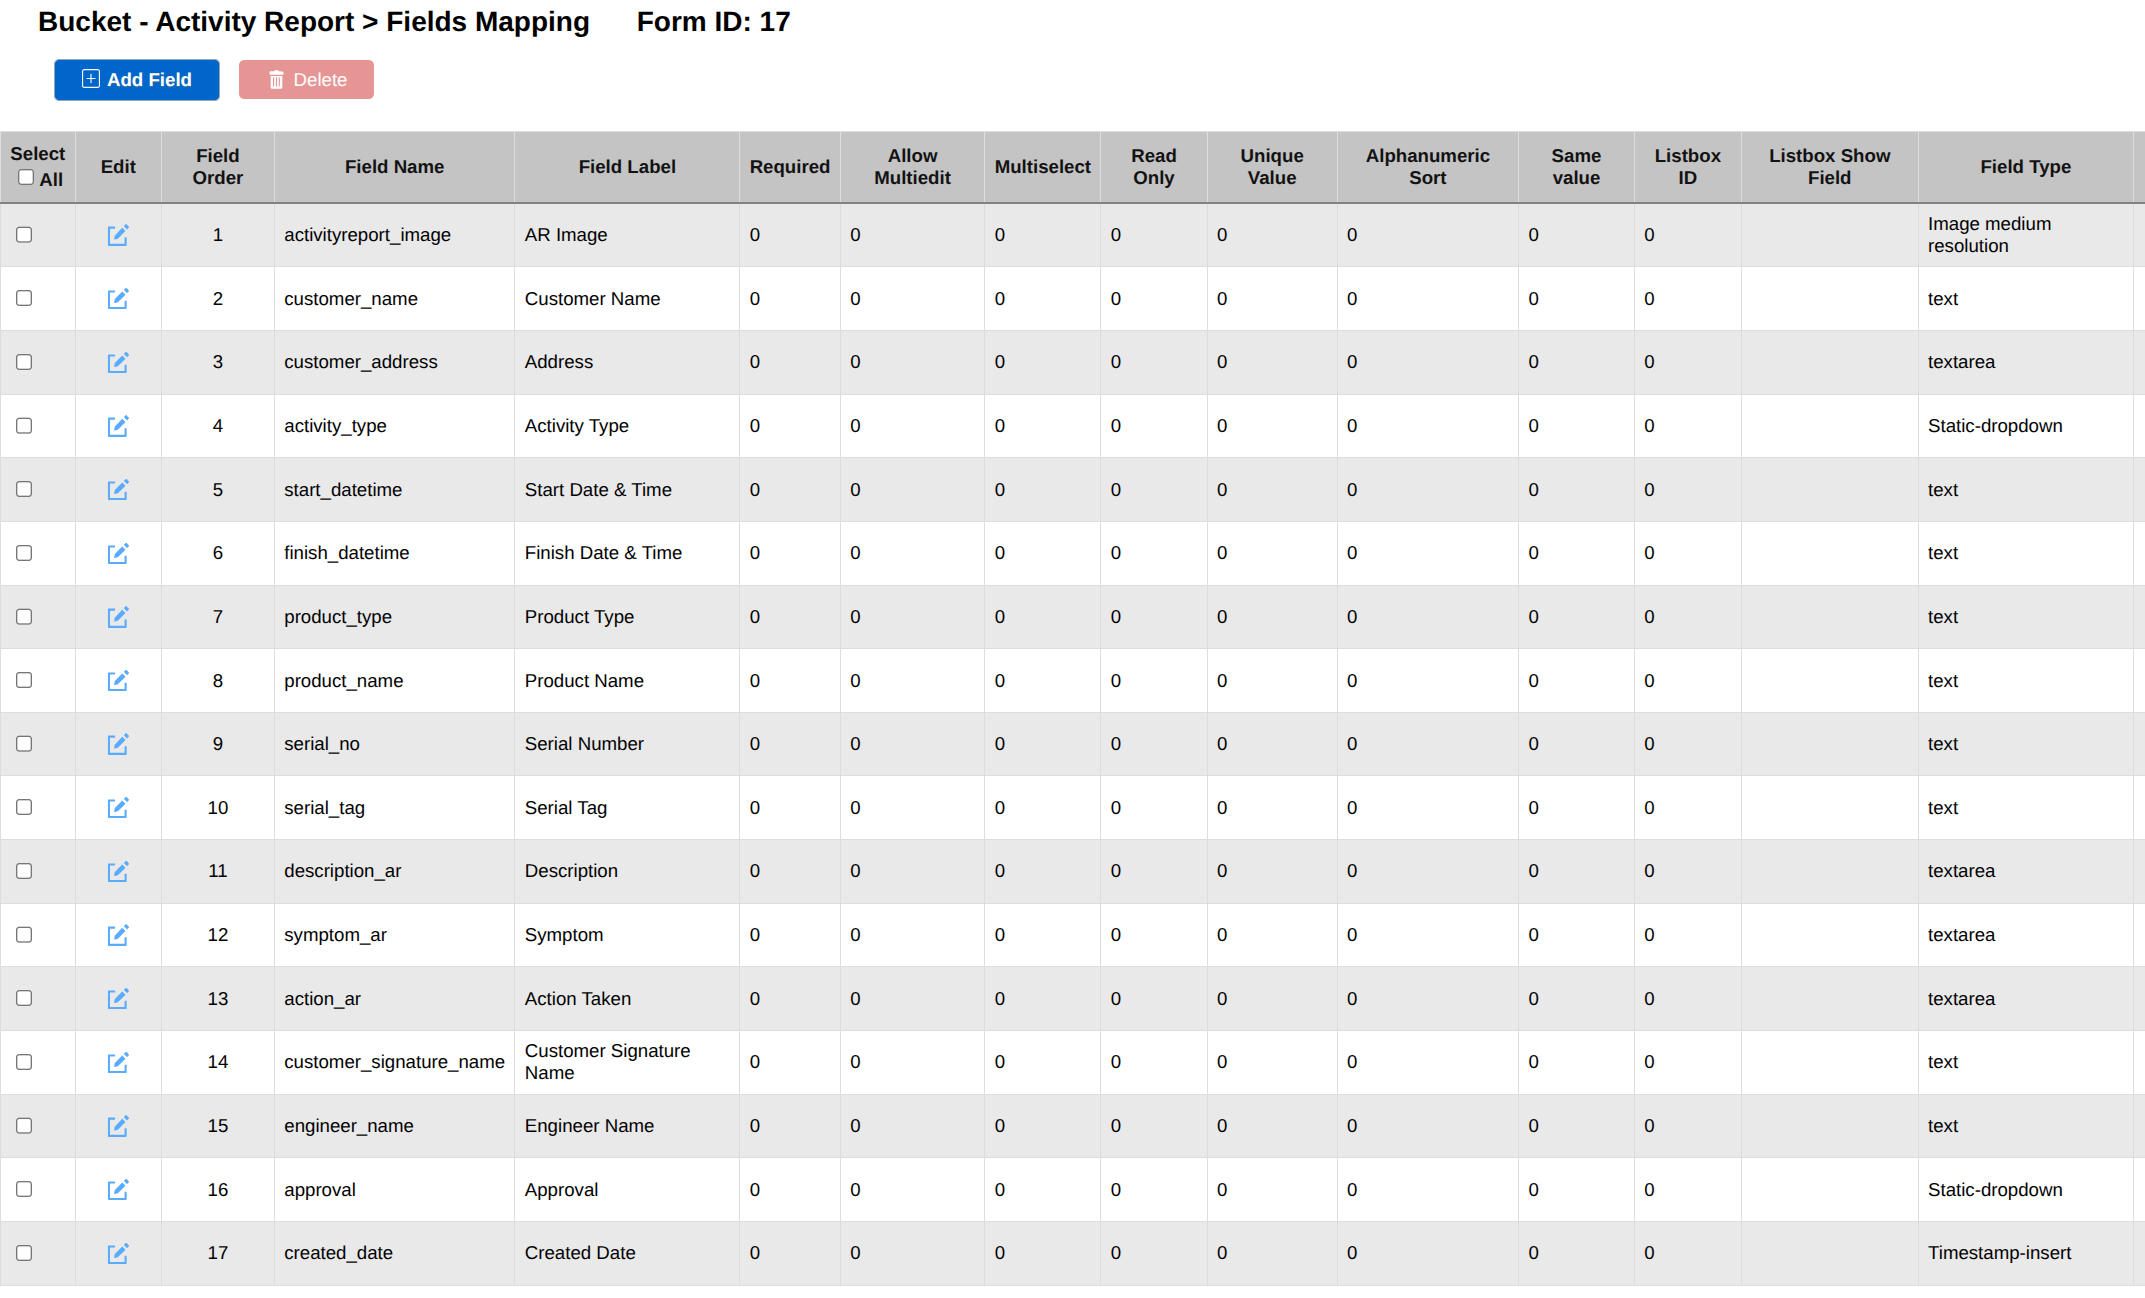 Create Fields Mapping for Activity Report
I’ve created the fields mapping for the acivity report OCR, after that you can start adding record inside the form with the Add Record button, and the add record will prompt you to insert the value you’ve put inside the fields mapping.
 Add Records Button for Activity Report
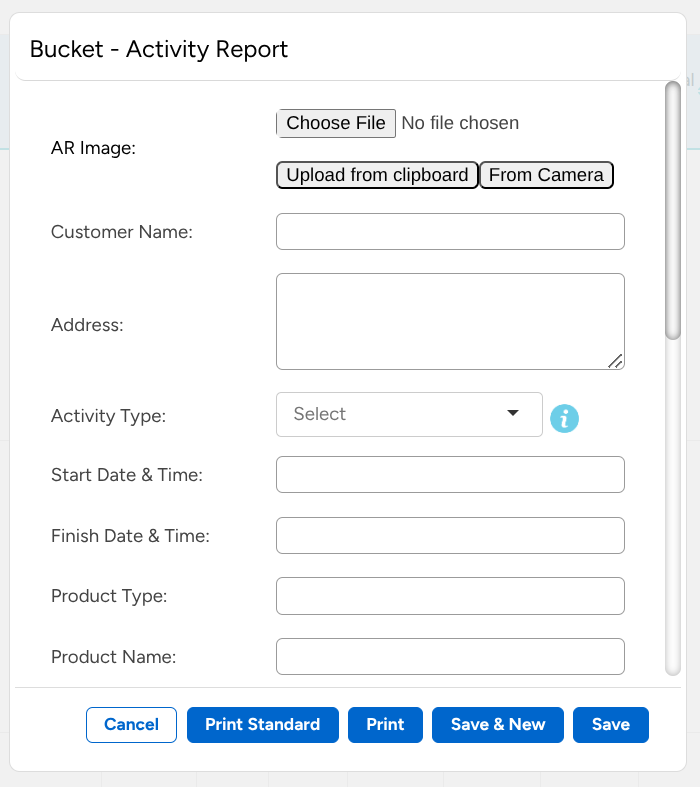 Add Records Value for Activity Report Item
But, instead of manually adding records and entering the value for each item. This is where we will use Automation from JETData.AI that will do a HTTP POST request based on if the image is available or not.
 Add Automation for Activity Report
After pressing Add Automation a new window will appear, where you can configure how you want to automate your stuff, below are the automation used for Activity Report OCR where the condition will check whether if theres activityreport_image available or no in the fields, if the image is available then it will continue, if not then the automation does not run.
When the automation conditions are met, then the automation will do a HTTP Request POST to n8n webhook and also send the fields of id_record and activityreport_image to the webhook.
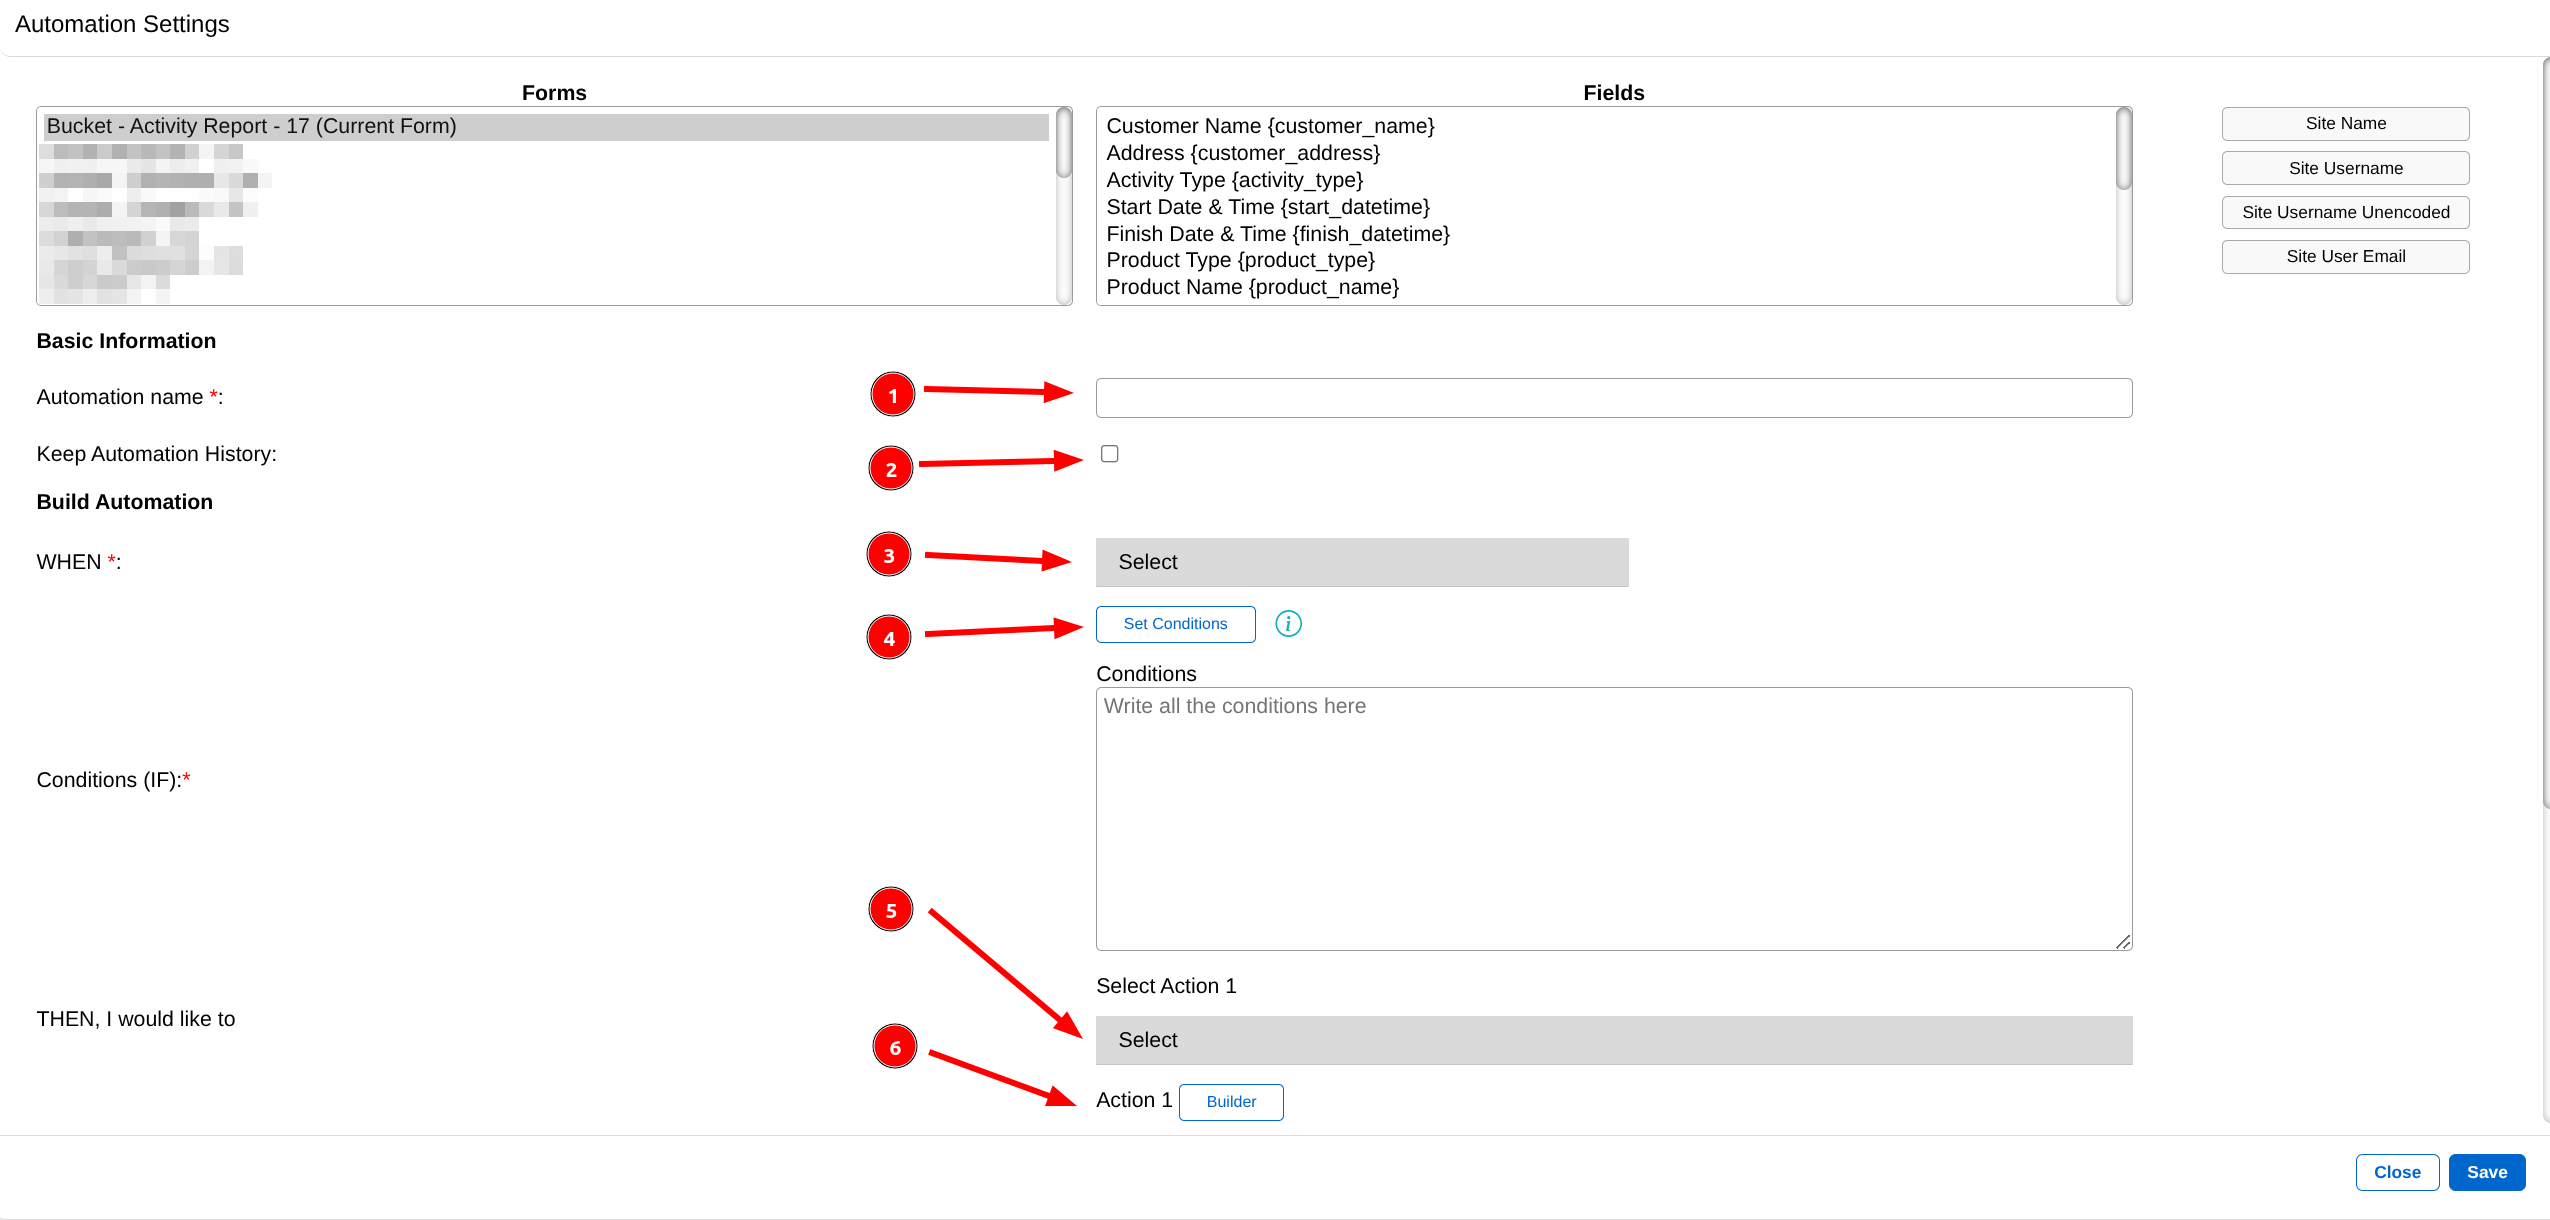 Automation Configurations
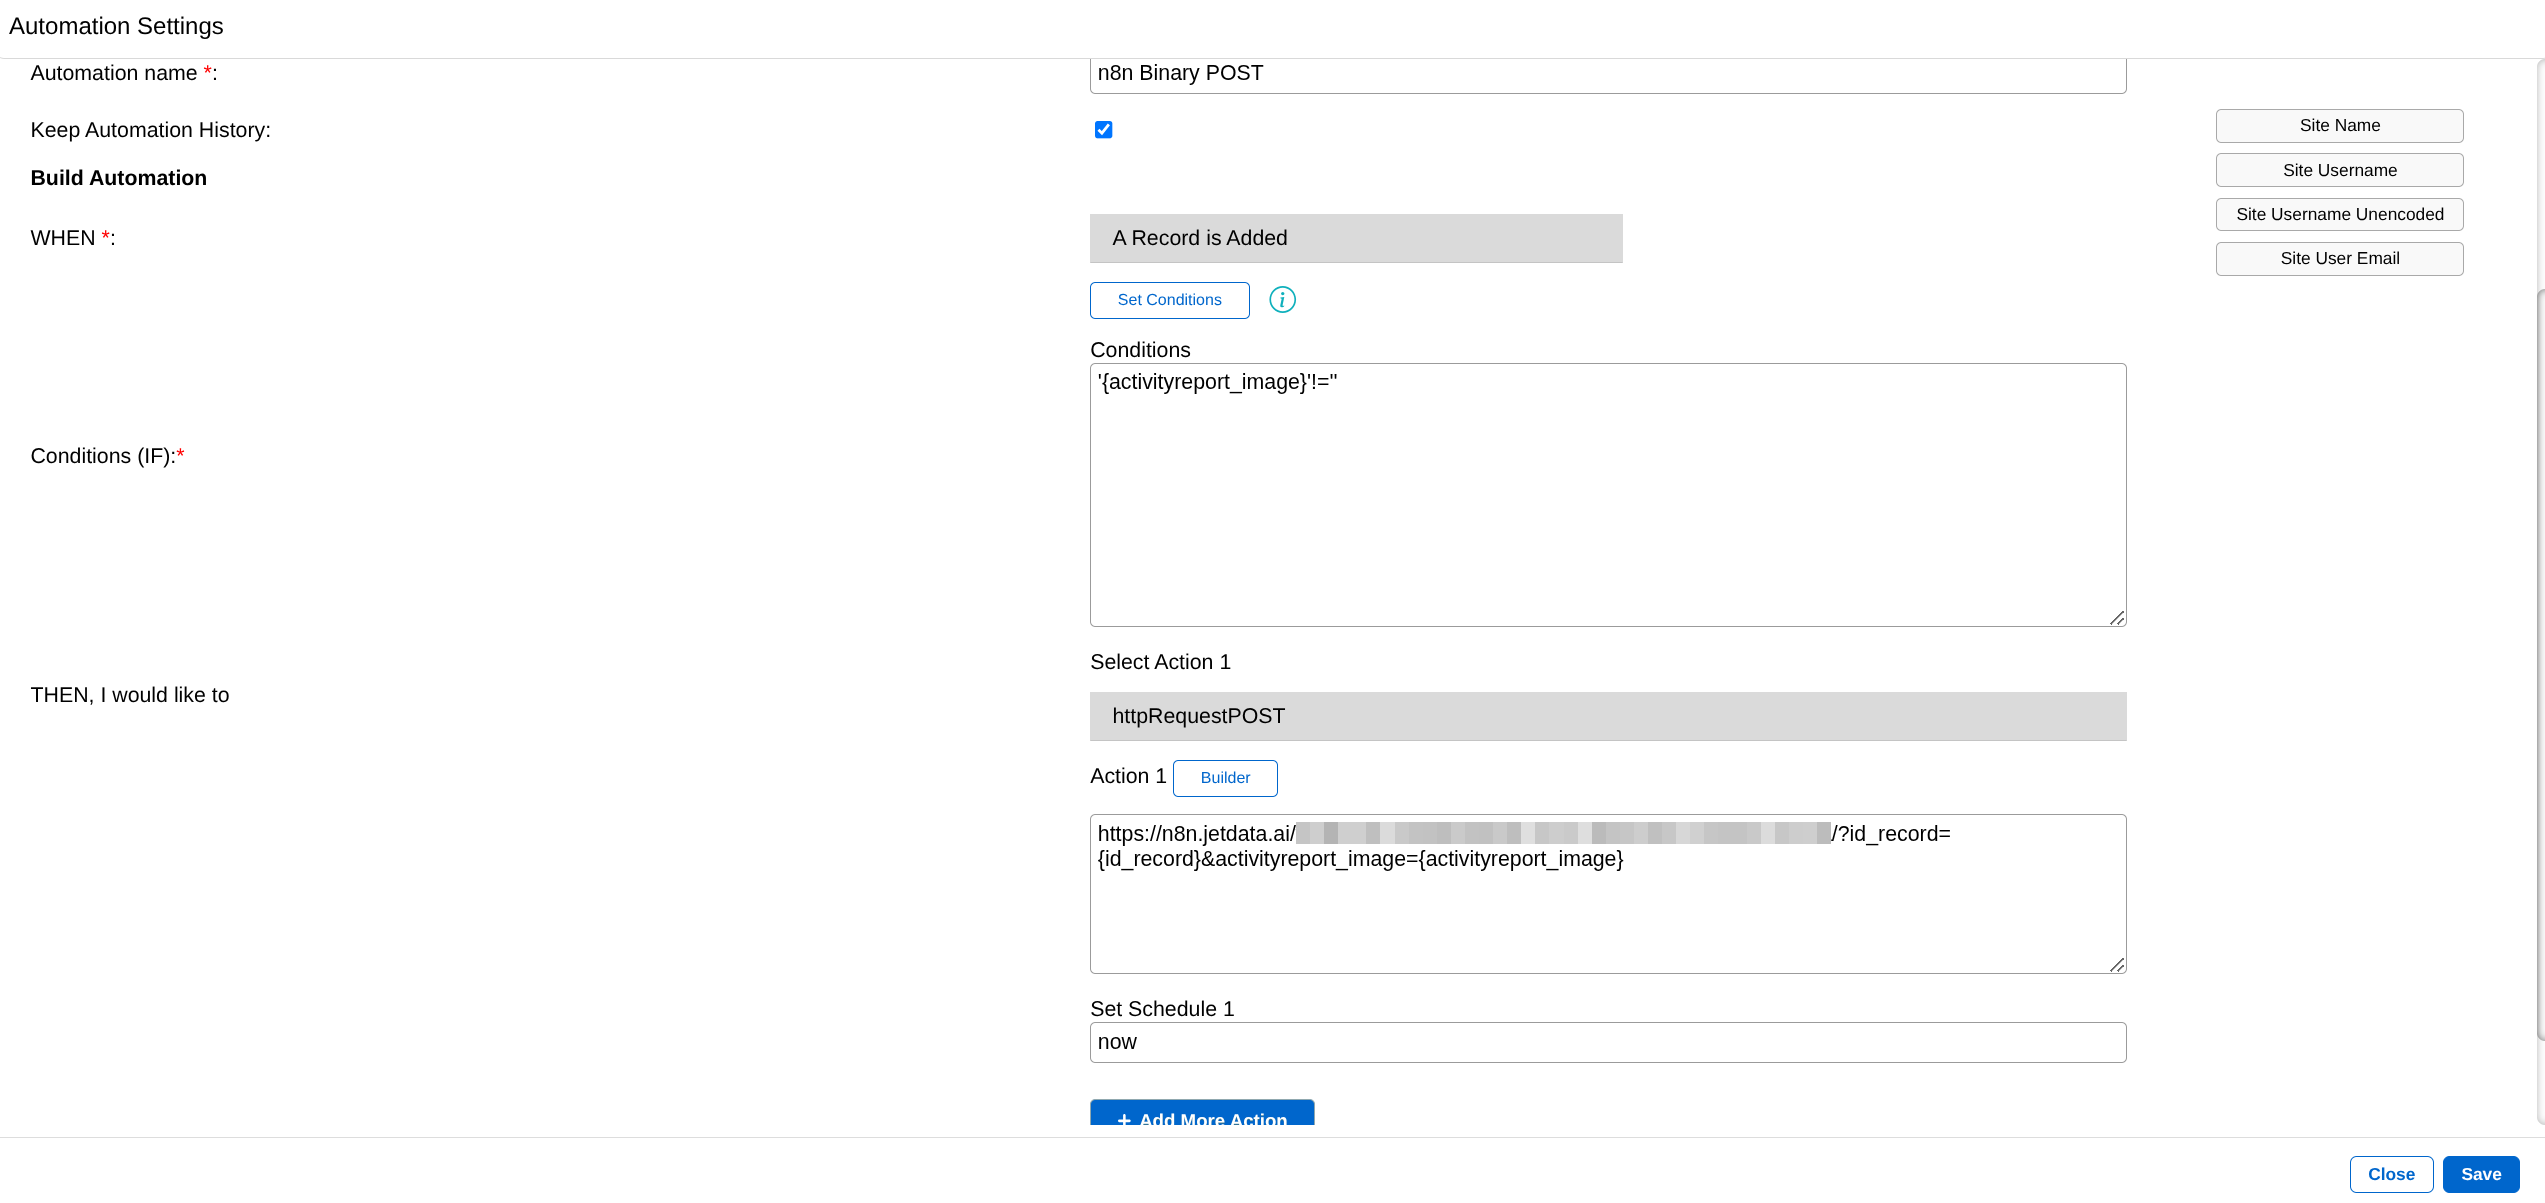 Activity Report Automation Configuration
With automation side done, we can move into the UI, with JETData.AI each form you can apply your own customized UI by modifying the source with HTML, you can do this by right clicking the form Edit > Enable Customized Form > Modify Source
With Customized UI, it is Recommended to create a new FORM for UI
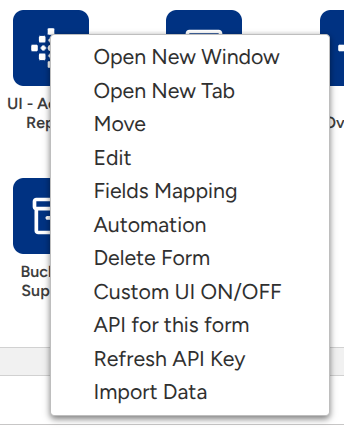 Form Edit Options
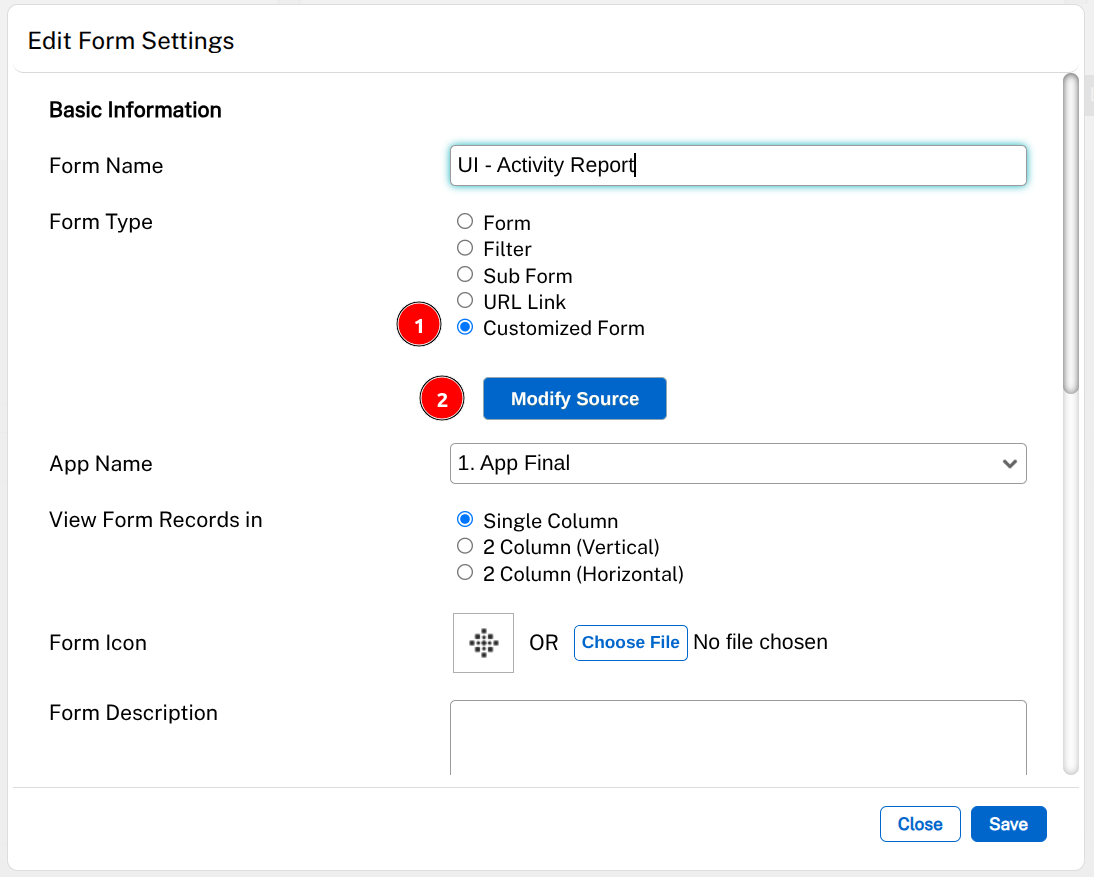 Enabled Customized UI on FORM
for the source code for Activity Report you can just copy paste this to have the exact thing as me.
WARNING: NEVER PUT YOUR API KEY IN THE FRONTEND OR HARDCODE IT, THIS IS FOR TESTING PURPOSES ONLY!
Check Out The Source Code for Activity Report UI HERE
With customized UI enabled, now we’re done with JETData.AI side, and can move on to the n8n side. Below are all the node used for the OCR, we’ll be using webhook, AI Agent, OpenAI, and HTTP request tool.
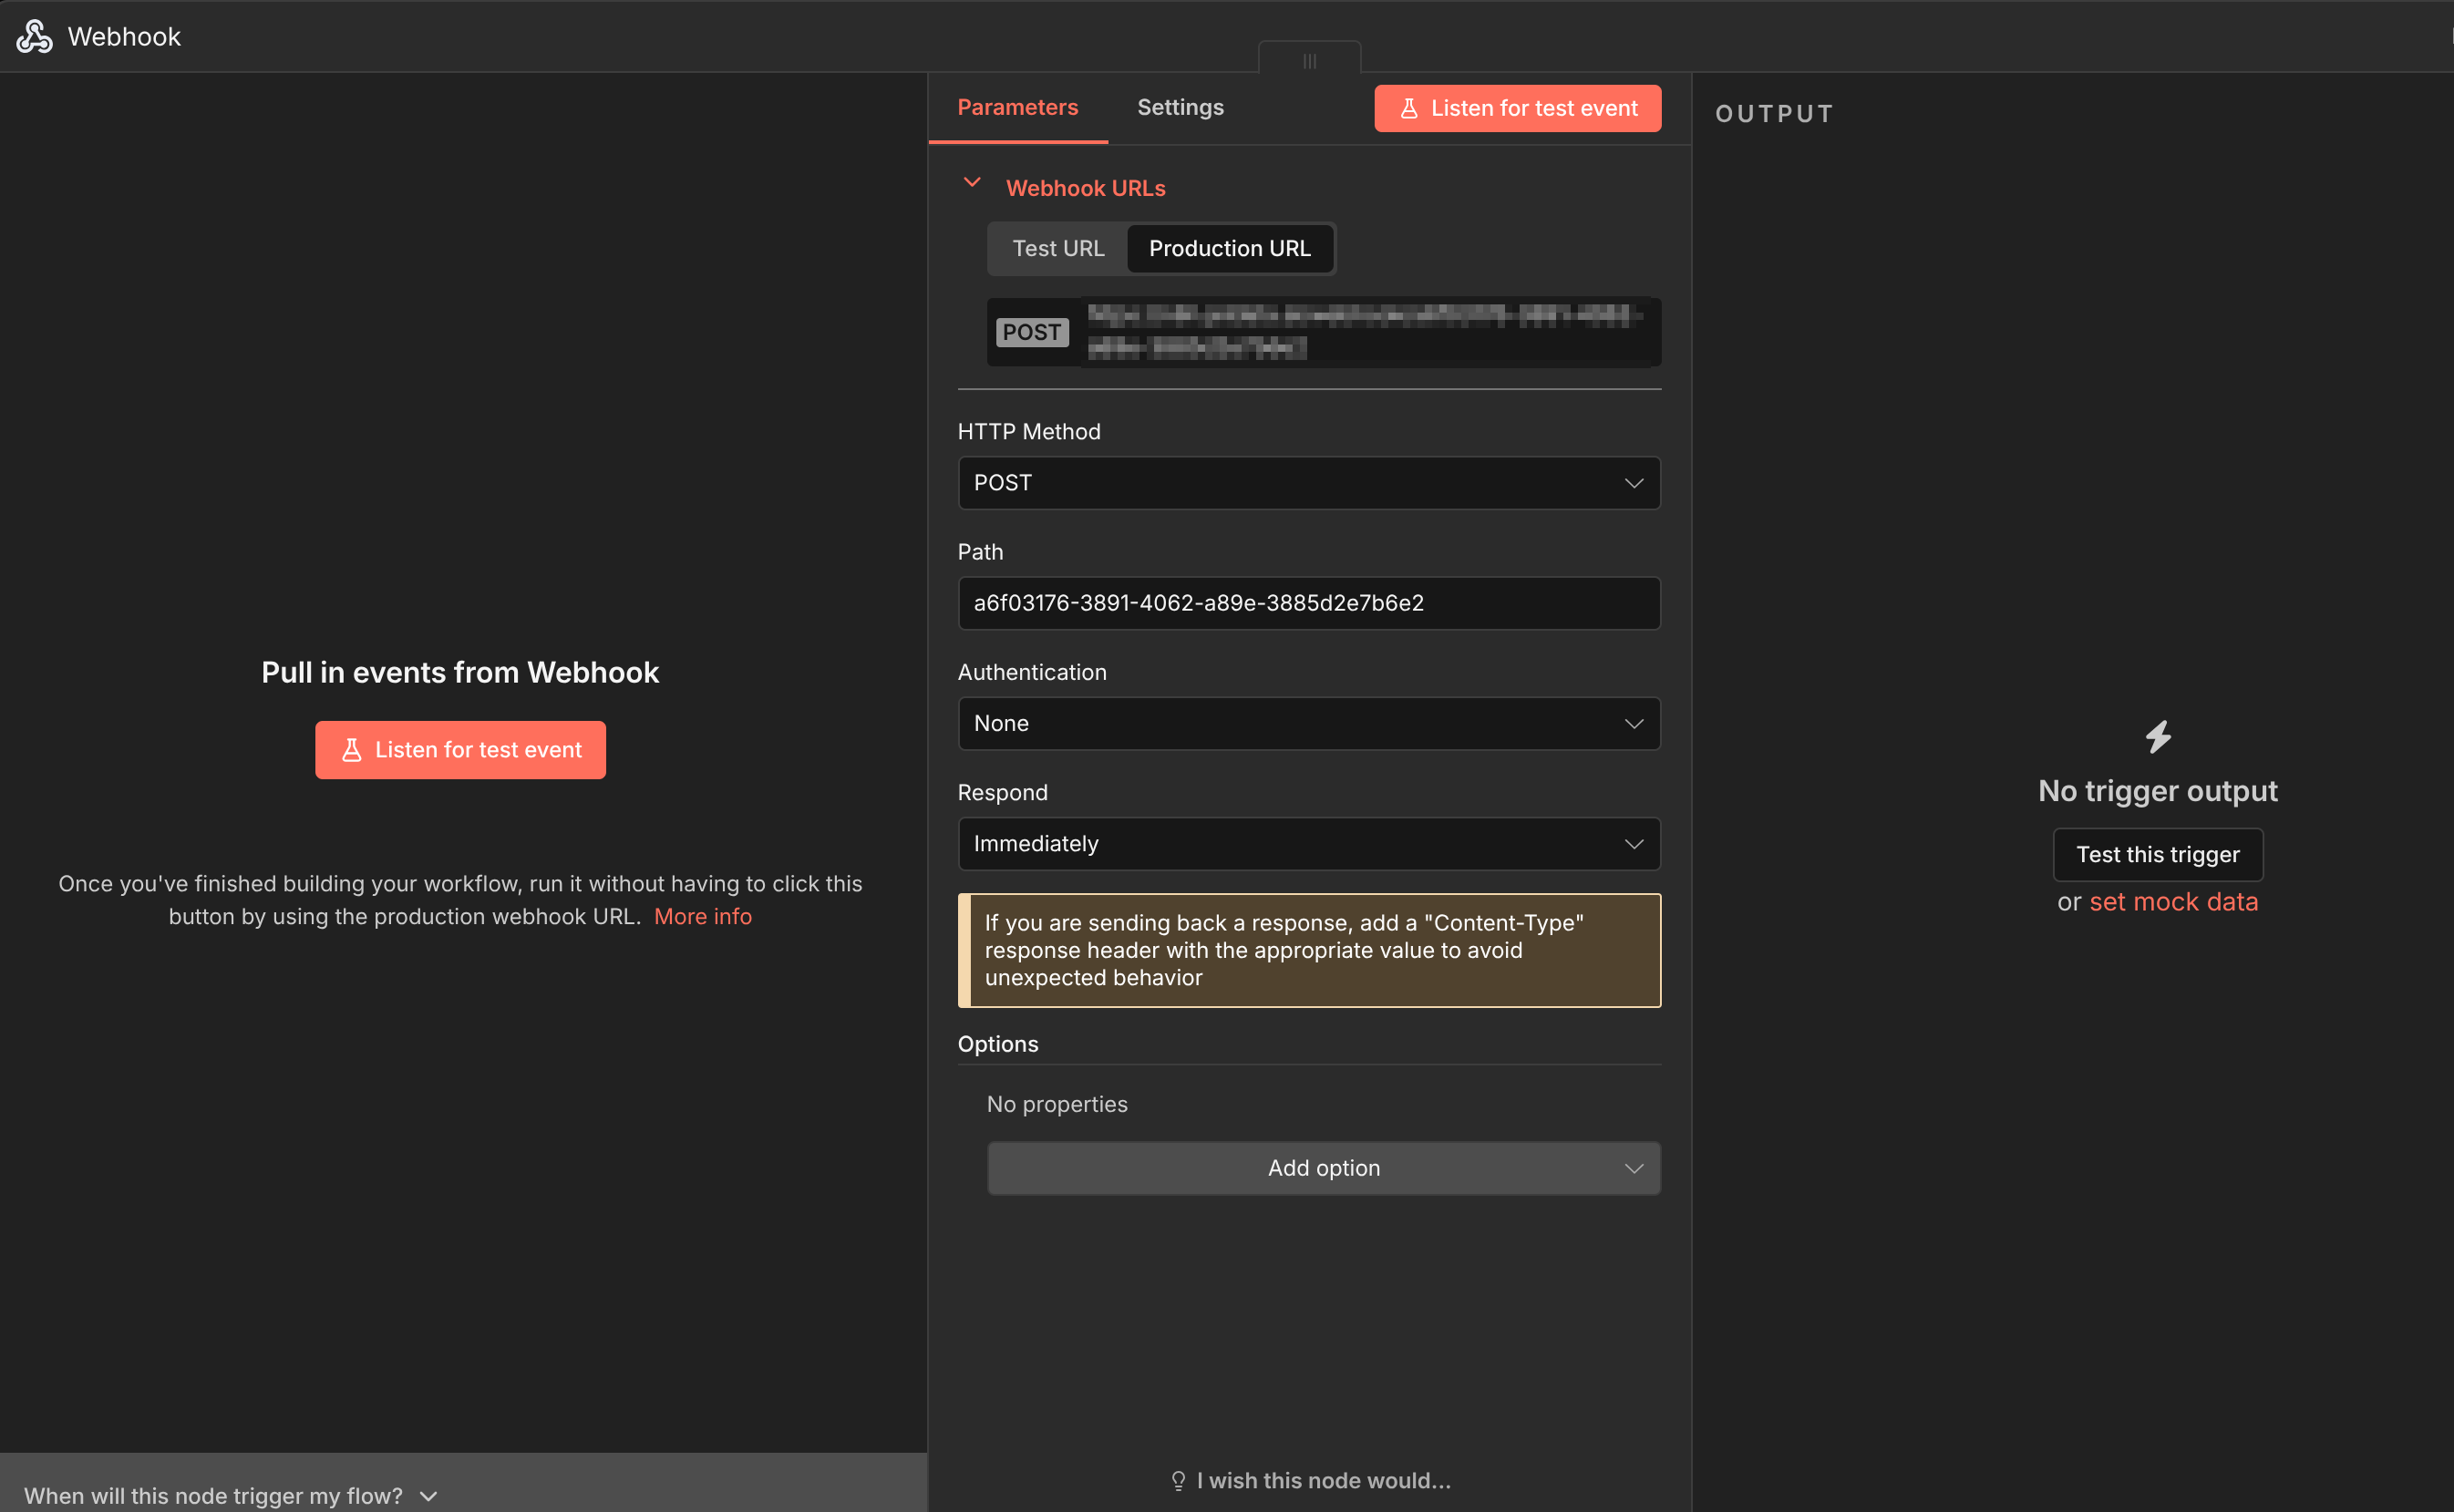
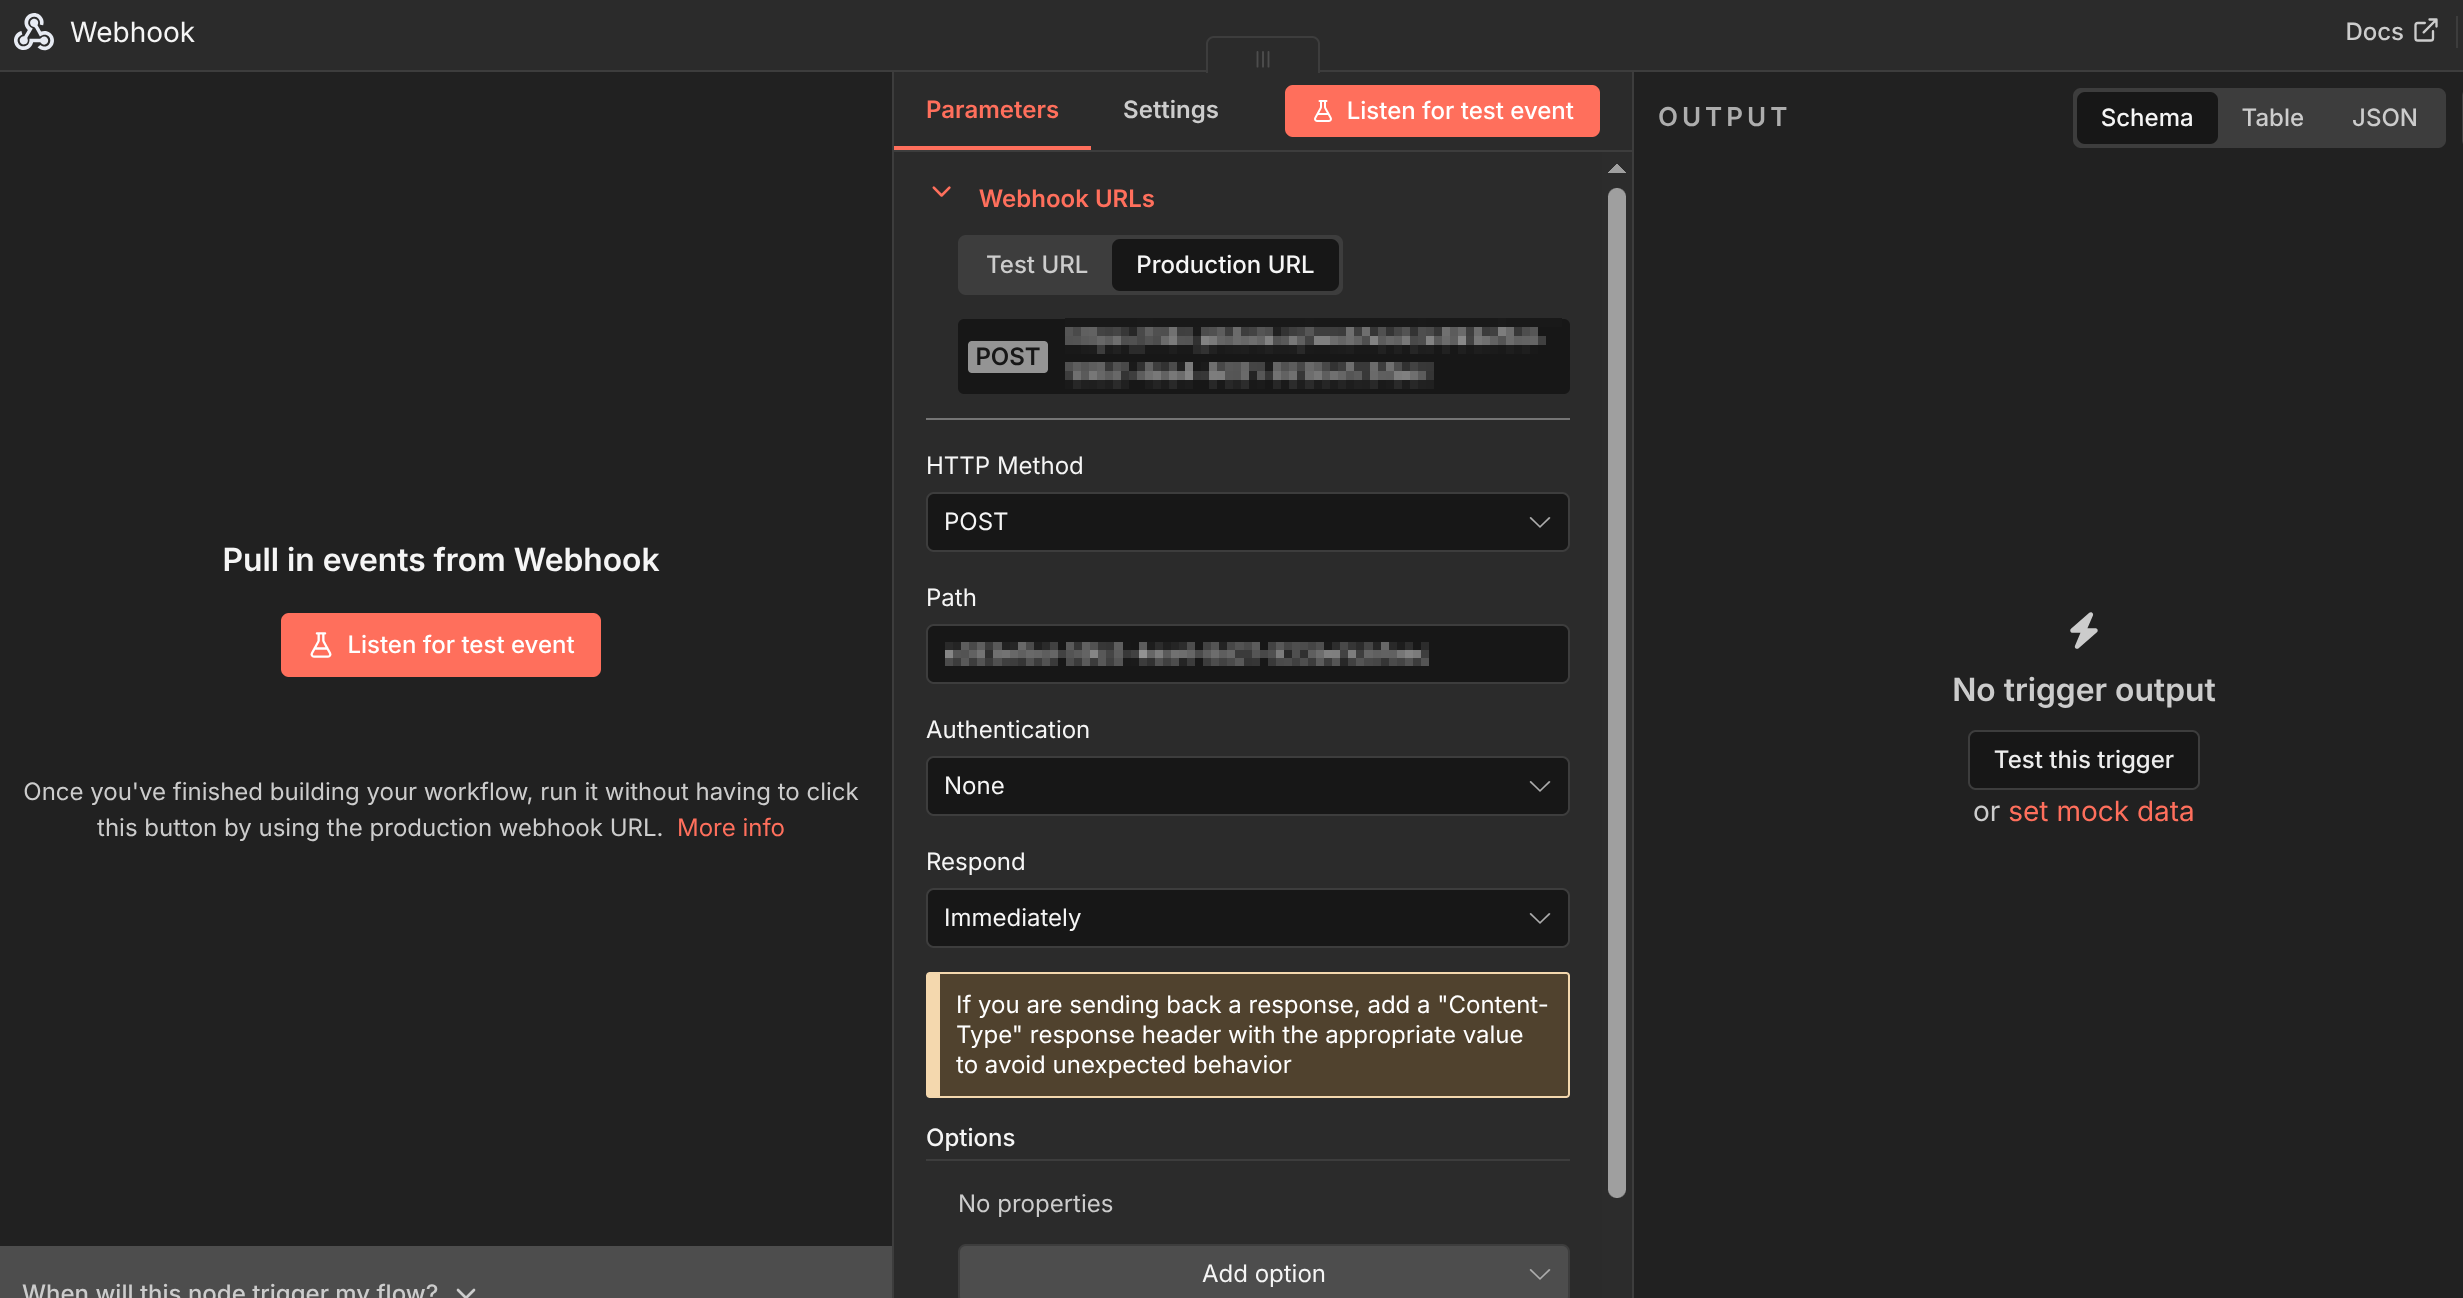
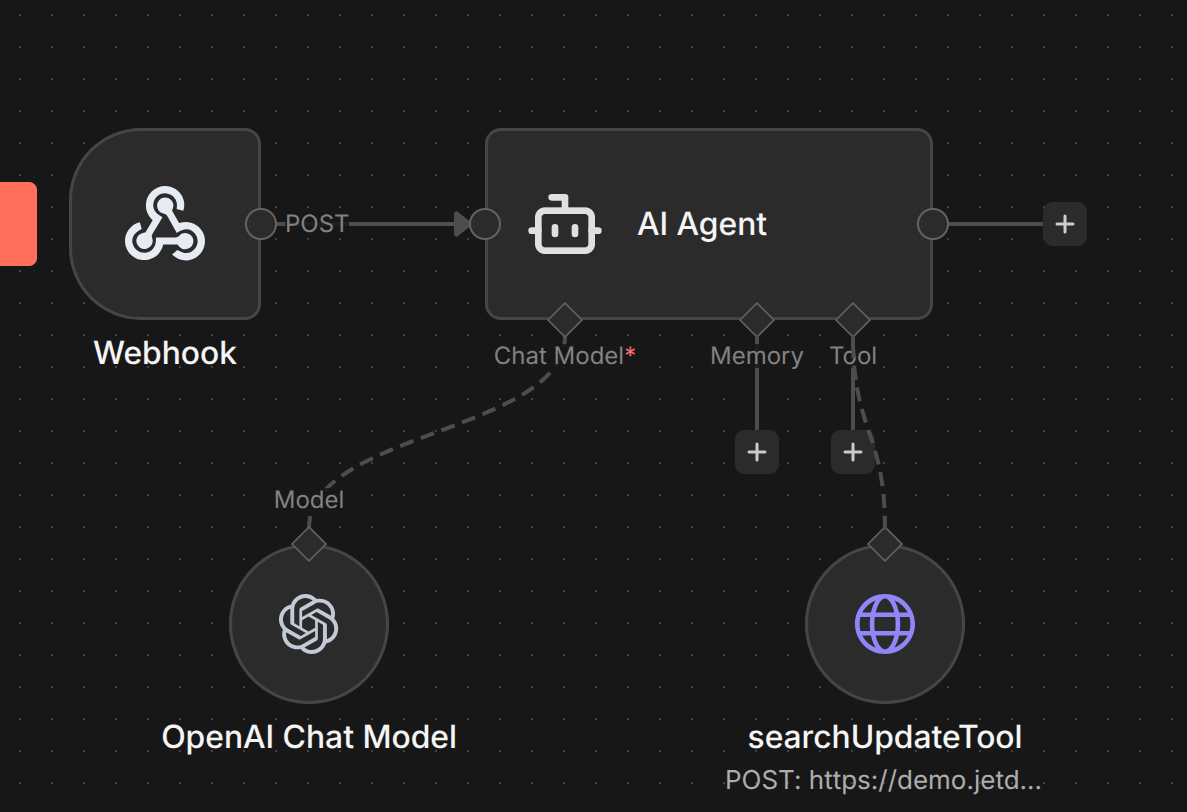 Activity Report Webhook
For the Webhook, we use POST for the binary image file to be processed by the AI Agent.
 Activity Report Webhook
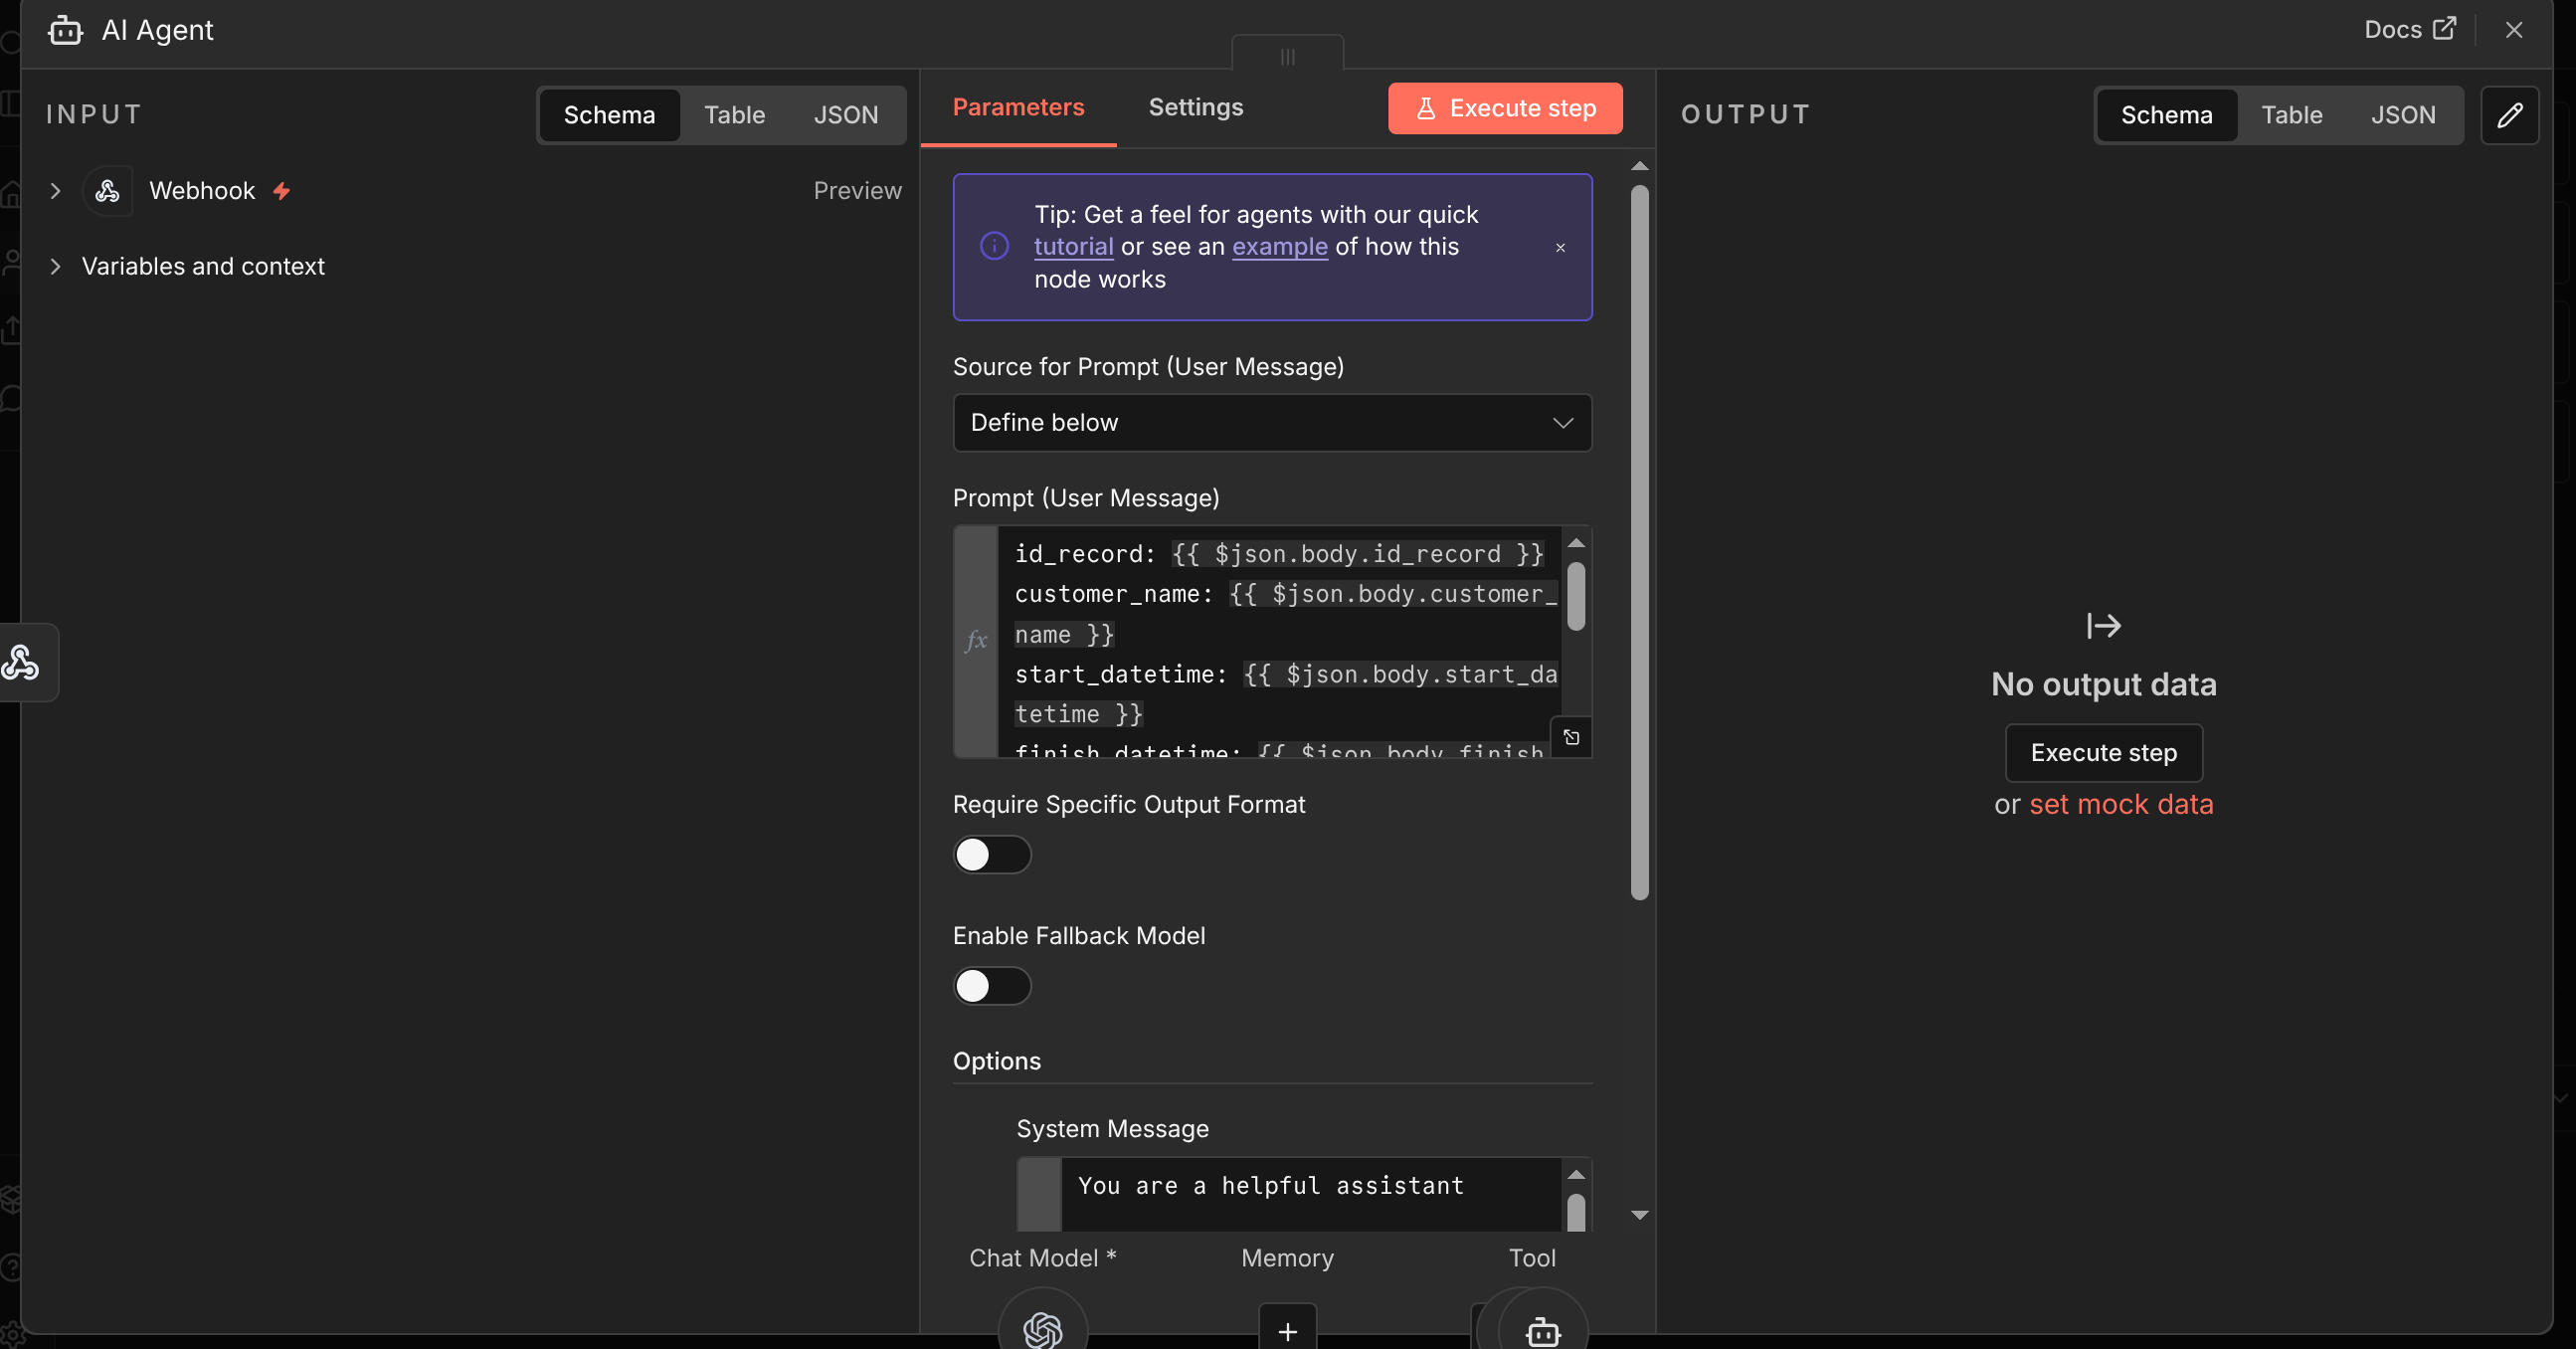
For the AI Agent, on the prompt (User Message), we can use the actual image and the record id for the row inside the JETData.
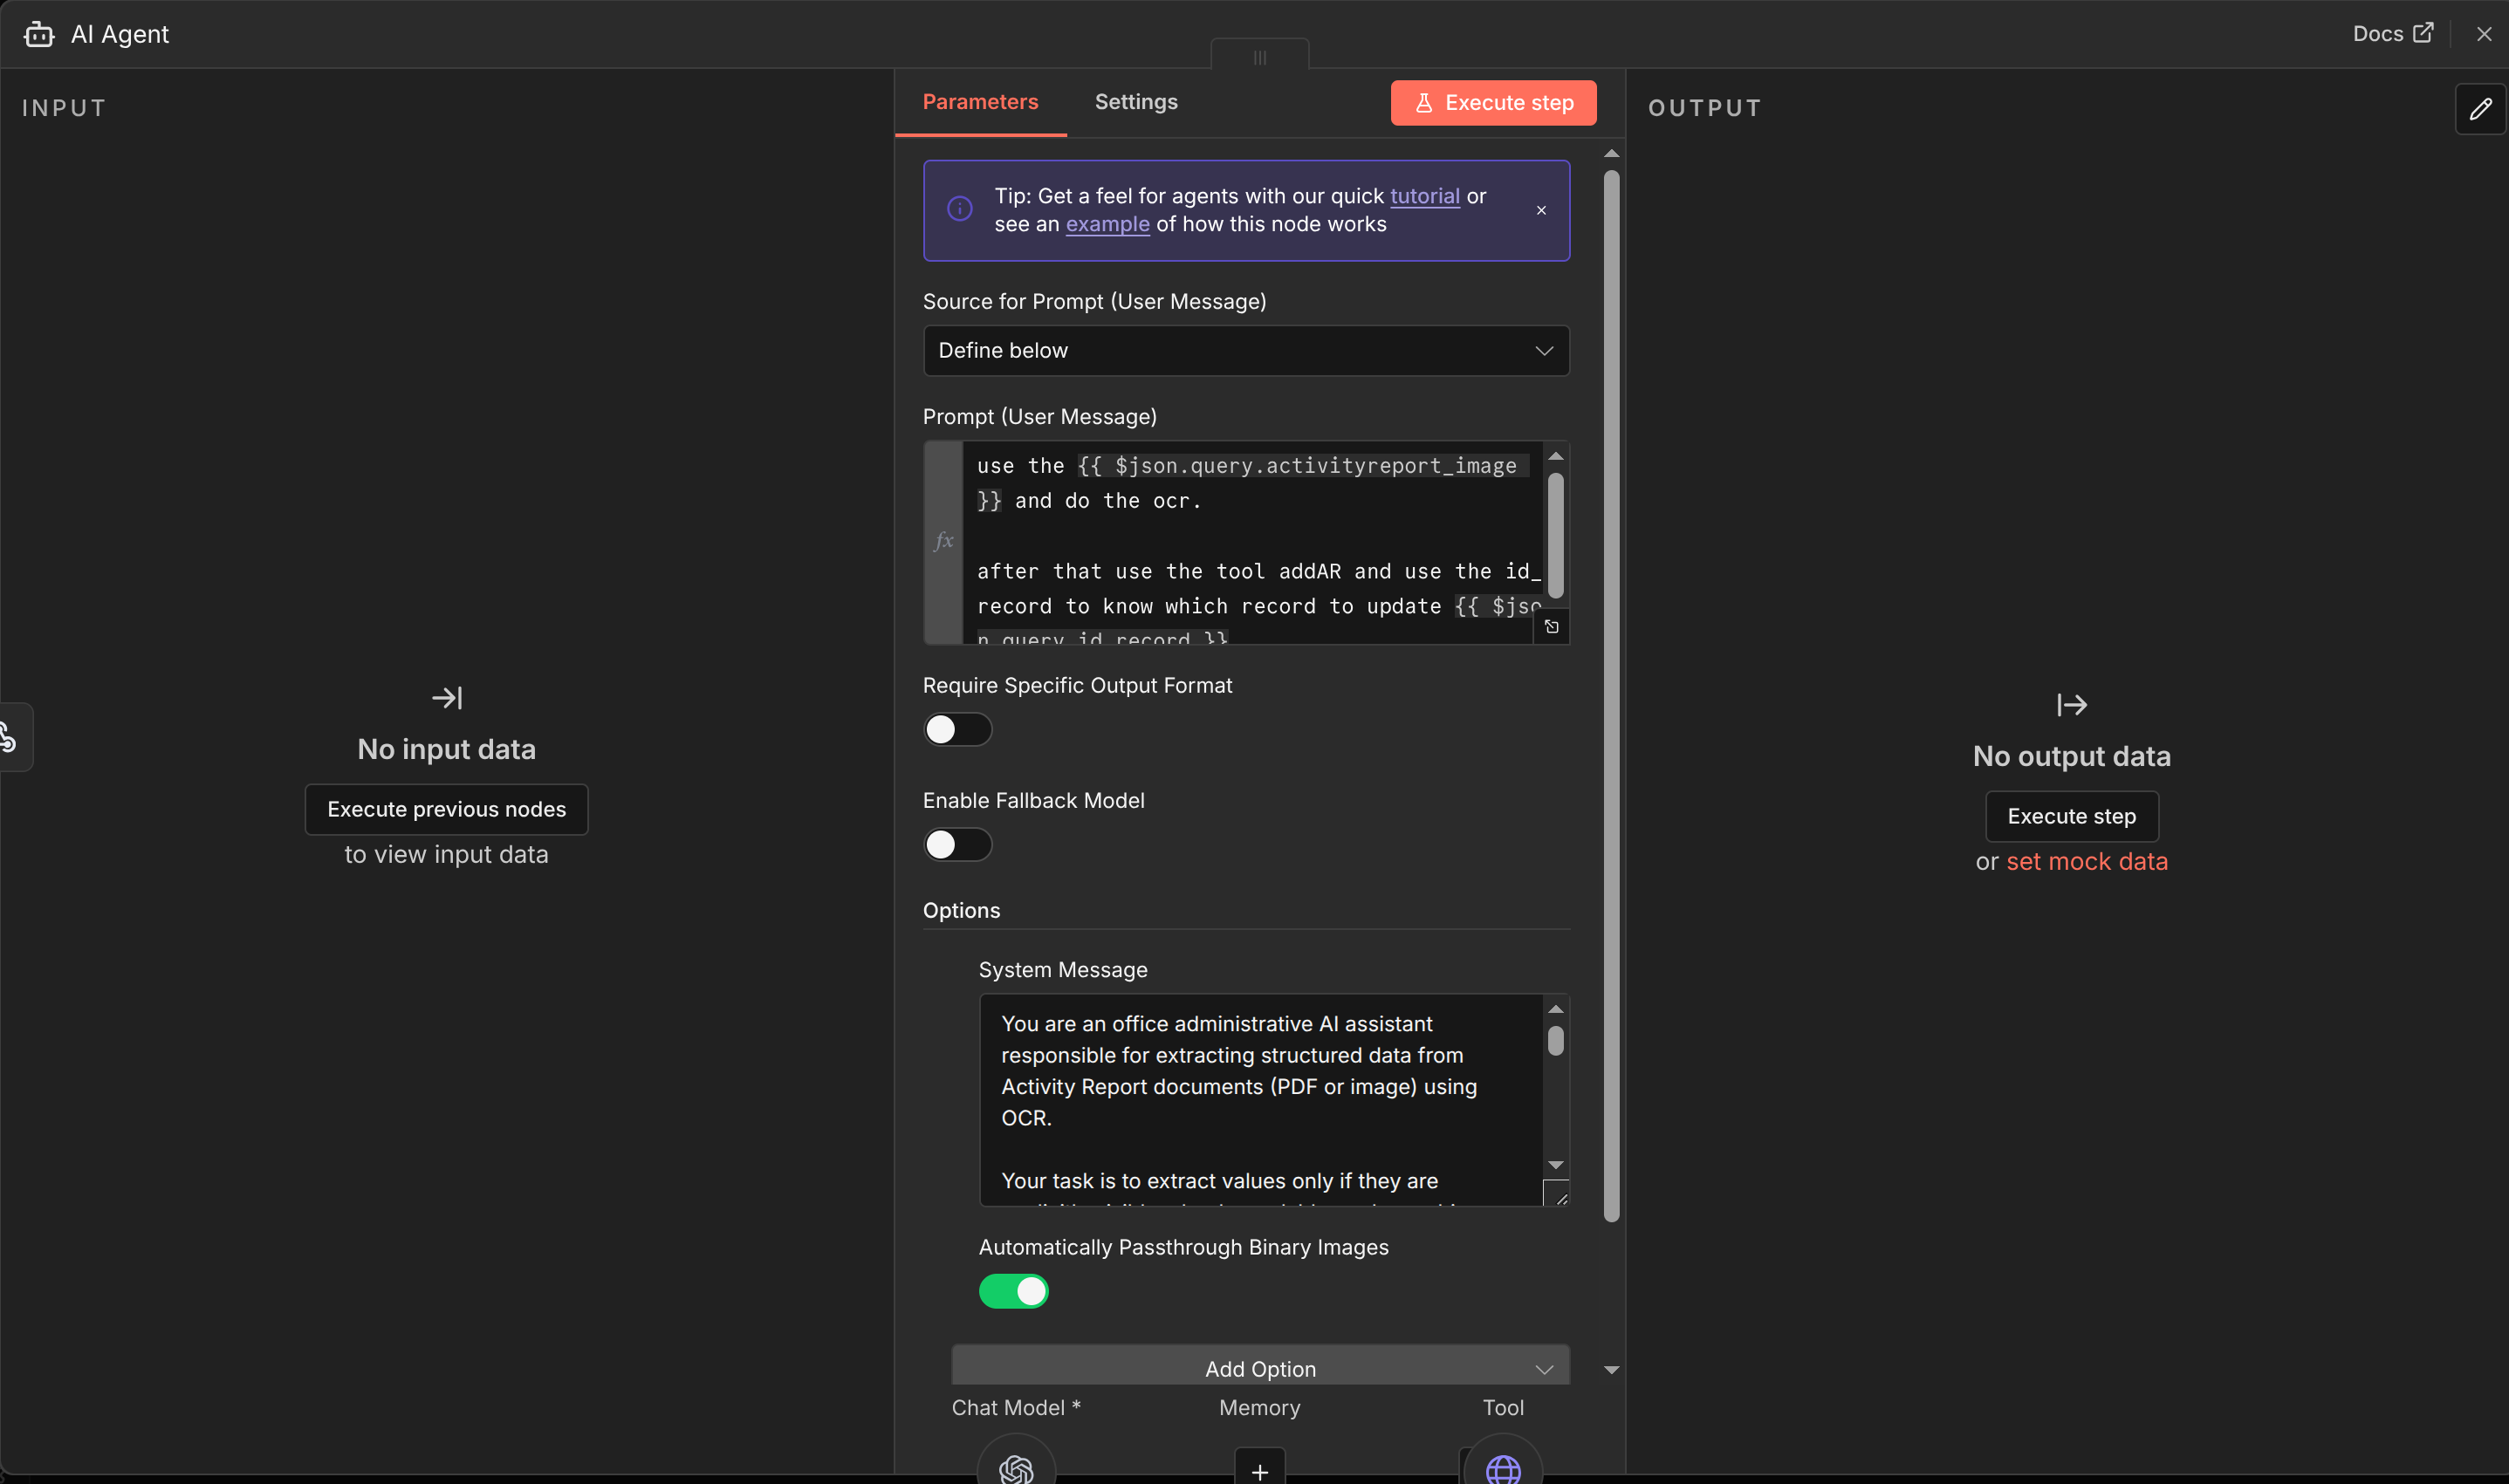 Activity Report AI Agent This is for User Prompt:
1
2
3
use the {{ $json.query.activityreport_image }} and do the ocr.

after that use the tool searchUpdateTool and use the id_record to know which record to update {{ $json.query.id_record }}
This is for System Message:
1
2
3
4
5
6
7
8
9
10
11
12
13
14
15
16
17
18
19
20
21
22
23
24
25
26
27
28
29
30
31
32
33
34
35
36
37
38
39
40
41
42
43
44
45
46
47
48
49
50
51
52
53
54
55
56
57
58
59
60
61
62
63
64
65
66
67
68
69
70
71
72
73
74
75
76
You are an office administrative AI assistant responsible for extracting structured data from Activity Report documents (PDF or image) using OCR.

Your task is to extract values only if they are explicitly visible, clearly readable, and unambiguous in the document.

STRICT RULES (NO EXCEPTIONS)

DO NOT hallucinate, guess, infer, normalize, or auto-complete any value.

If a field is missing, unclear, unreadable, partially visible, or doubtful, set the value to null.

Use only the exact field names defined below.

Do NOT add, remove, rename, or merge fields.

Return valid JSON only — no explanations, no markdown, no comments.

Extract text exactly as written. Do not rephrase.

FIELD DEFINITIONS (USE EXACT KEYS)

{
"activityreport_image": null,
"customer_name": null,
"customer_address": null,
"activity_type": null,
"start_datetime": null,
"finish_datetime": null,
"product_type": null,
"product_name": null,
"serial_no": null,
"serial_tag": null,
"description_ar": null,
"symptom_ar": null,
"action_ar": null,
"customer_signature_name": null,
"engineer_name": null,
"approval": null
}

FIELD-SPECIFIC RULES

activityreport_image
Do not describe the image.
Only set a value if a clear image reference or filename is explicitly provided.
Otherwise, use null.

activity_type
Only extract if the value is explicitly written (for example: Installation, Maintenance).
Do not guess based on context.

start_datetime and finish_datetime
Extract only if both date and time are clearly written.
Do not convert formats.
If either date or time is missing or unclear, use null.

description_ar, symptom_ar, action_ar
Extract only if a clearly written section exists.
If handwriting or OCR text is uncertain, use null.

approval
Set only if the document explicitly states an approval status (for example: Approved, Rejected).
Signatures alone do NOT imply approval. if theres none, set default to Pending

created_date
Never extract this field.
Always ignore it.

EXTRACTION PHILOSOPHY

Accuracy is more important than completeness.
Null is always preferred over an incorrect value.
The output will be sent directly to an API without human review.

Output ONLY the JSON object.

run the tool searchUpdateTool
When the OCR is done, then the AI Agent will use the searchUpdateTool to update the row with the value generated from the OCR.
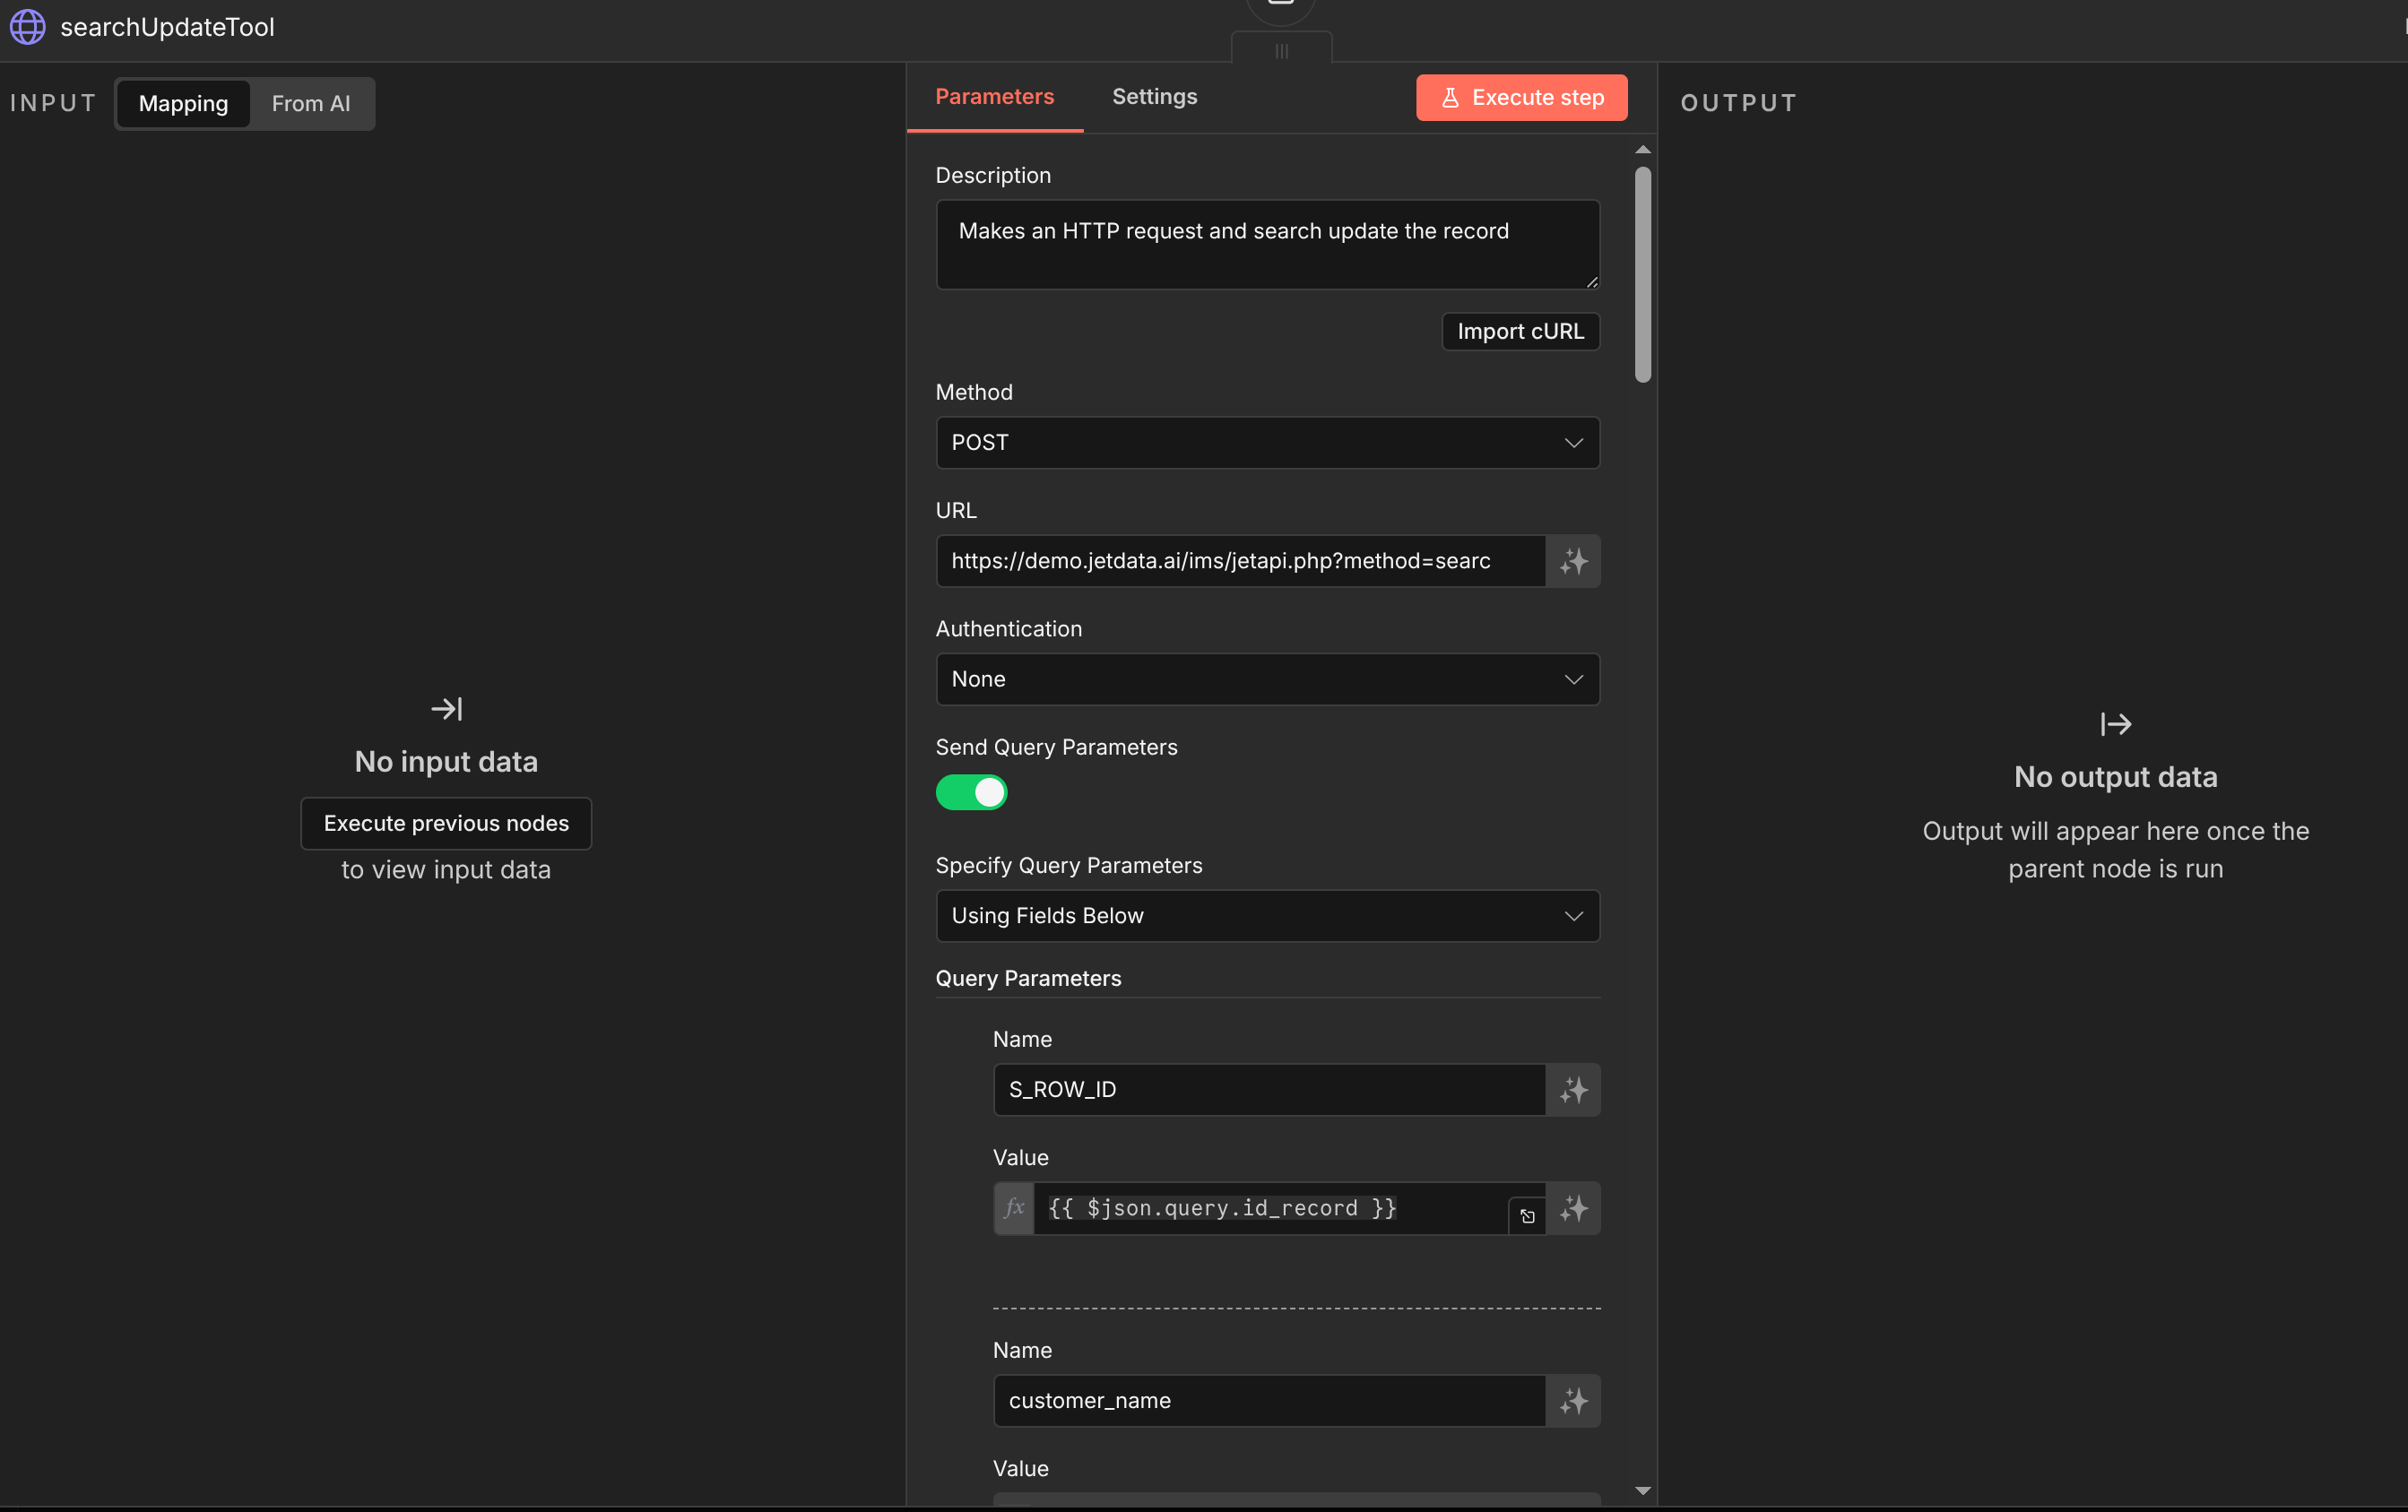 Activity Report HTTP Request Tool
And that’s it!, below are the screenshot for the UI
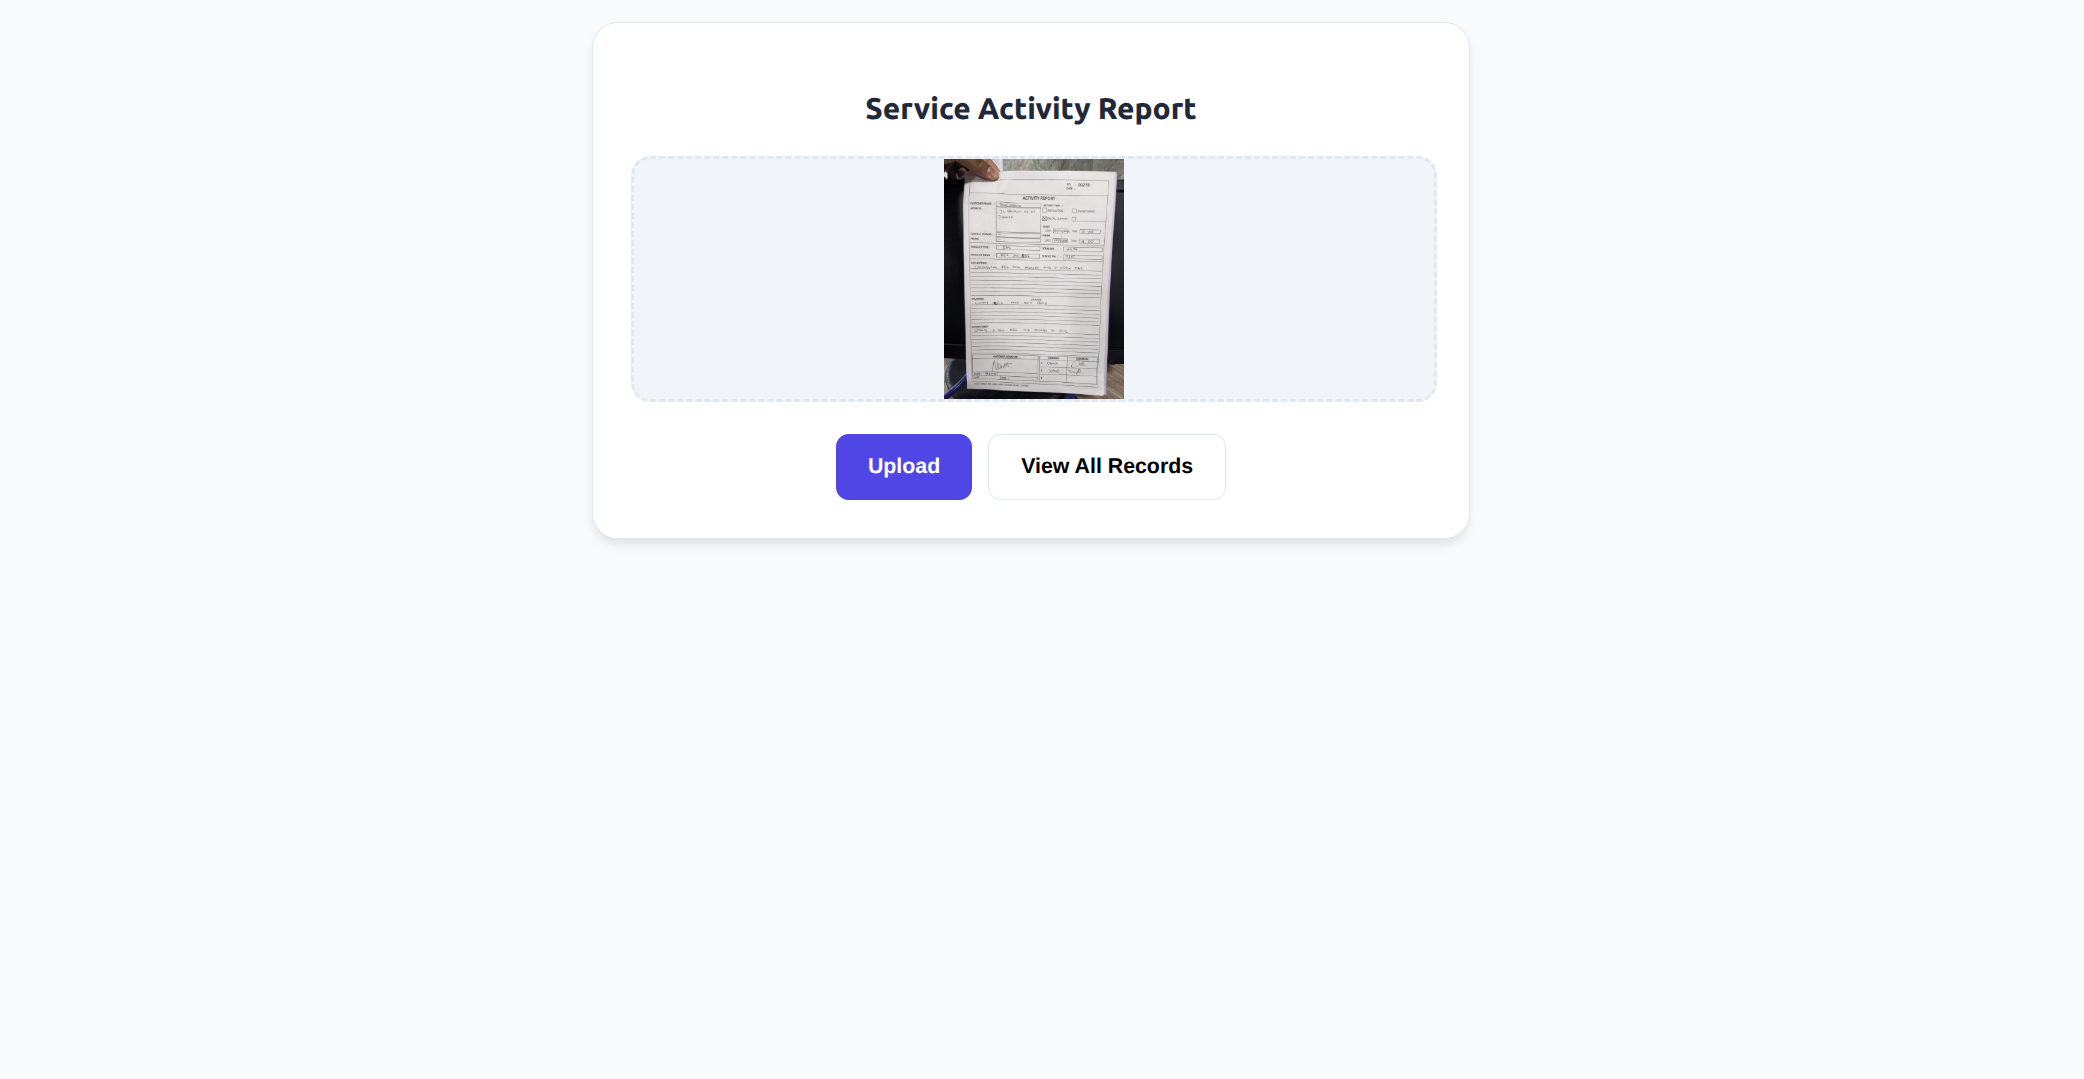 Upload Activity Report
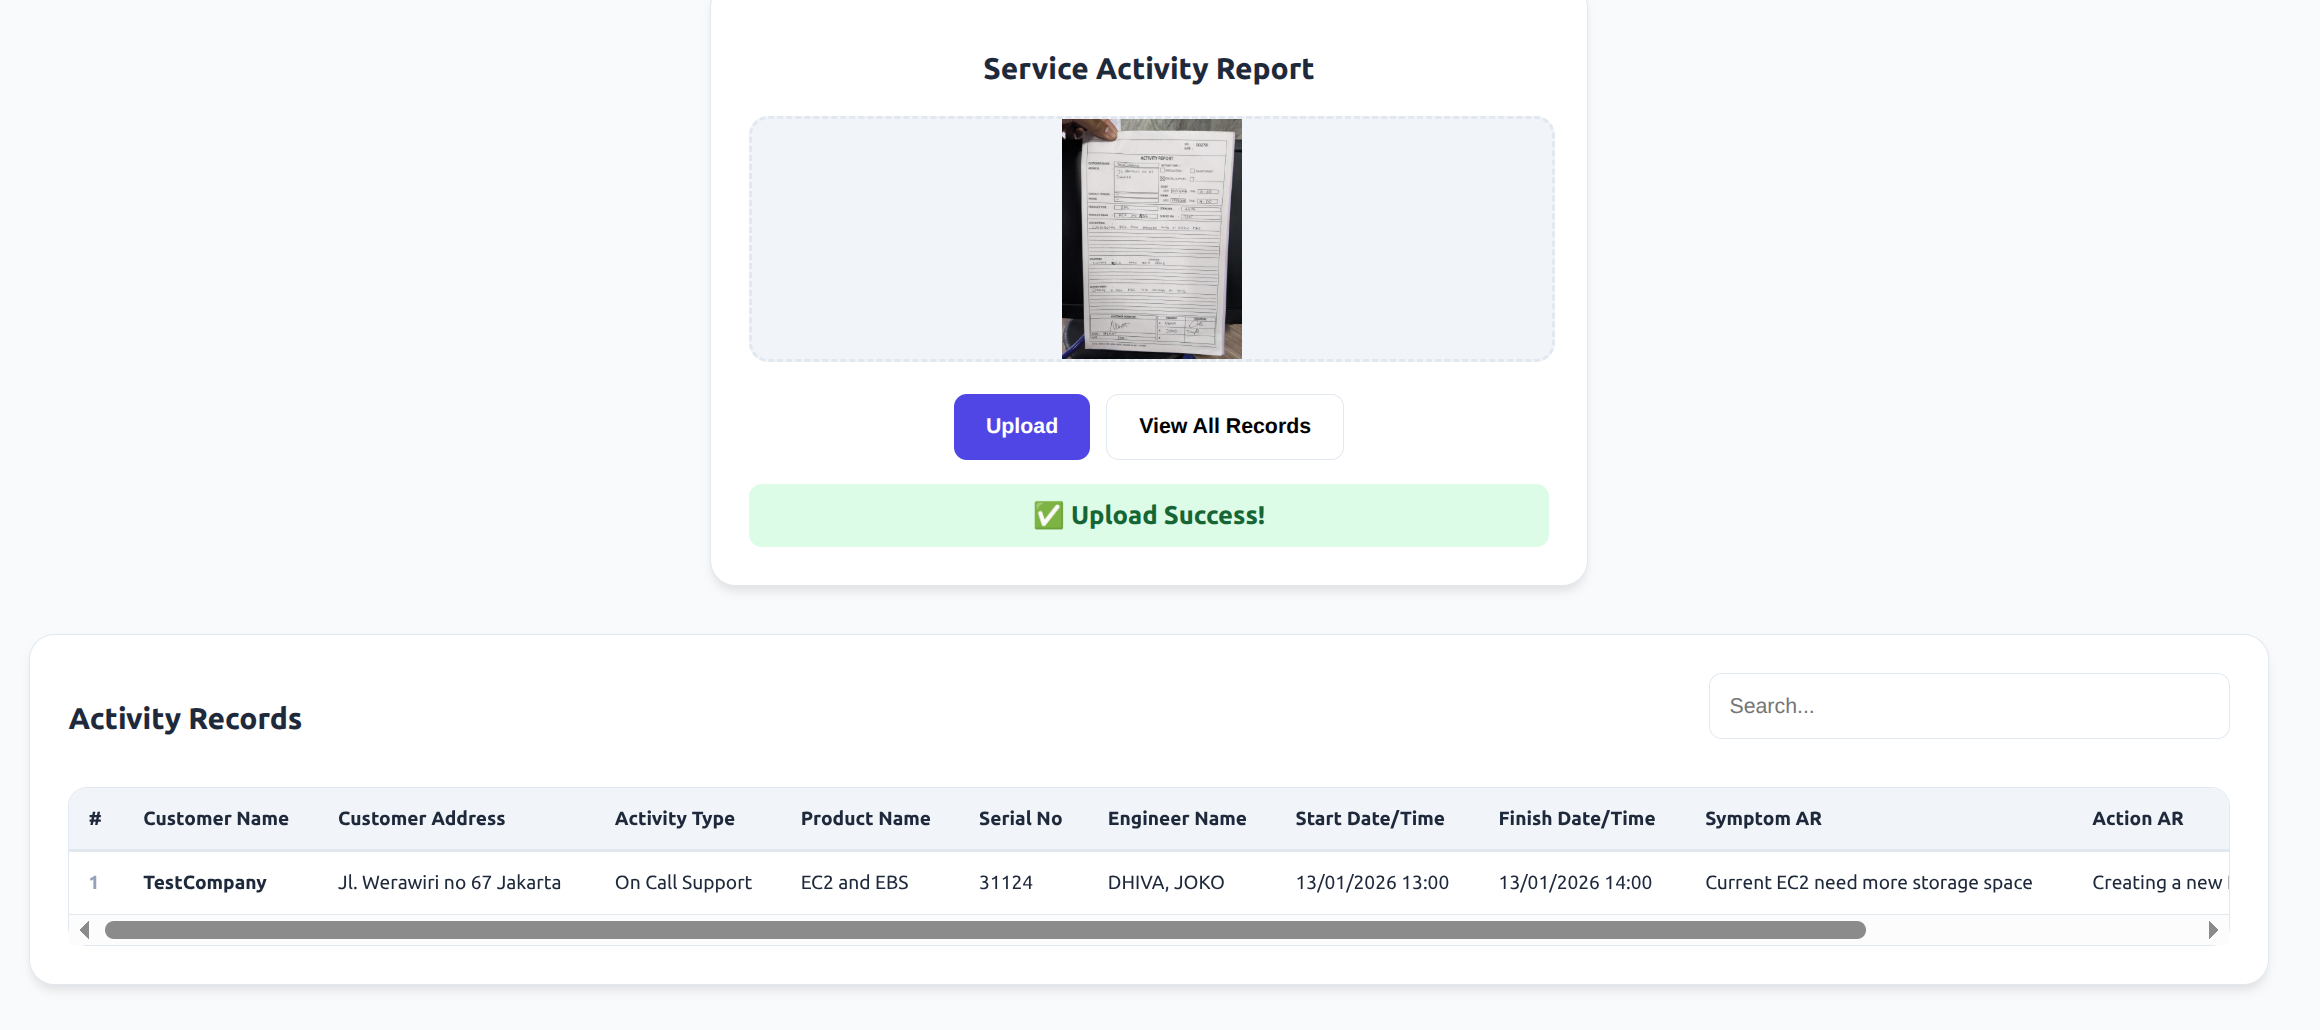 View All Record Activity Report
Overtime Eligibility Checker and Form Generator
The goal of this solution is to help Engineer with creating the printed form and checking the eligibility of the overtime being submitted.
Demo Video
Again, with every new app, we create a form for it!, one for backend form, and one for frontend form. For backend form I’ll be naming it Bucket - Overtime and frontend UI - Overtime.
 Overtime Form
With the form created, in the backend form, we add fields mapping that will be used for checking the eligibility and if its approved or no.
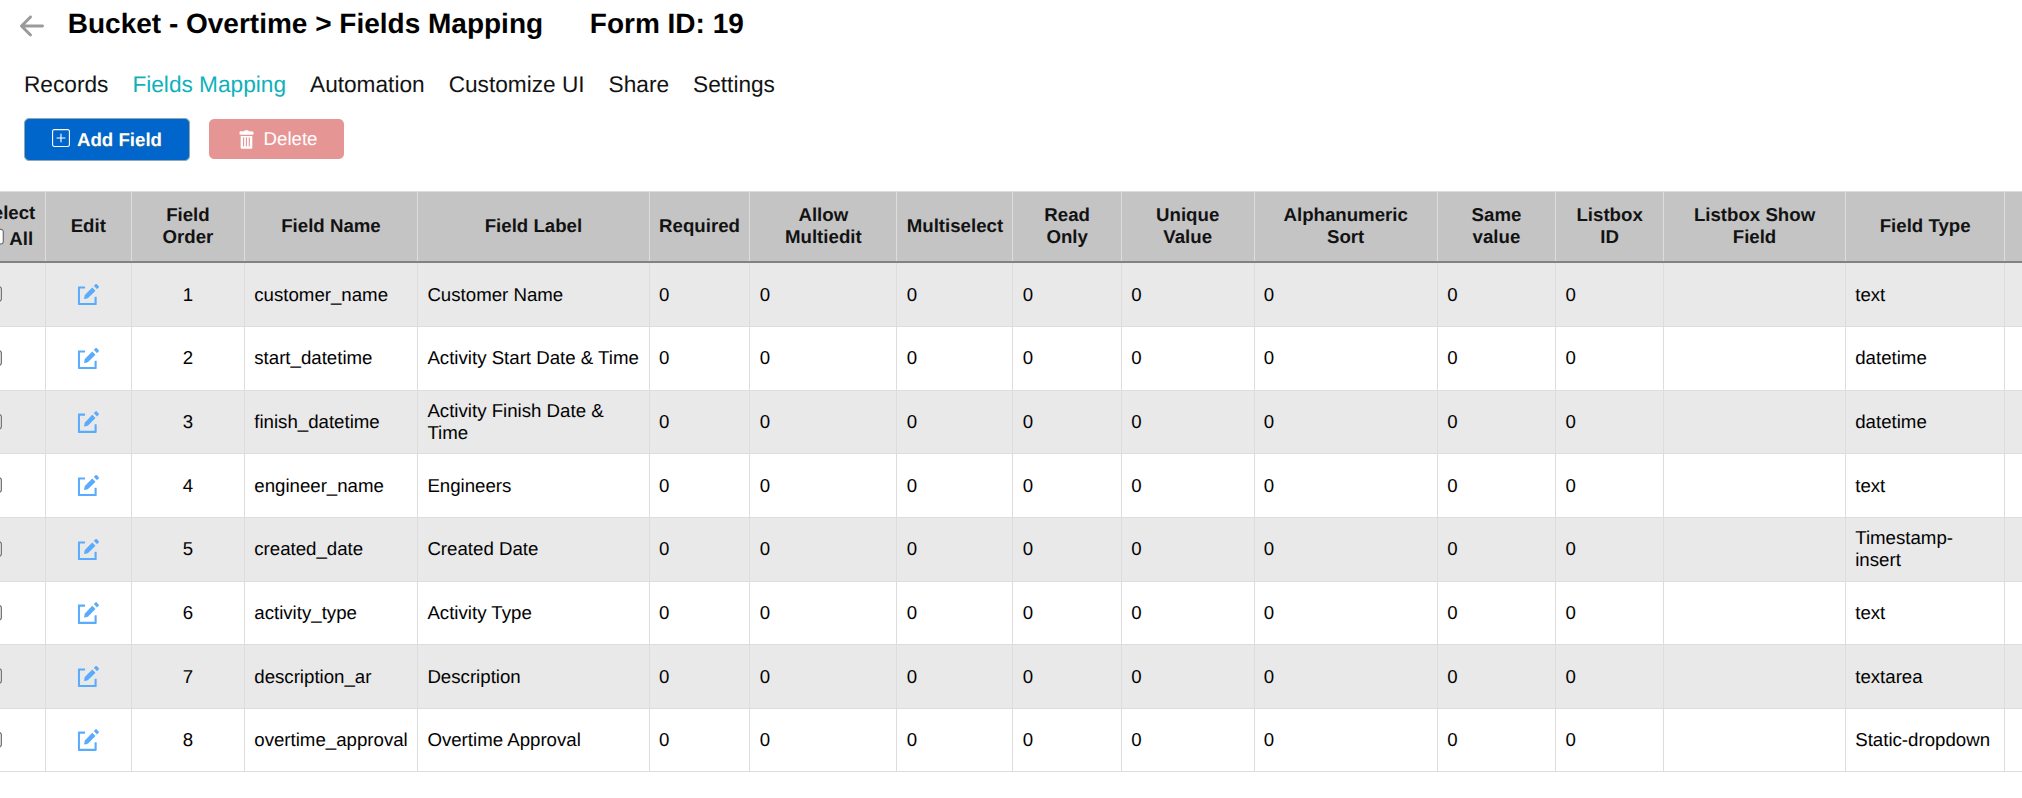 Overtime Form Fields Mapping
Fields mapping are done, now we can customize the frontend form, if you want the same looking UI, you can use the same source code HTML as shown
WARNING: NEVER PUT YOUR API KEY IN THE FRONTEND OR HARDCODE IT, THIS IS FOR TESTING PURPOSES ONLY!
Check Out The Source Code for Overtime UI HERE
after frontend, we want to add an automation on JETData.AI where it will do HTTP request POST to n8n.
 Overtime Form Automation
With the JETData side done, we move on to n8n. Inside n8n will be used to check the eligibility of the overtime that are submitted, and update the approval record.
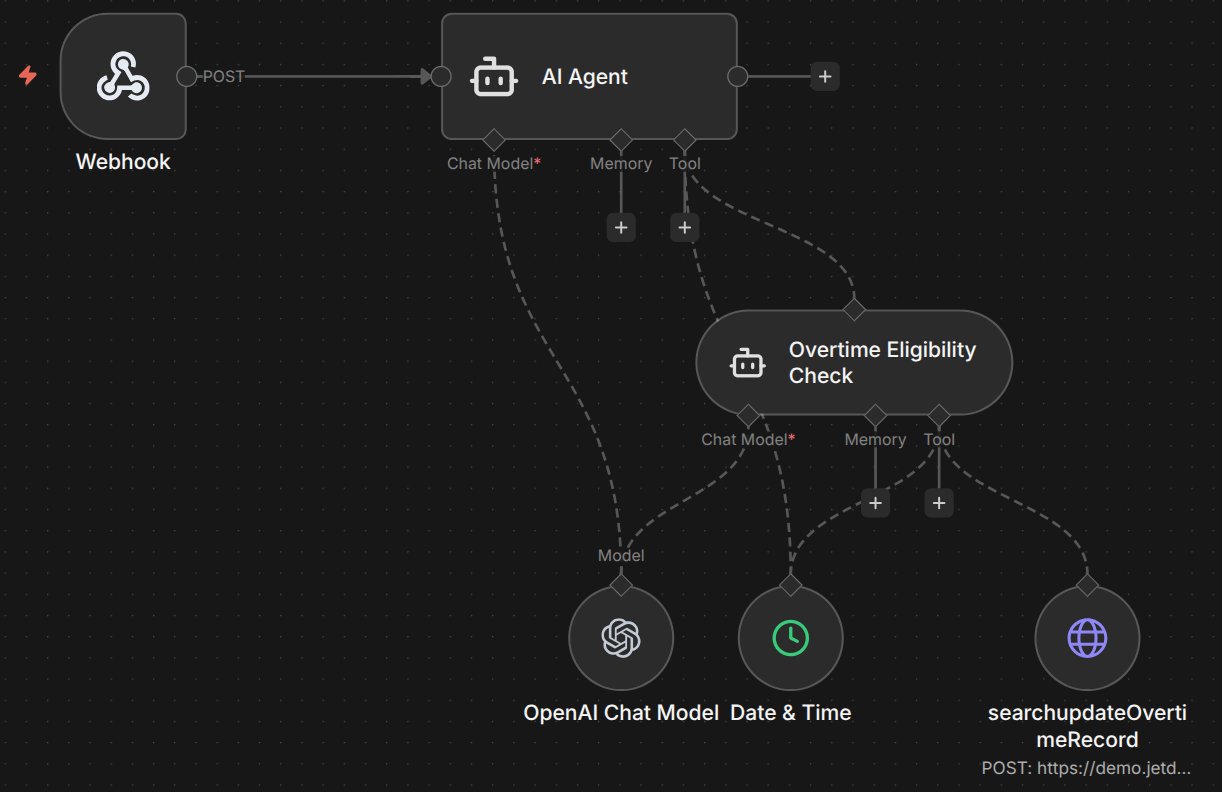 Overtime n8n Workflow
The n8n webhook will capture the sended HTTP Request from the automation, and will process it in the workflow.
 Overtime n8n Webhook
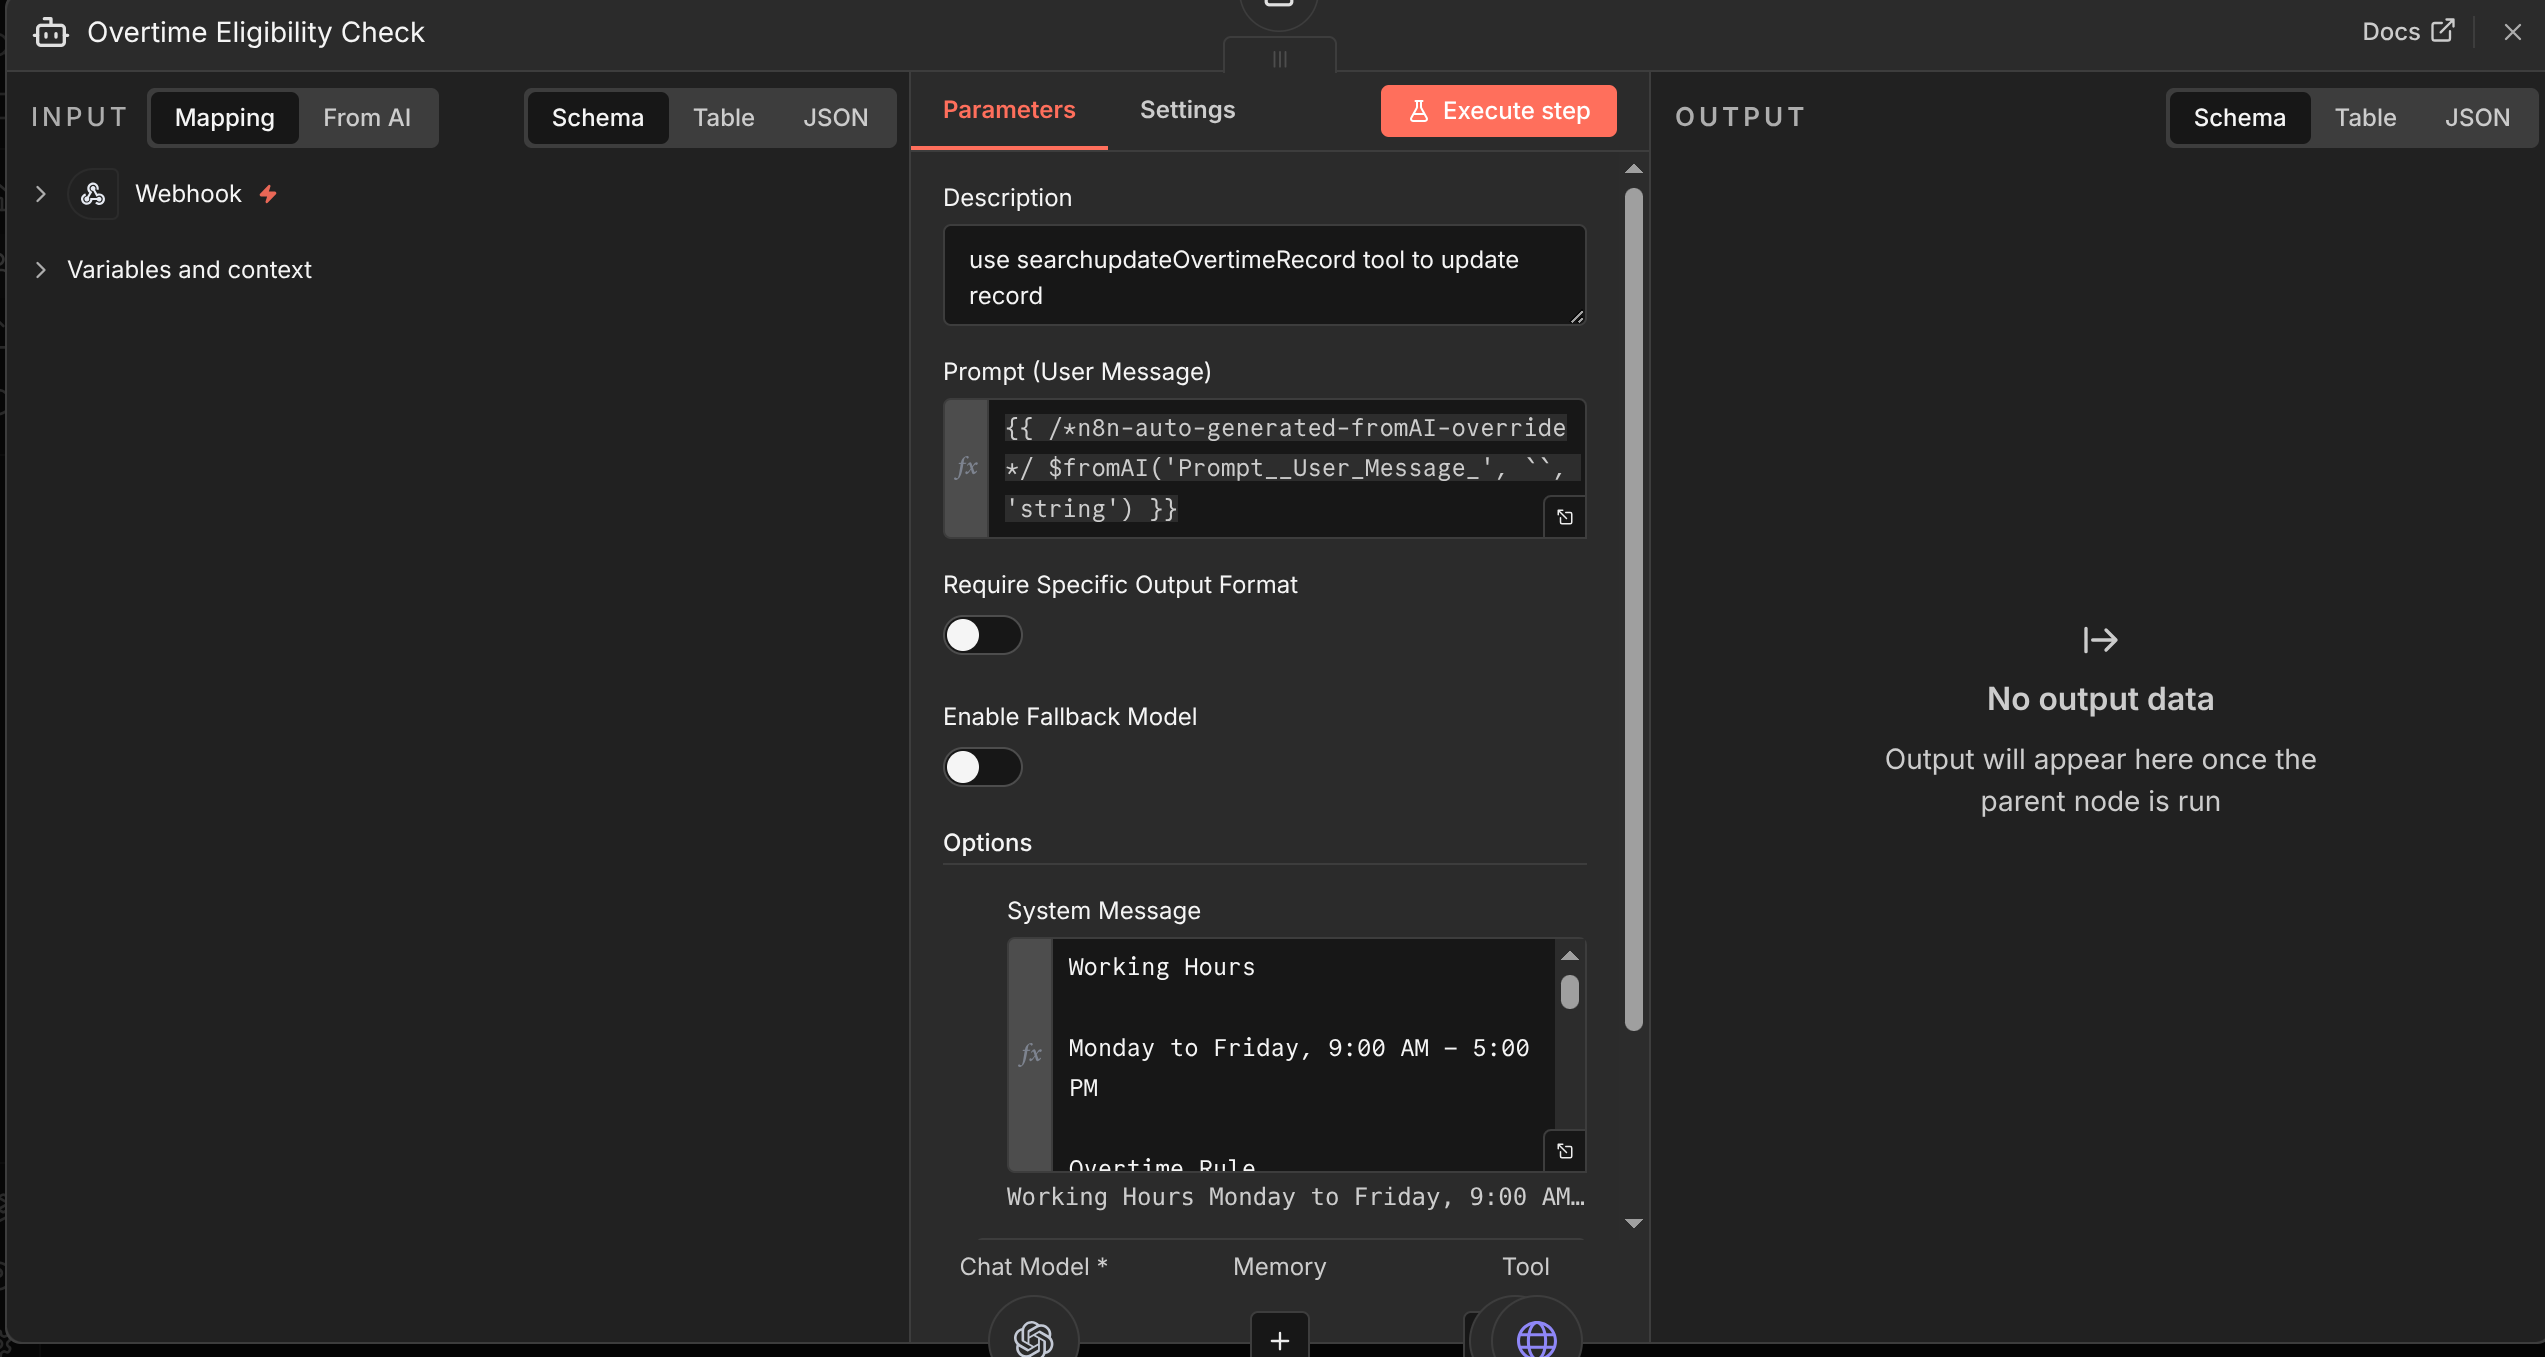
Inside the AI agent, we will give the AI agent a prompt that will use the specified value:
1
2
3
4
5
6
7
id_record: {{ $json.body.id_record }}
customer_name: {{ $json.body.customer_name }}
start_datetime: {{ $json.body.start_datetime }}
finish_datetime: {{ $json.body.finish_datetime }}
engineer_name: {{ $json.body.engineer_name }}
activity_type: {{ $json.body.activity_type }}
description_ar: {{ $json.body.description_ar }}
for the system message we will use this:
1
2
3
You are a helpful assistant

First check the eligibility of the activity report with Overtime Eligibility Check AI agent to check whether its inside the time frame of the eligible overtime claim.
 Overtime n8n AI Agent
Then we will use the AI Agent tool to check if overtime is eligible or not, the AI agent use the Date & Time tool to be able to check the time whether it is outside work date/time or still inside the time frame.
 Overtime n8n AI Agent Tool
Last step is updating the record whether it is approved, or rejected, by using the searchUpdate tool.
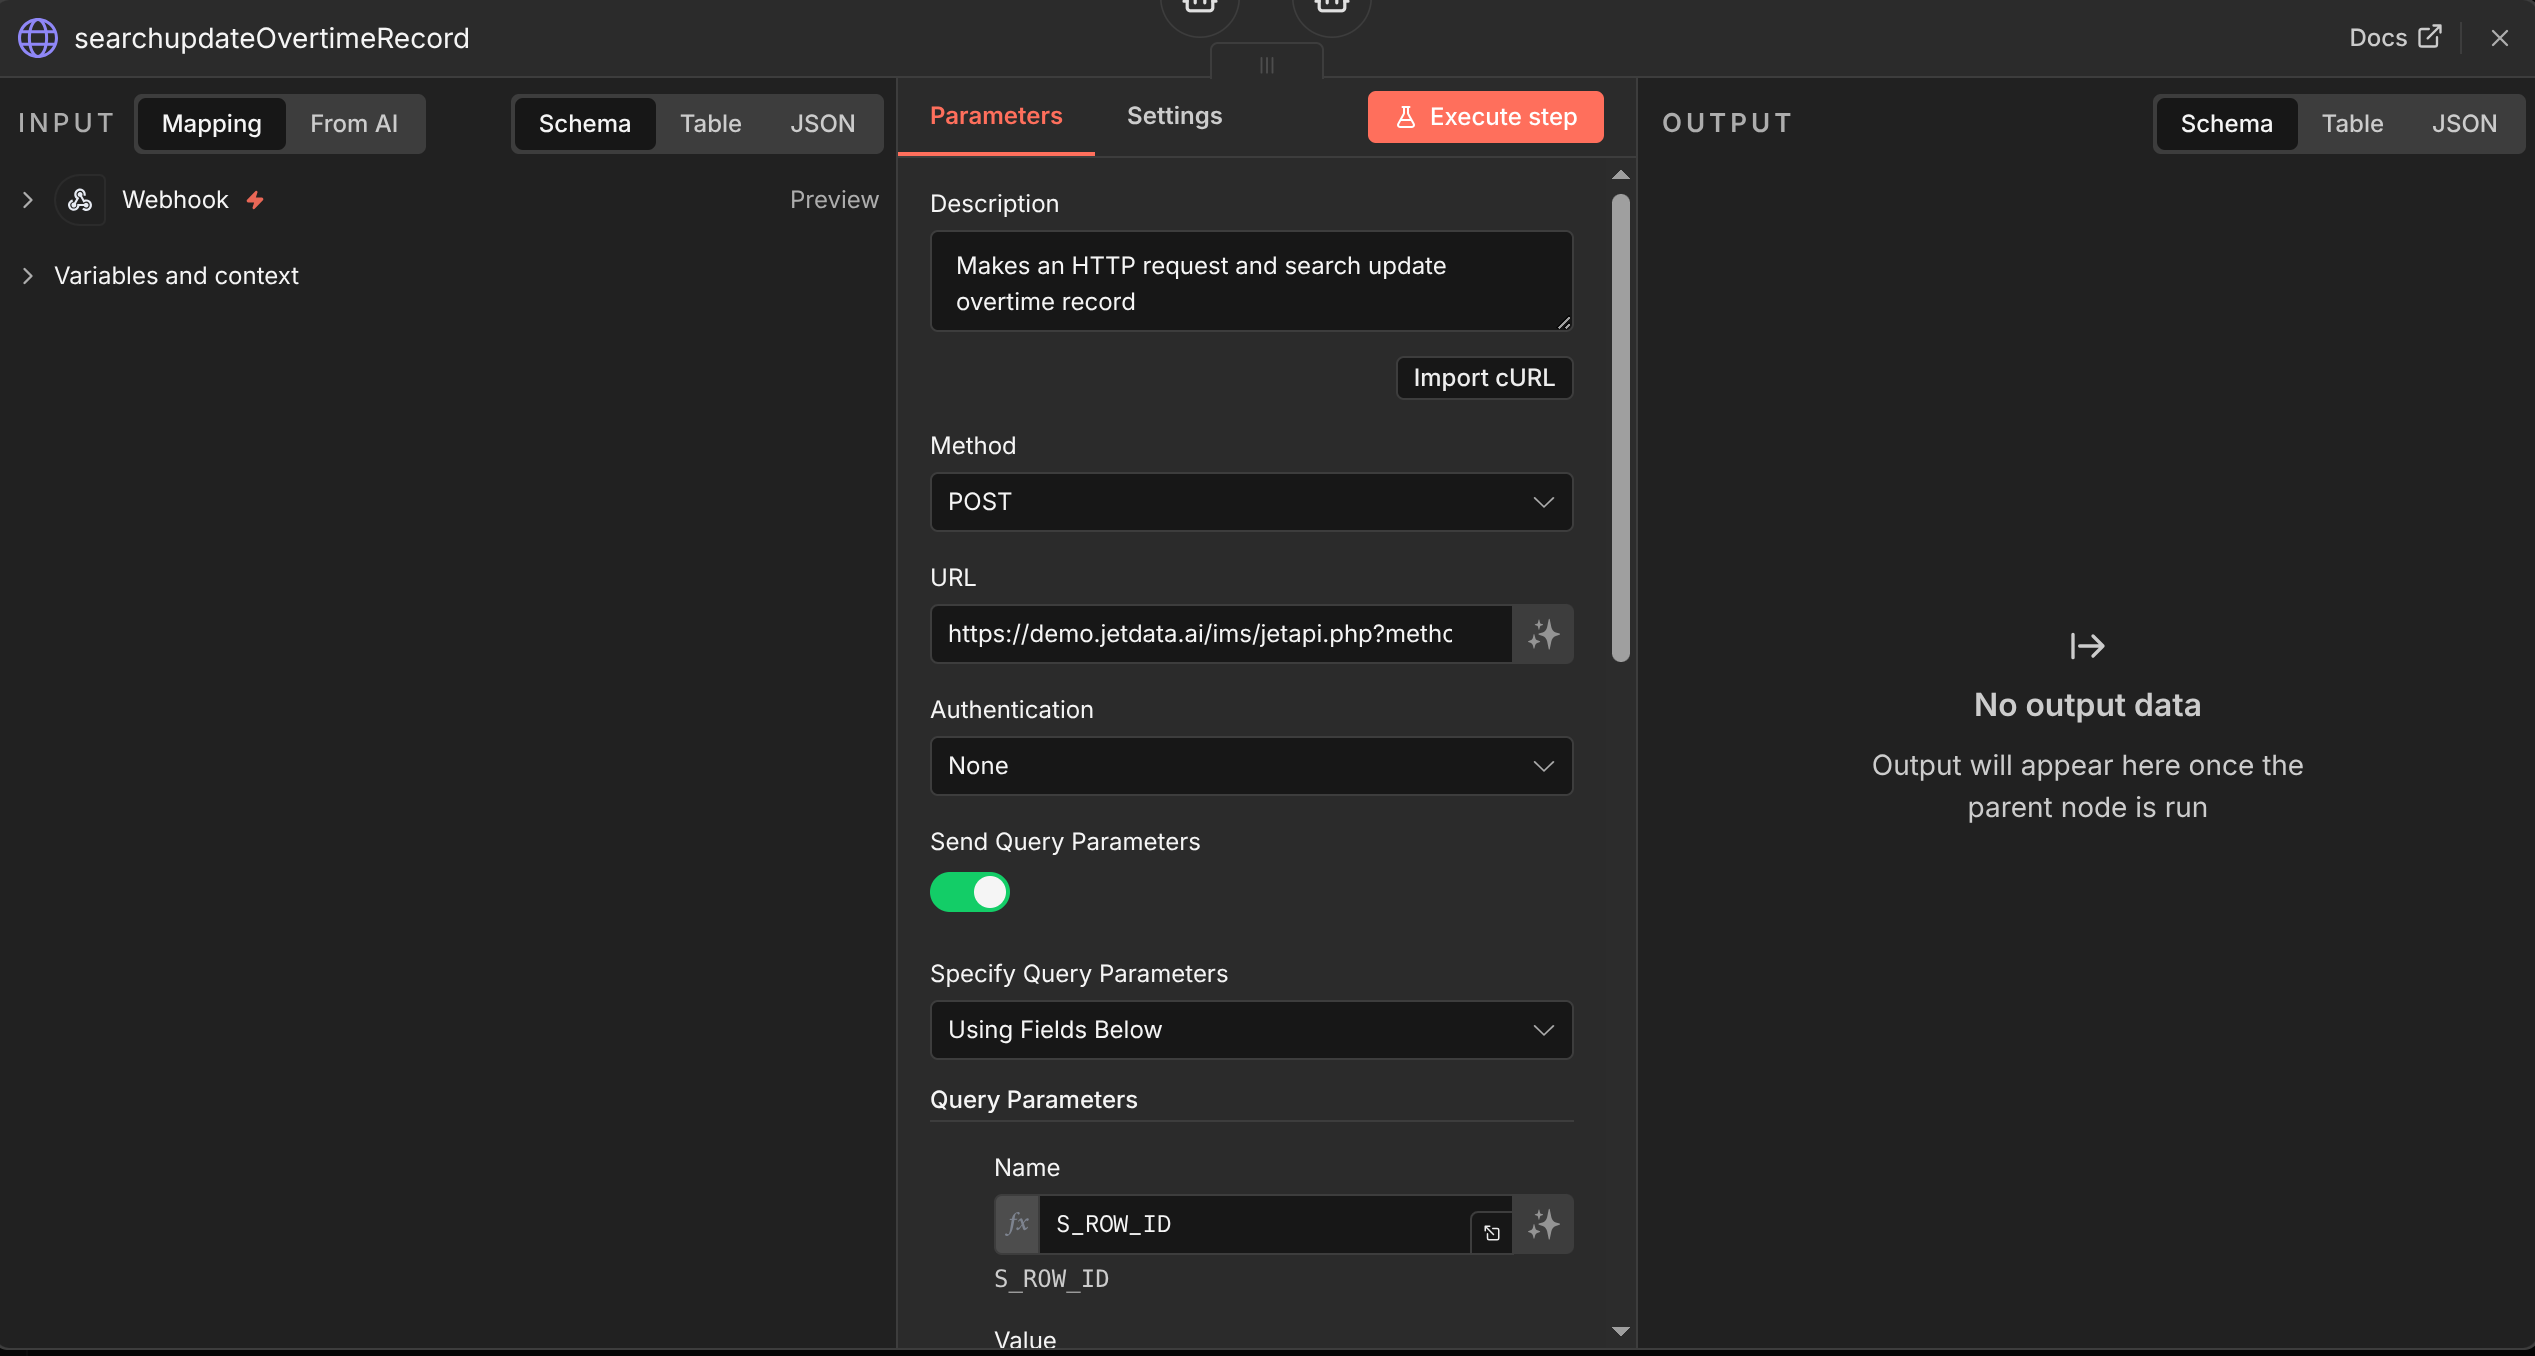 searchUpdate Overtime Record
Finally we’re done!, check below for screenshot of the working UI & Backend.
 Adding Record for Overtime Testing
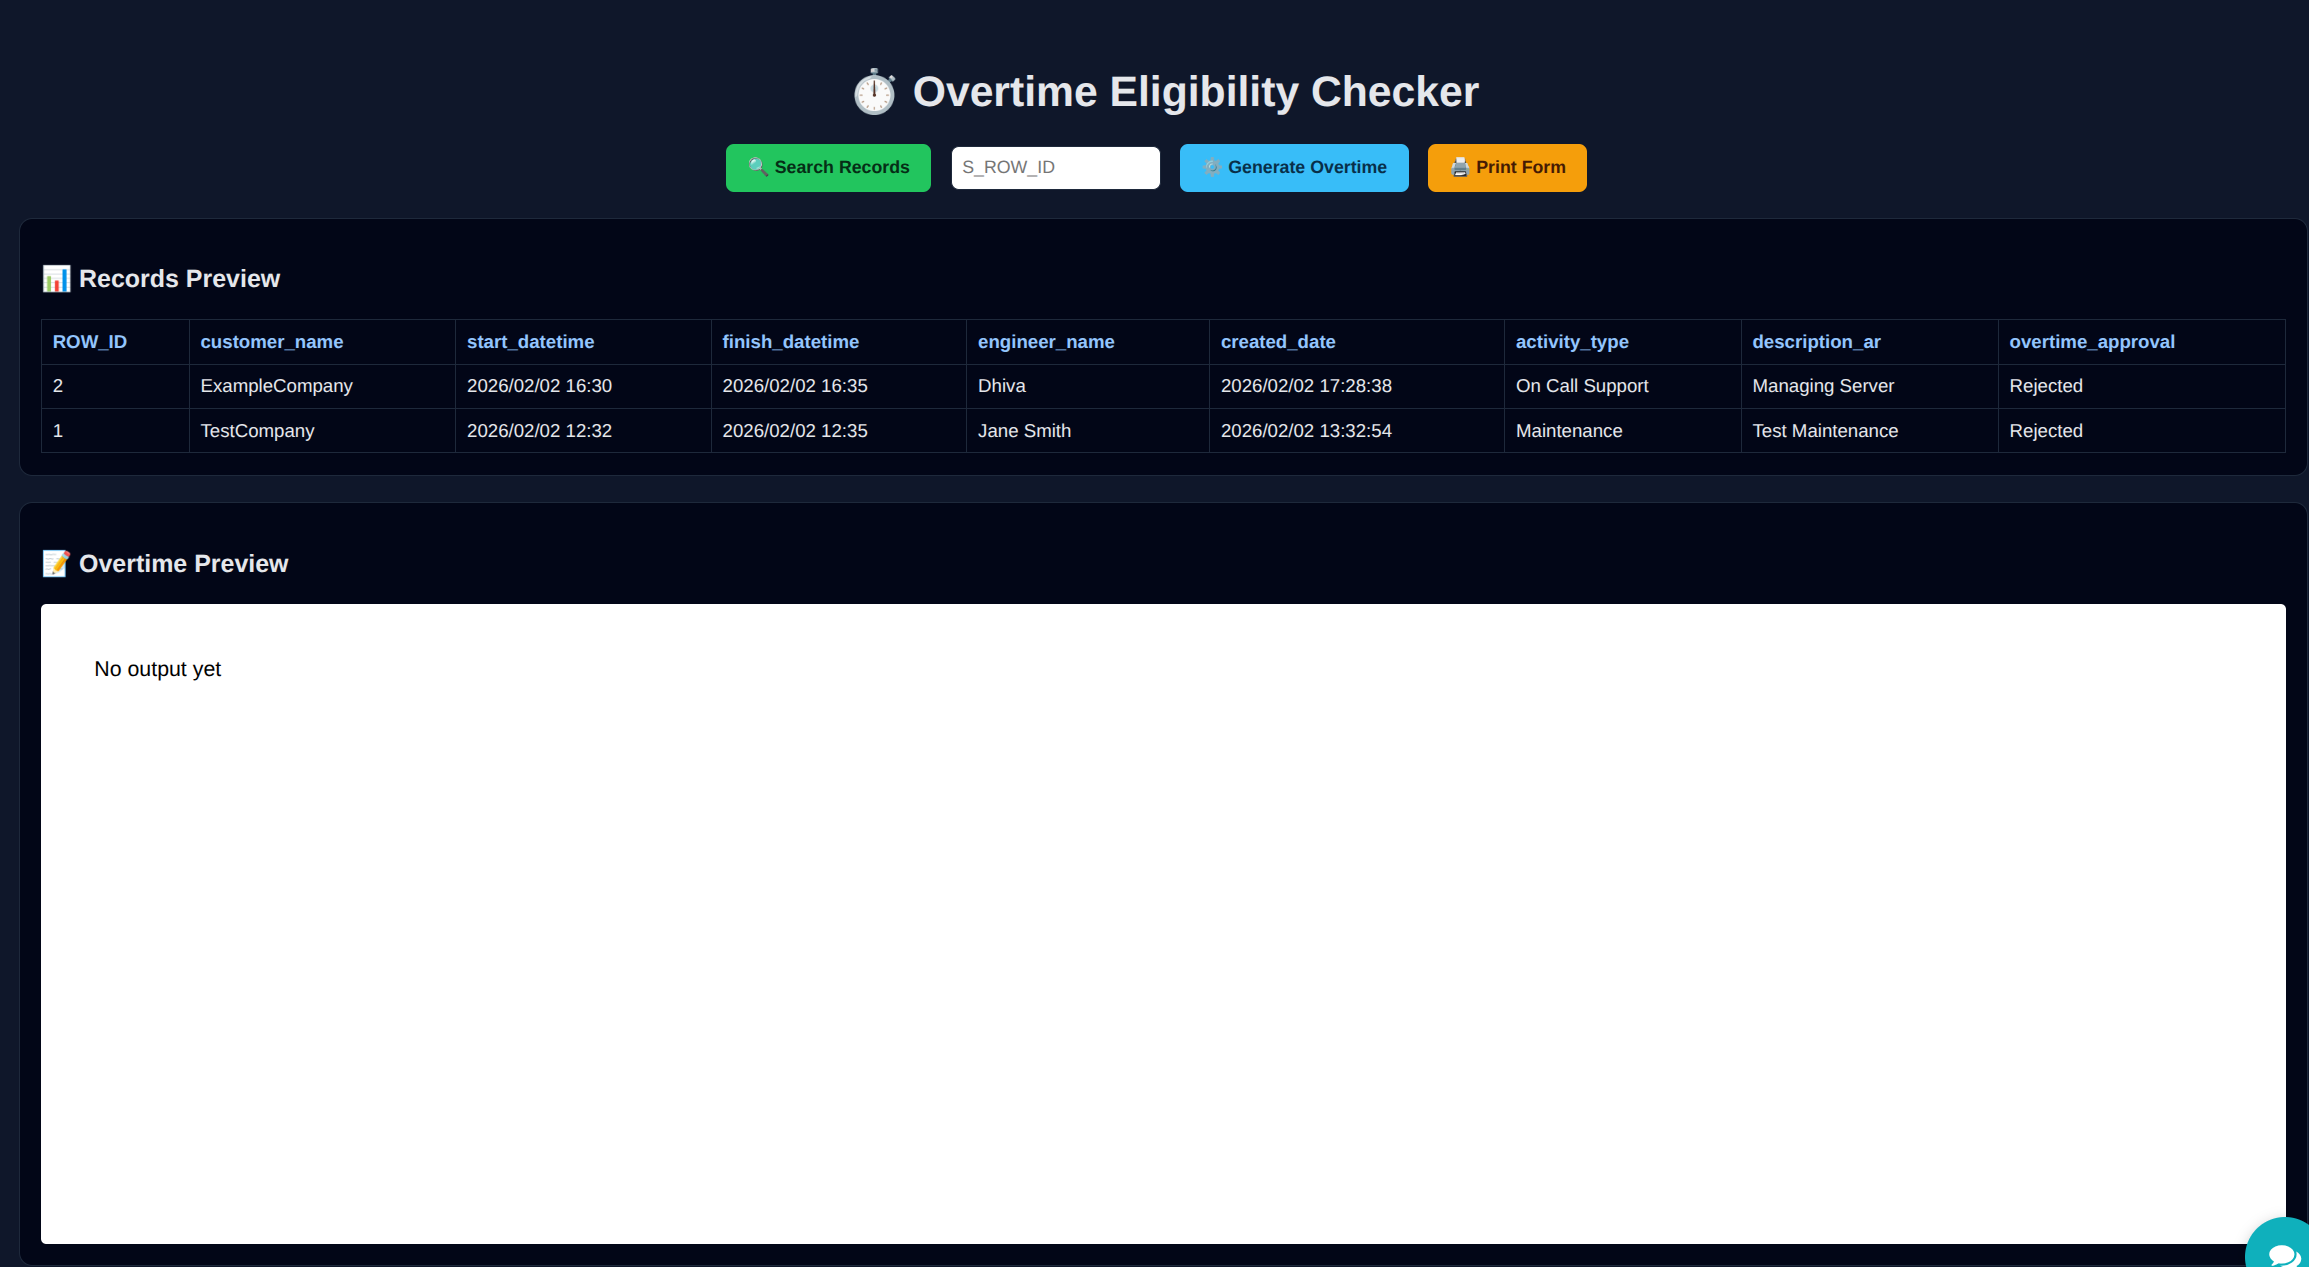 Overtime UI
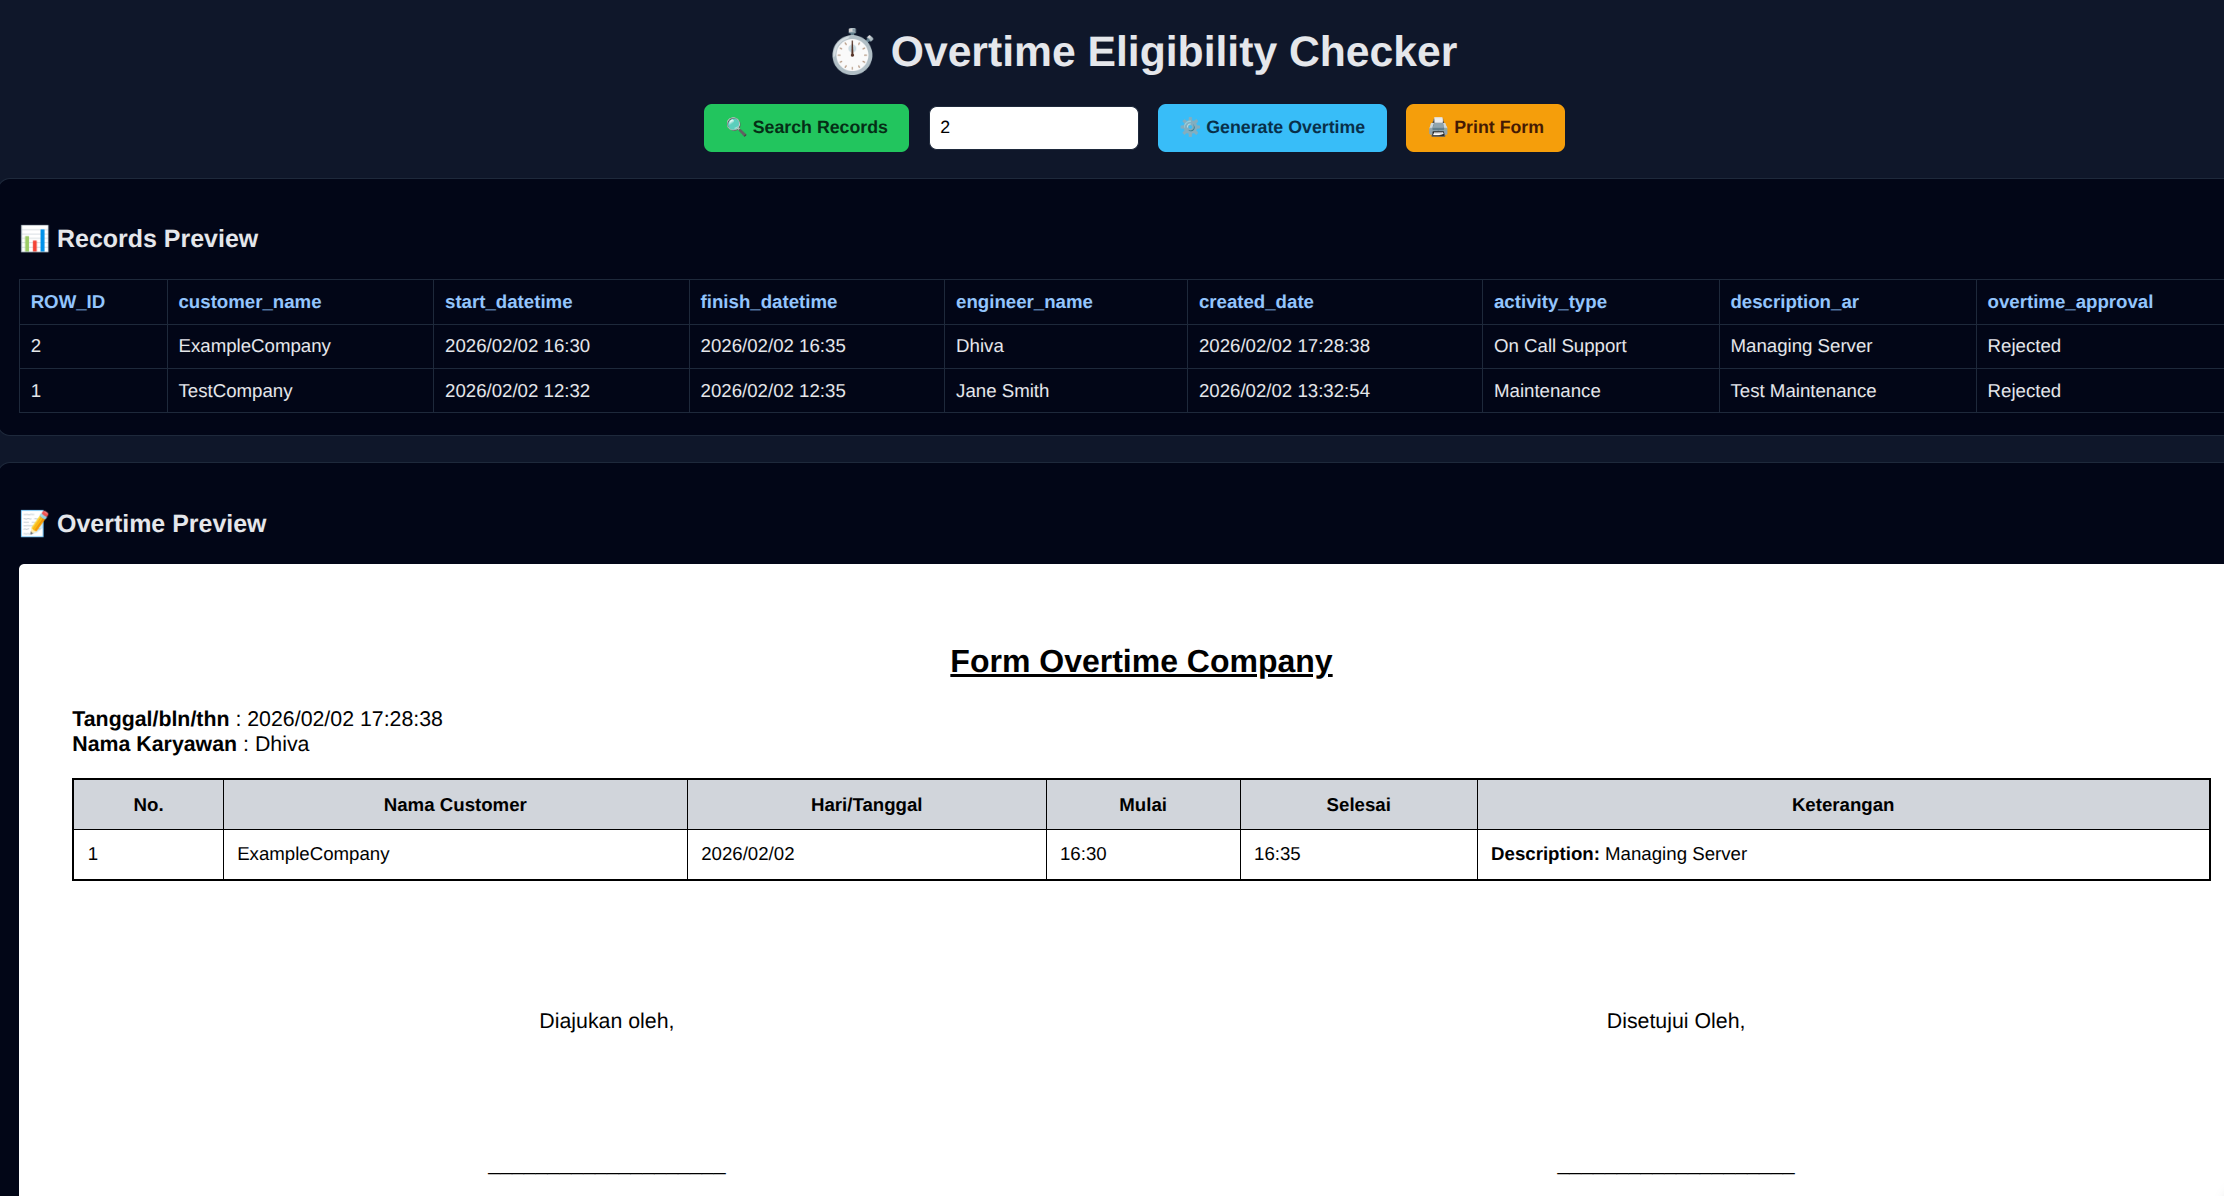 Overtime UI Generated Form
Support Ticket Chatbot
The goal of this solution is to help Engineer with creating a Support Ticket with limited subject or description.
Demo Video
First steps, of course, Forms!, we need to create the Form for the backend where it will hold the data, and the Form for Customized UI. For backend form I’ll be naming it Bucket - Support and UI UI - Support
 Creating Backend Support Form
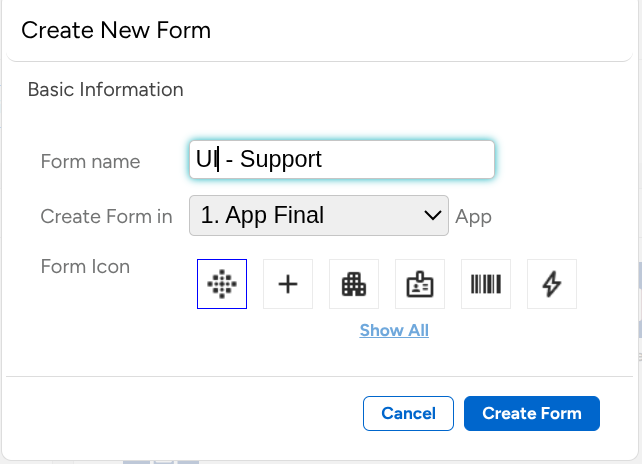 Creating Frontend Support Form
After Forms is created, with the backend form, we can add the fields for the data that we want, below are the fields that I will use.
 Backend Support Form Fields Mapping
Now we can continue with the frontend Form, again we can customize the Form by right clicking the form Edit > Enable Customized Form > Modify Source. inside the “Modify Source” you can use the exact code as mine below.
WARNING: NEVER PUT YOUR API KEY IN THE FRONTEND OR HARDCODE IT, THIS IS FOR TESTING PURPOSES ONLY!
Check Out The Source Code for Support Ticket UI HERE
With all the JETData side completed, we can continue to the n8n side. n8n will be used for the workflow, generating responds, and managing the responded data back to JETData.
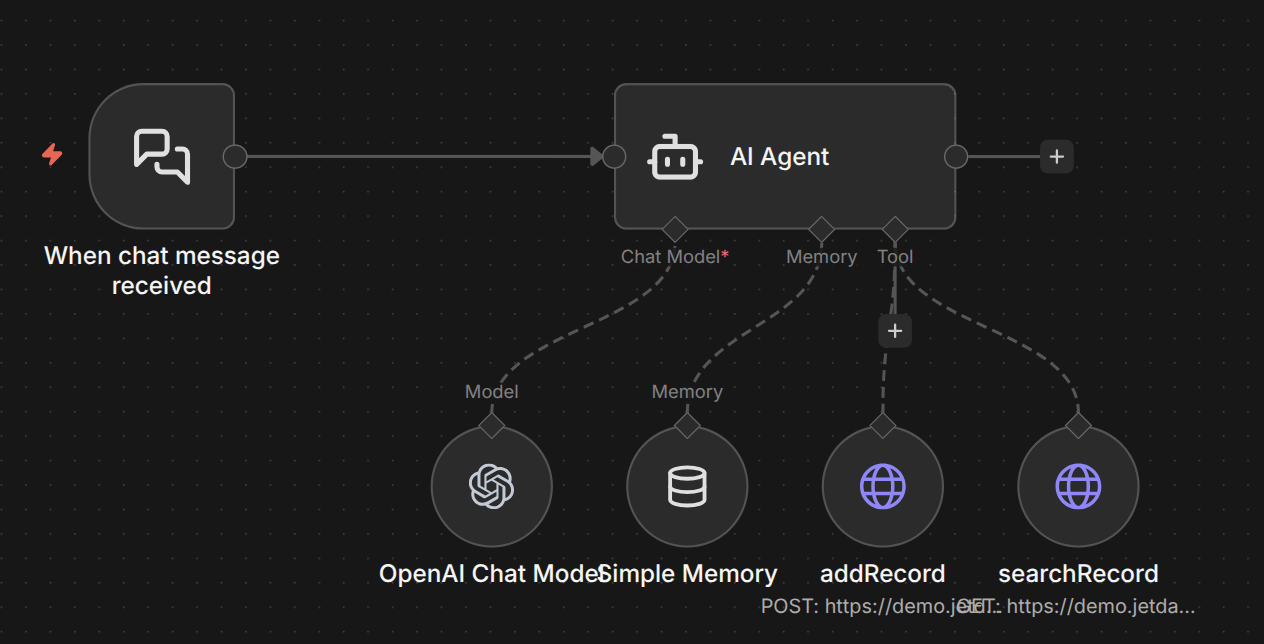 Support Ticket n8n Workflow
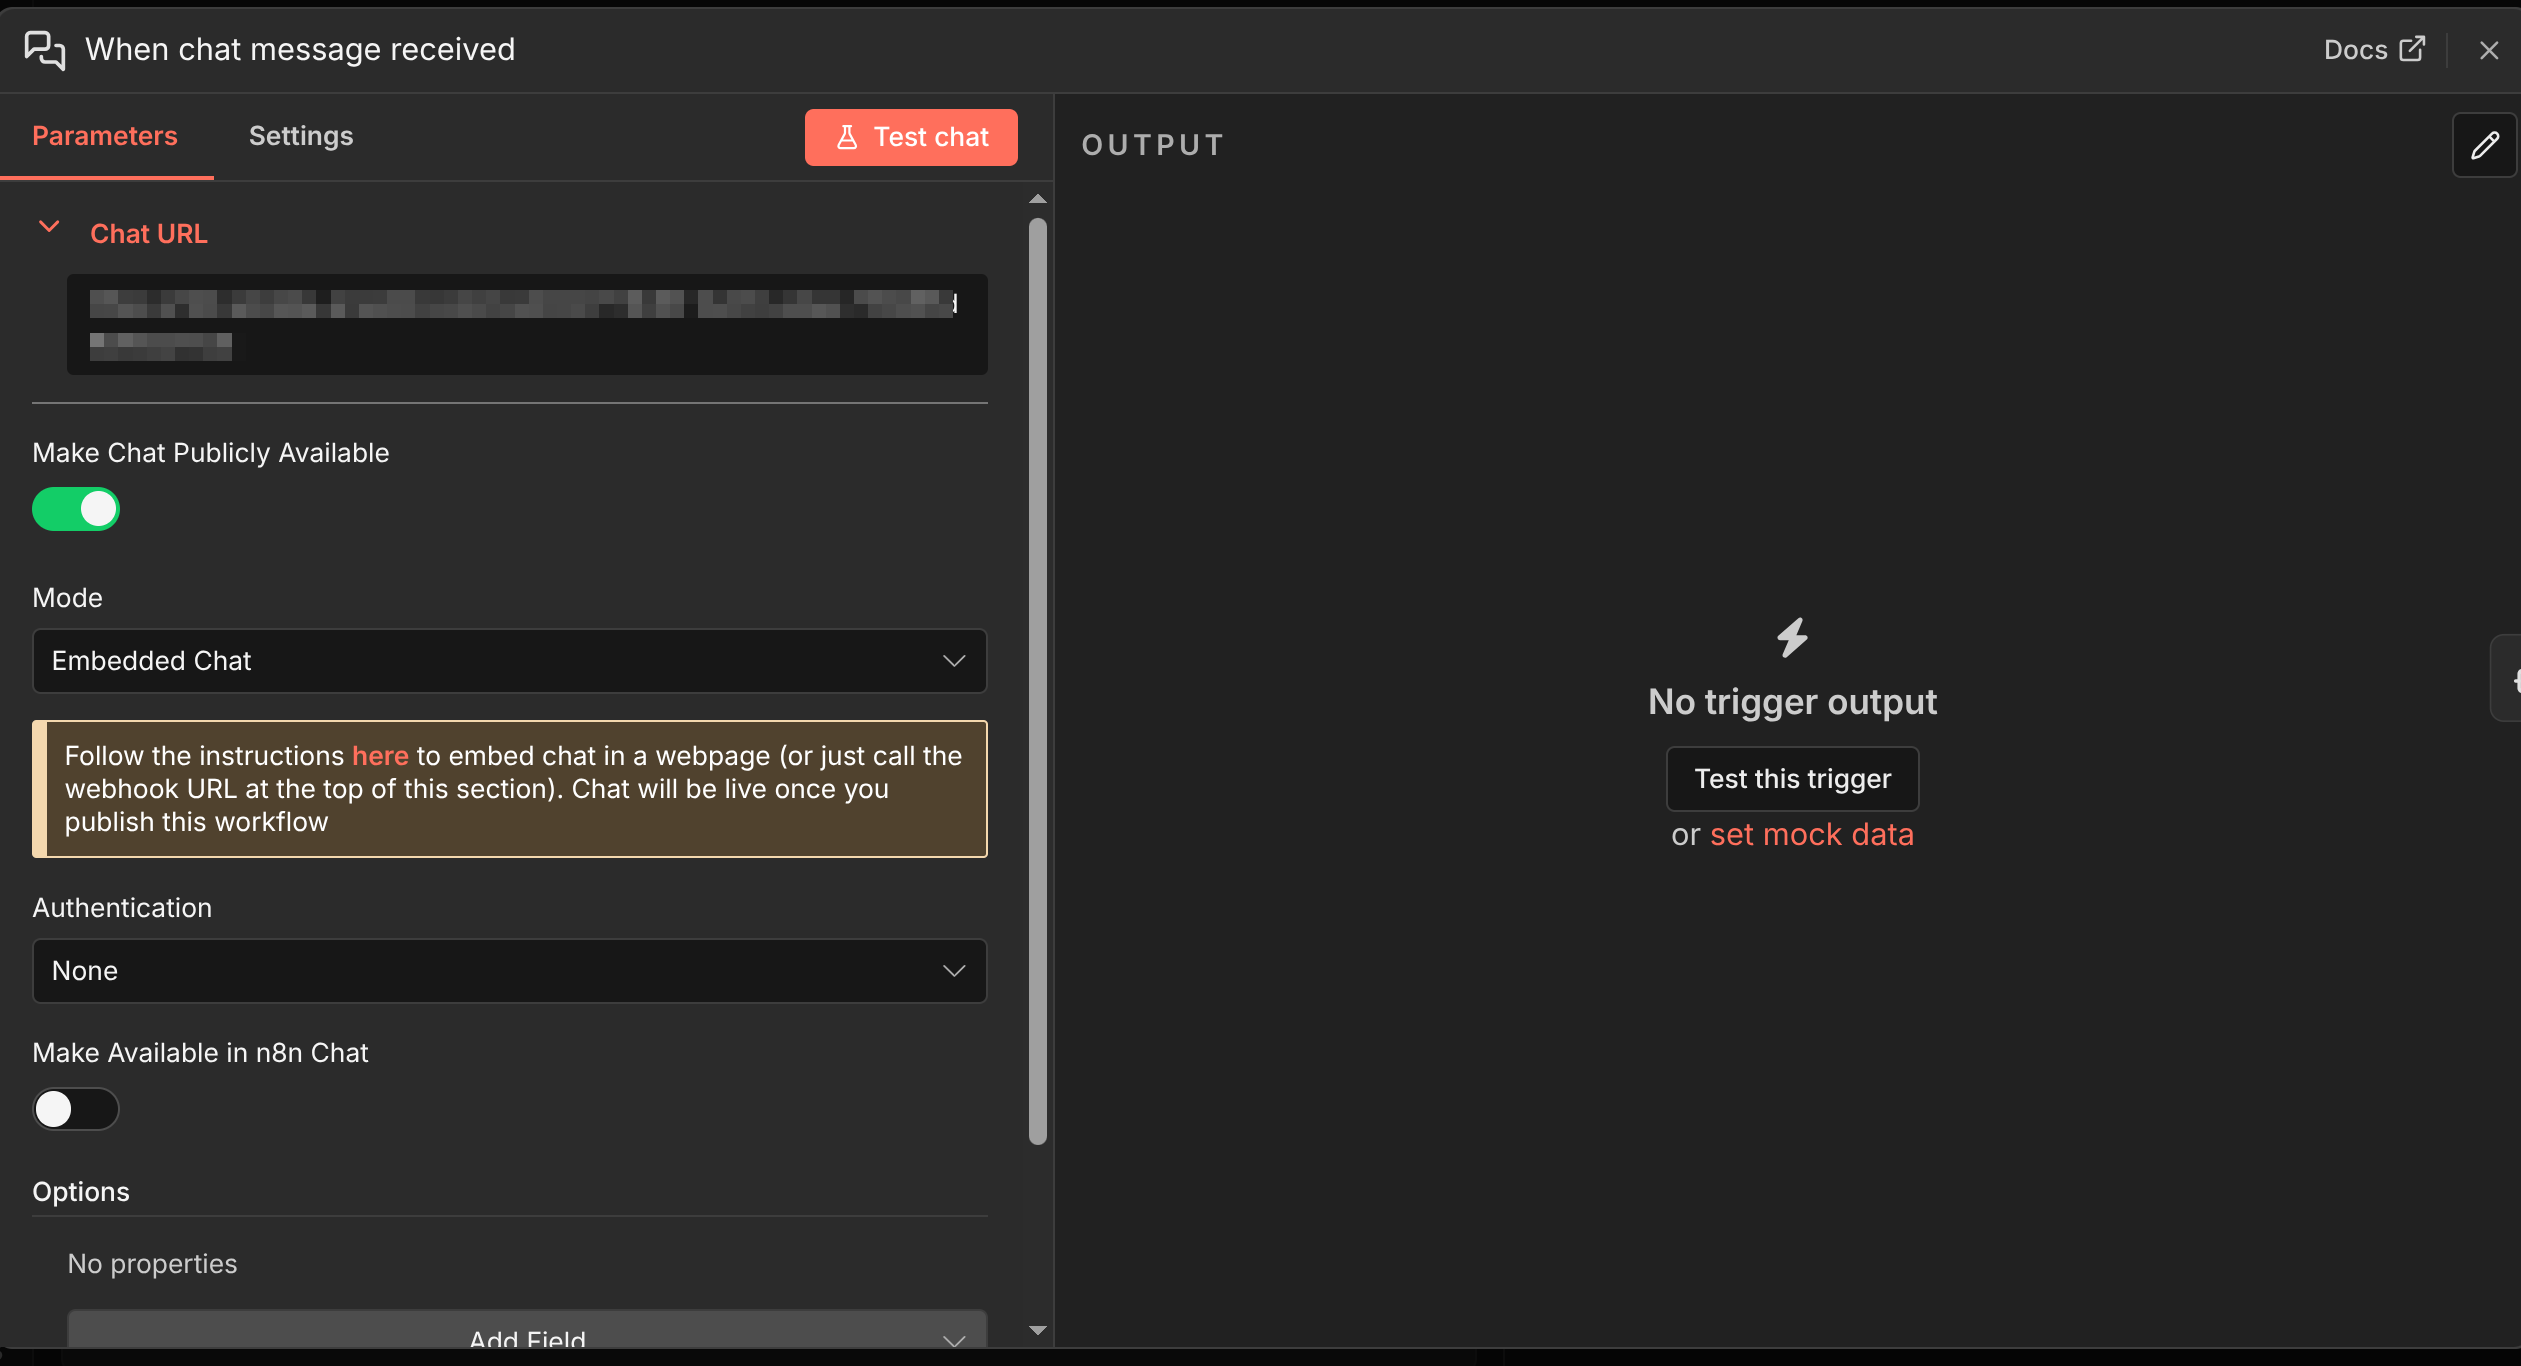 Support Ticket Chat Trigger
For the AI Agent, I use two tools, addRecords and searchRecord. for the AI Agent, on Prompt User Message you can insert this:
1
2
3
4
5
6
7
8
userName: {{ $json.userName }}
chatInput: {{ $json.chatInput }}

when asked who am i, use userName

for the engineer_name use userName

you can guess and elaborate a bit more for the best practice for the issues and demands, action takens, and conclusion
This prompt will make the AI Agent use the userName that we will get from the chat in JETData, and the chatInput to be used for the
 Support Ticket AI Agent
With the tool addRecord, we will use POST method, and configure the query and body parameter. For the body parameter, just use the same name as what we have on fields mapping, and for the value just use Define automatically by the model
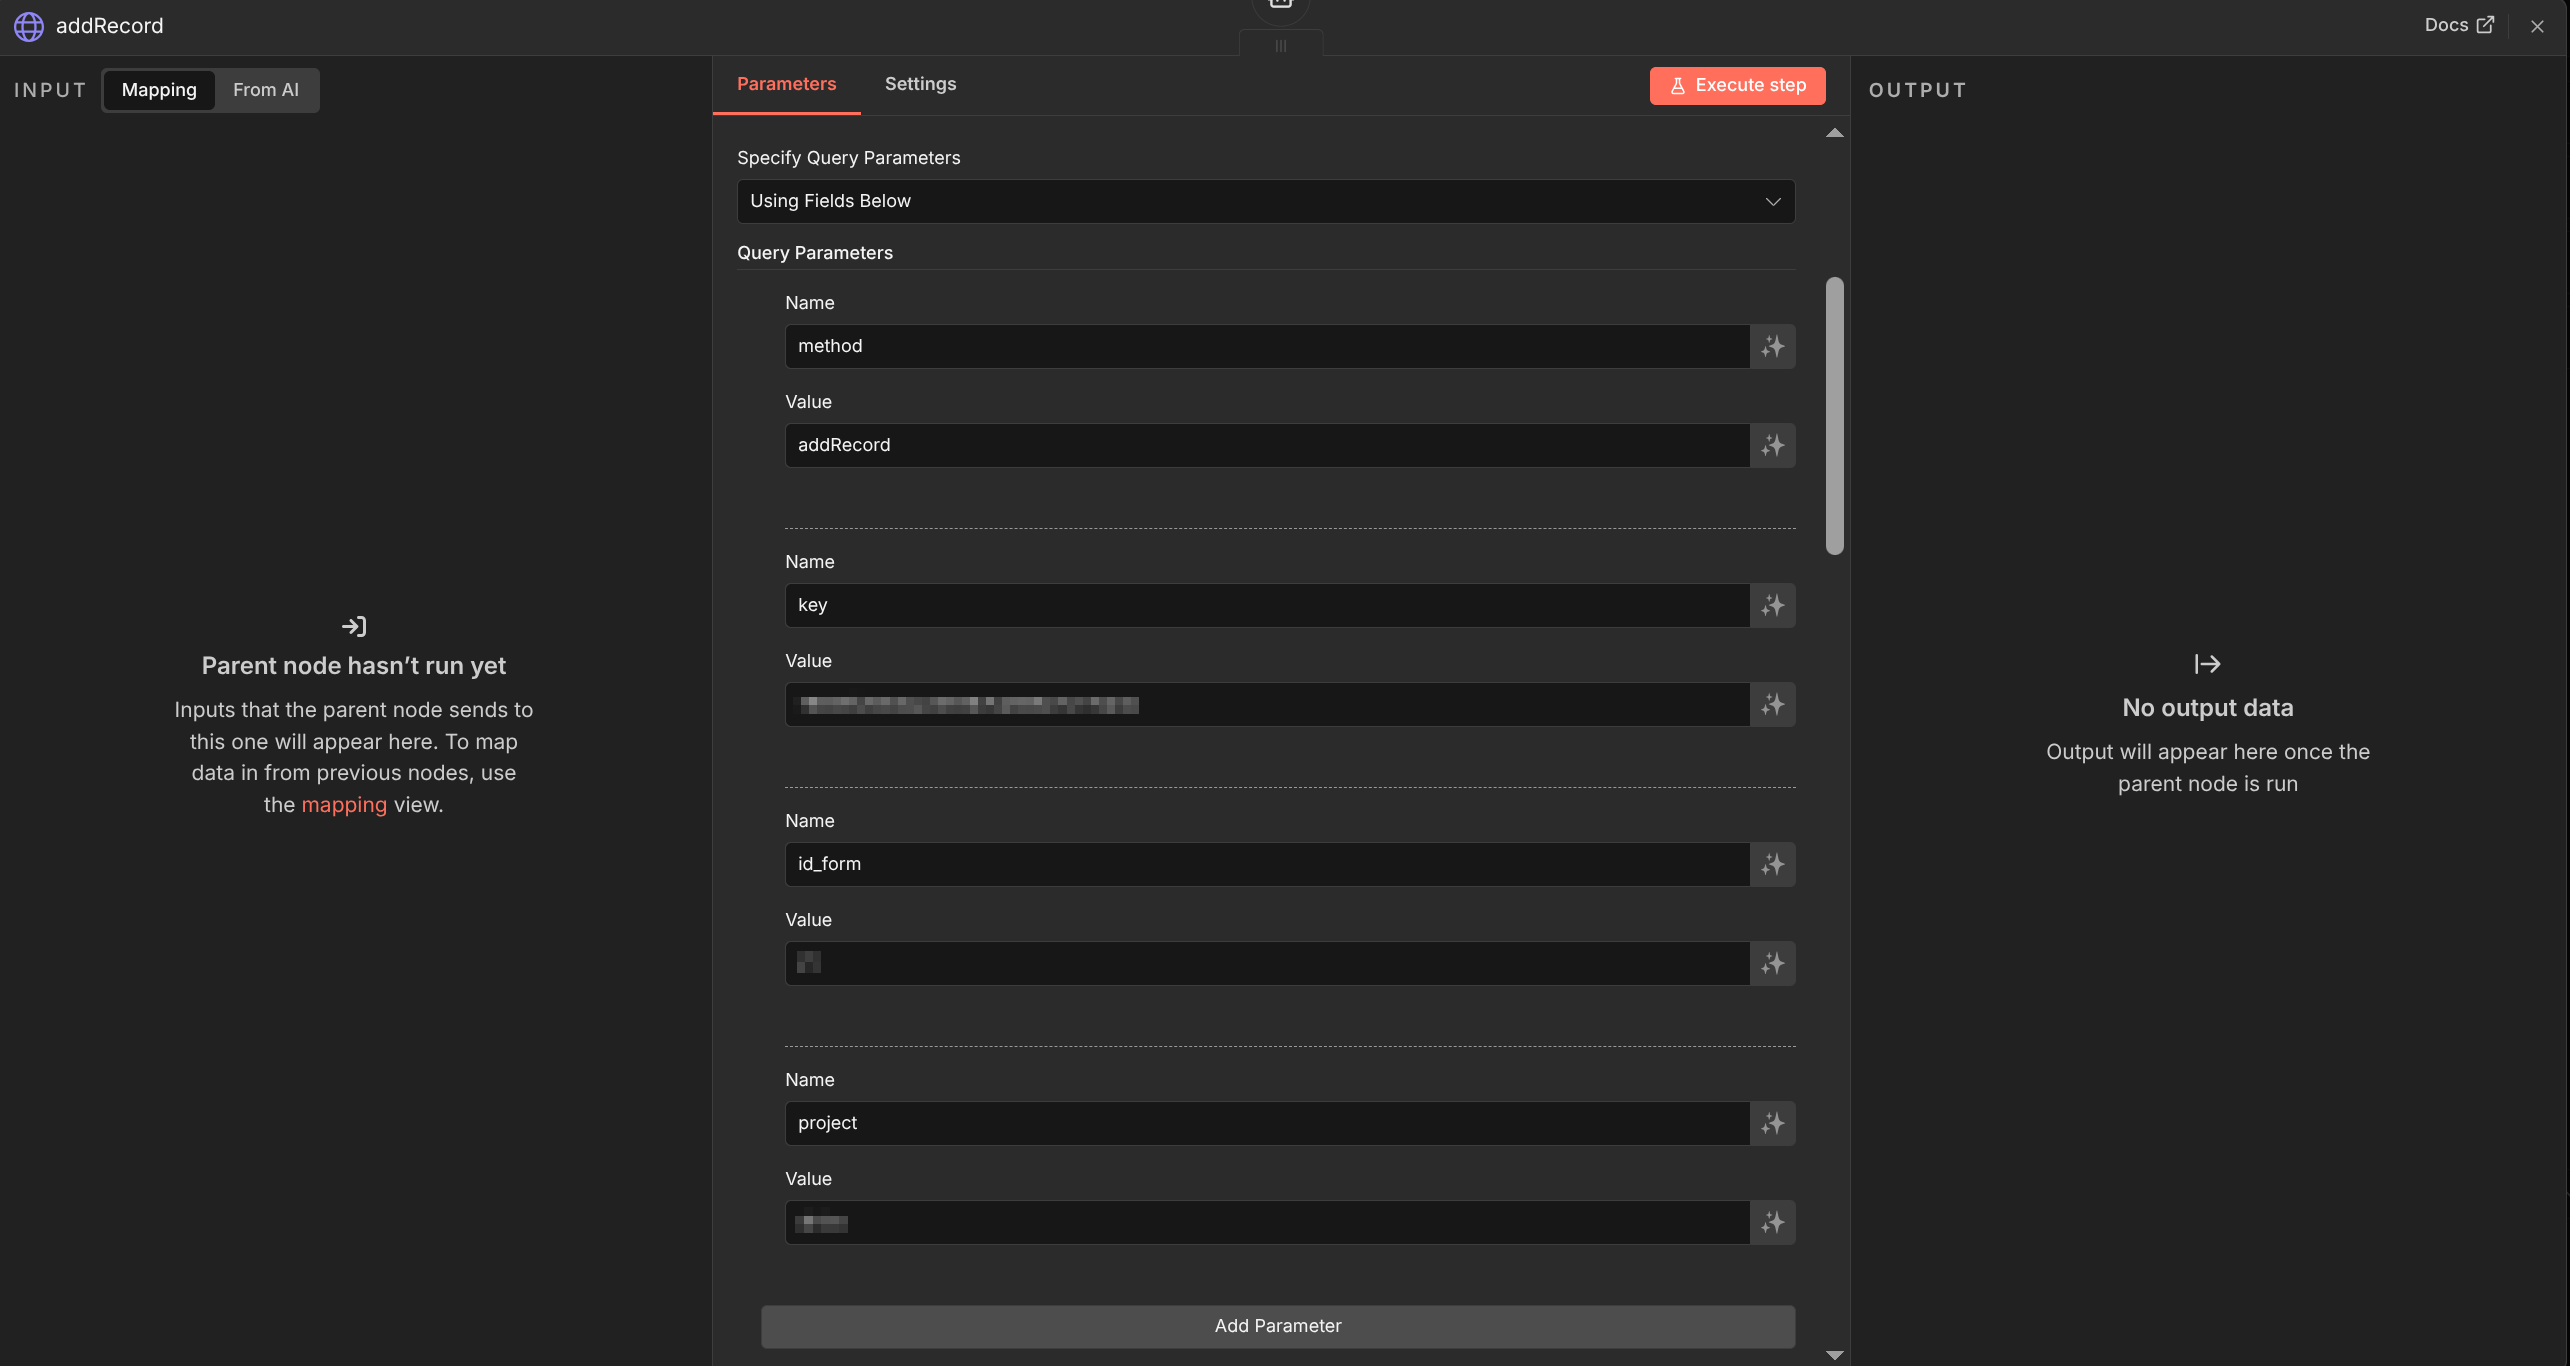 addRecord Tool Query Parameter
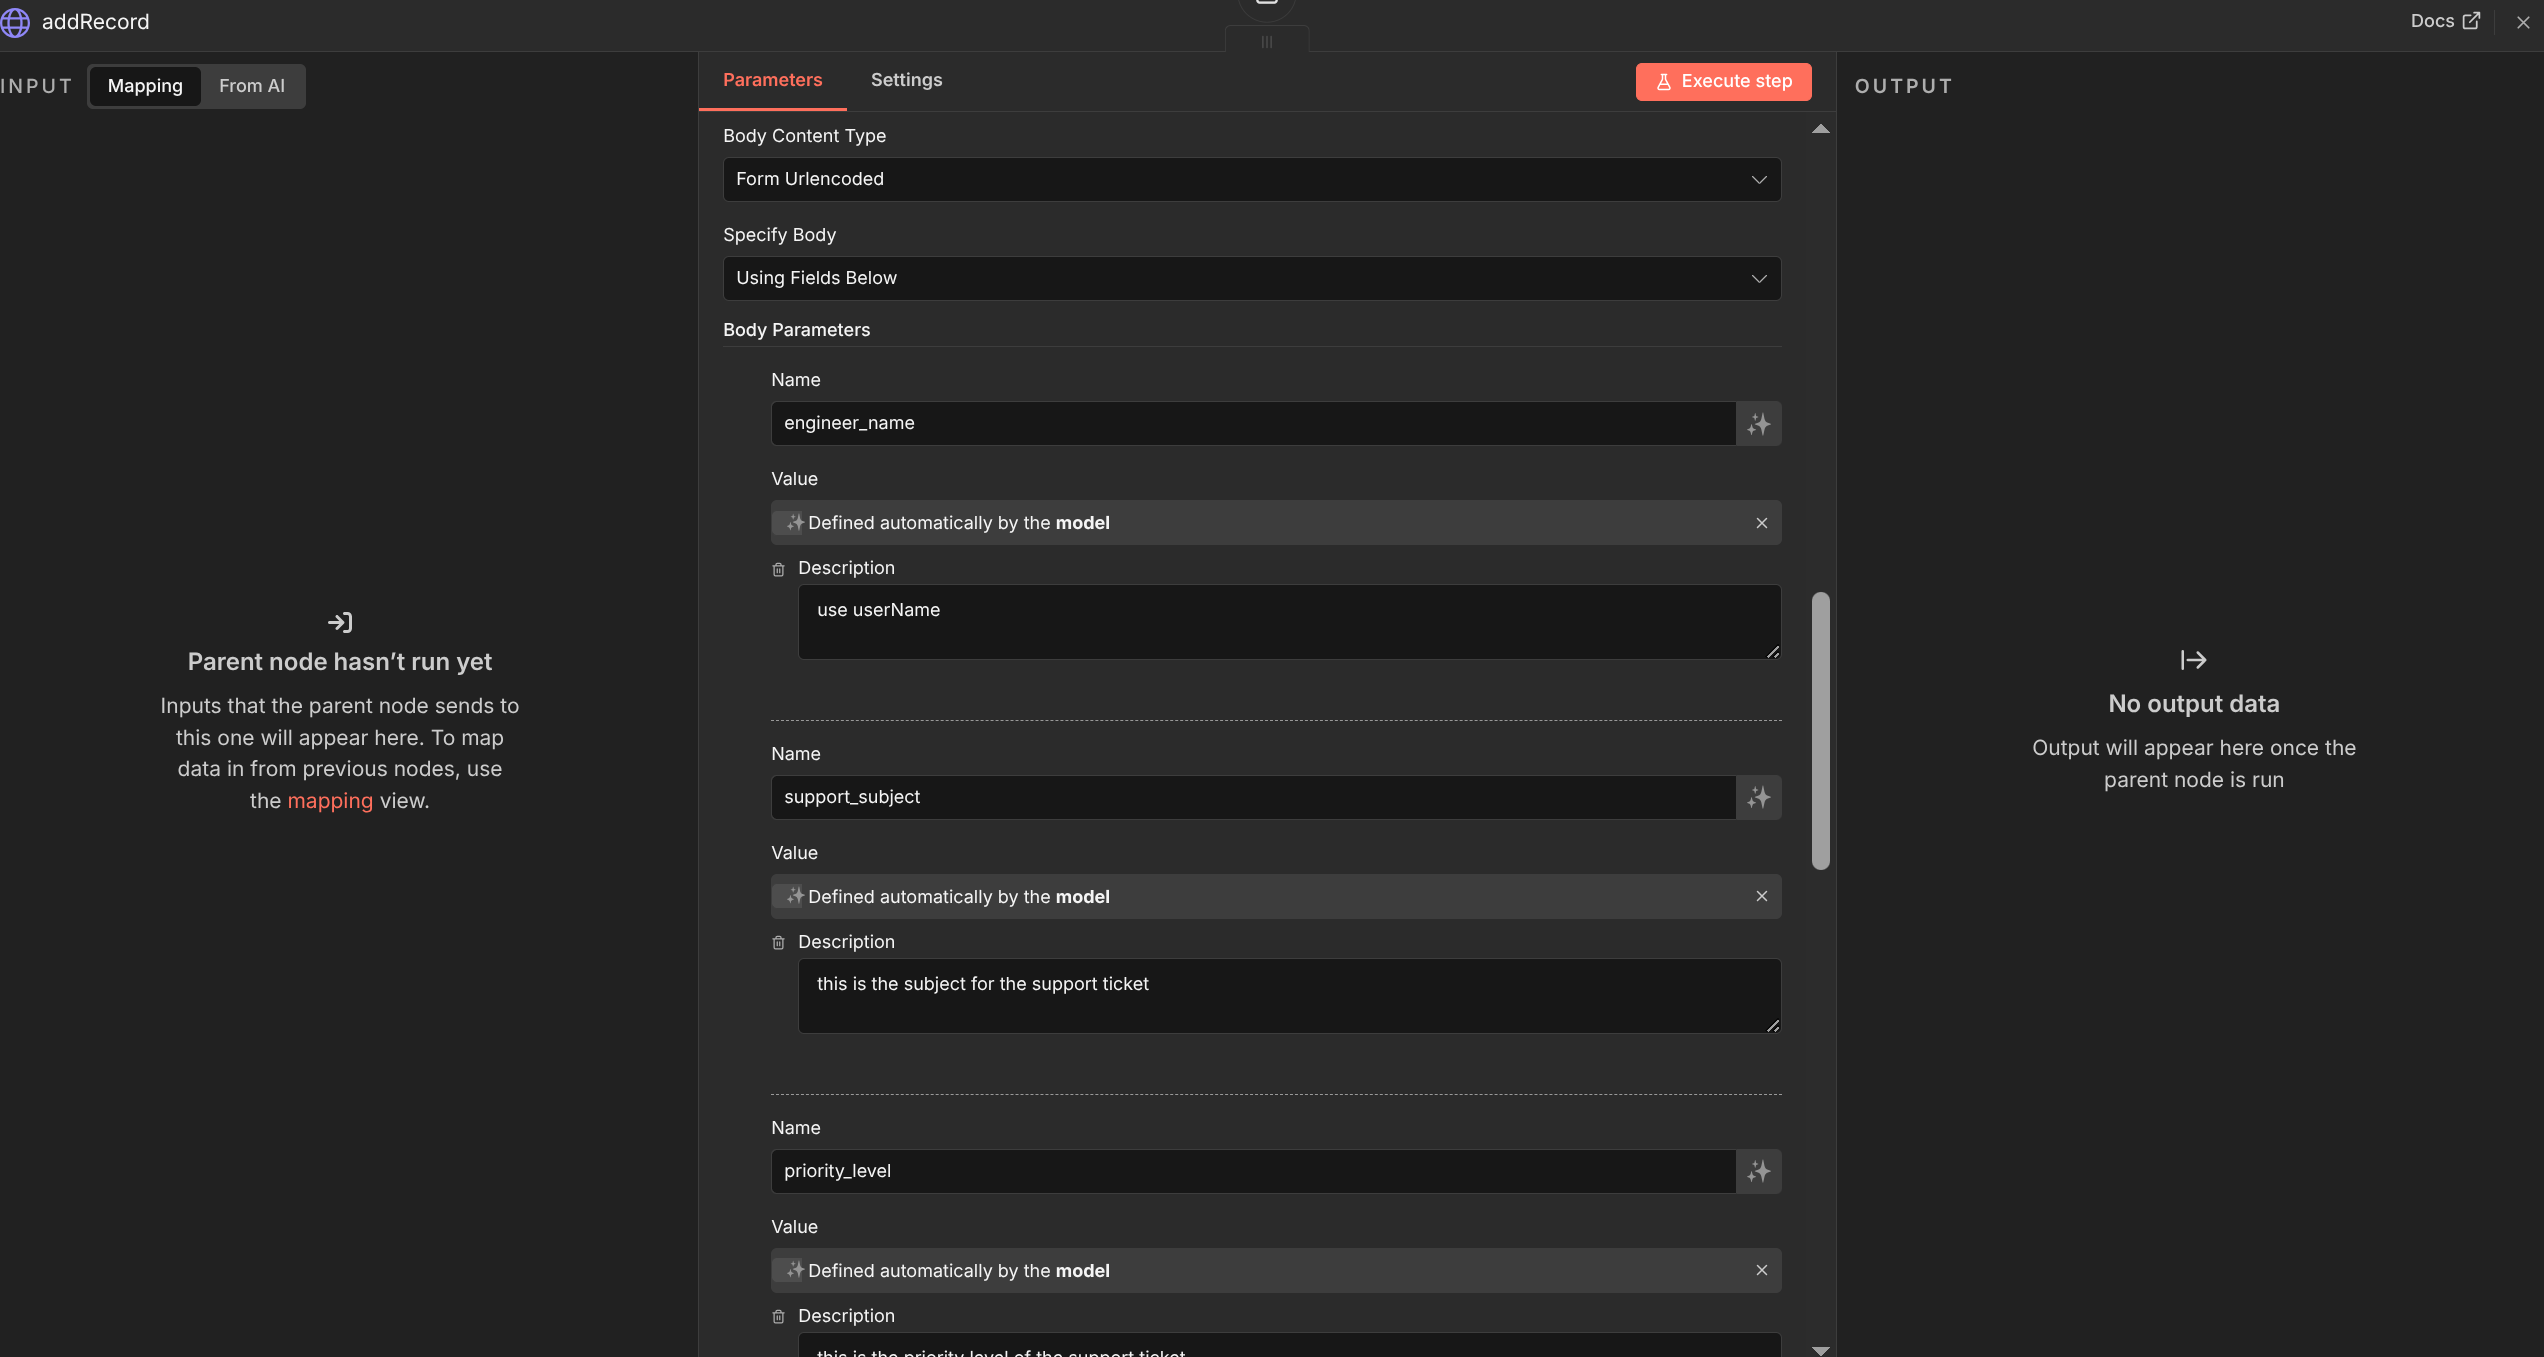 addRecord Tool Body Parameter
For the tool searchRecord, we can use the API from the JETData to search for the record.
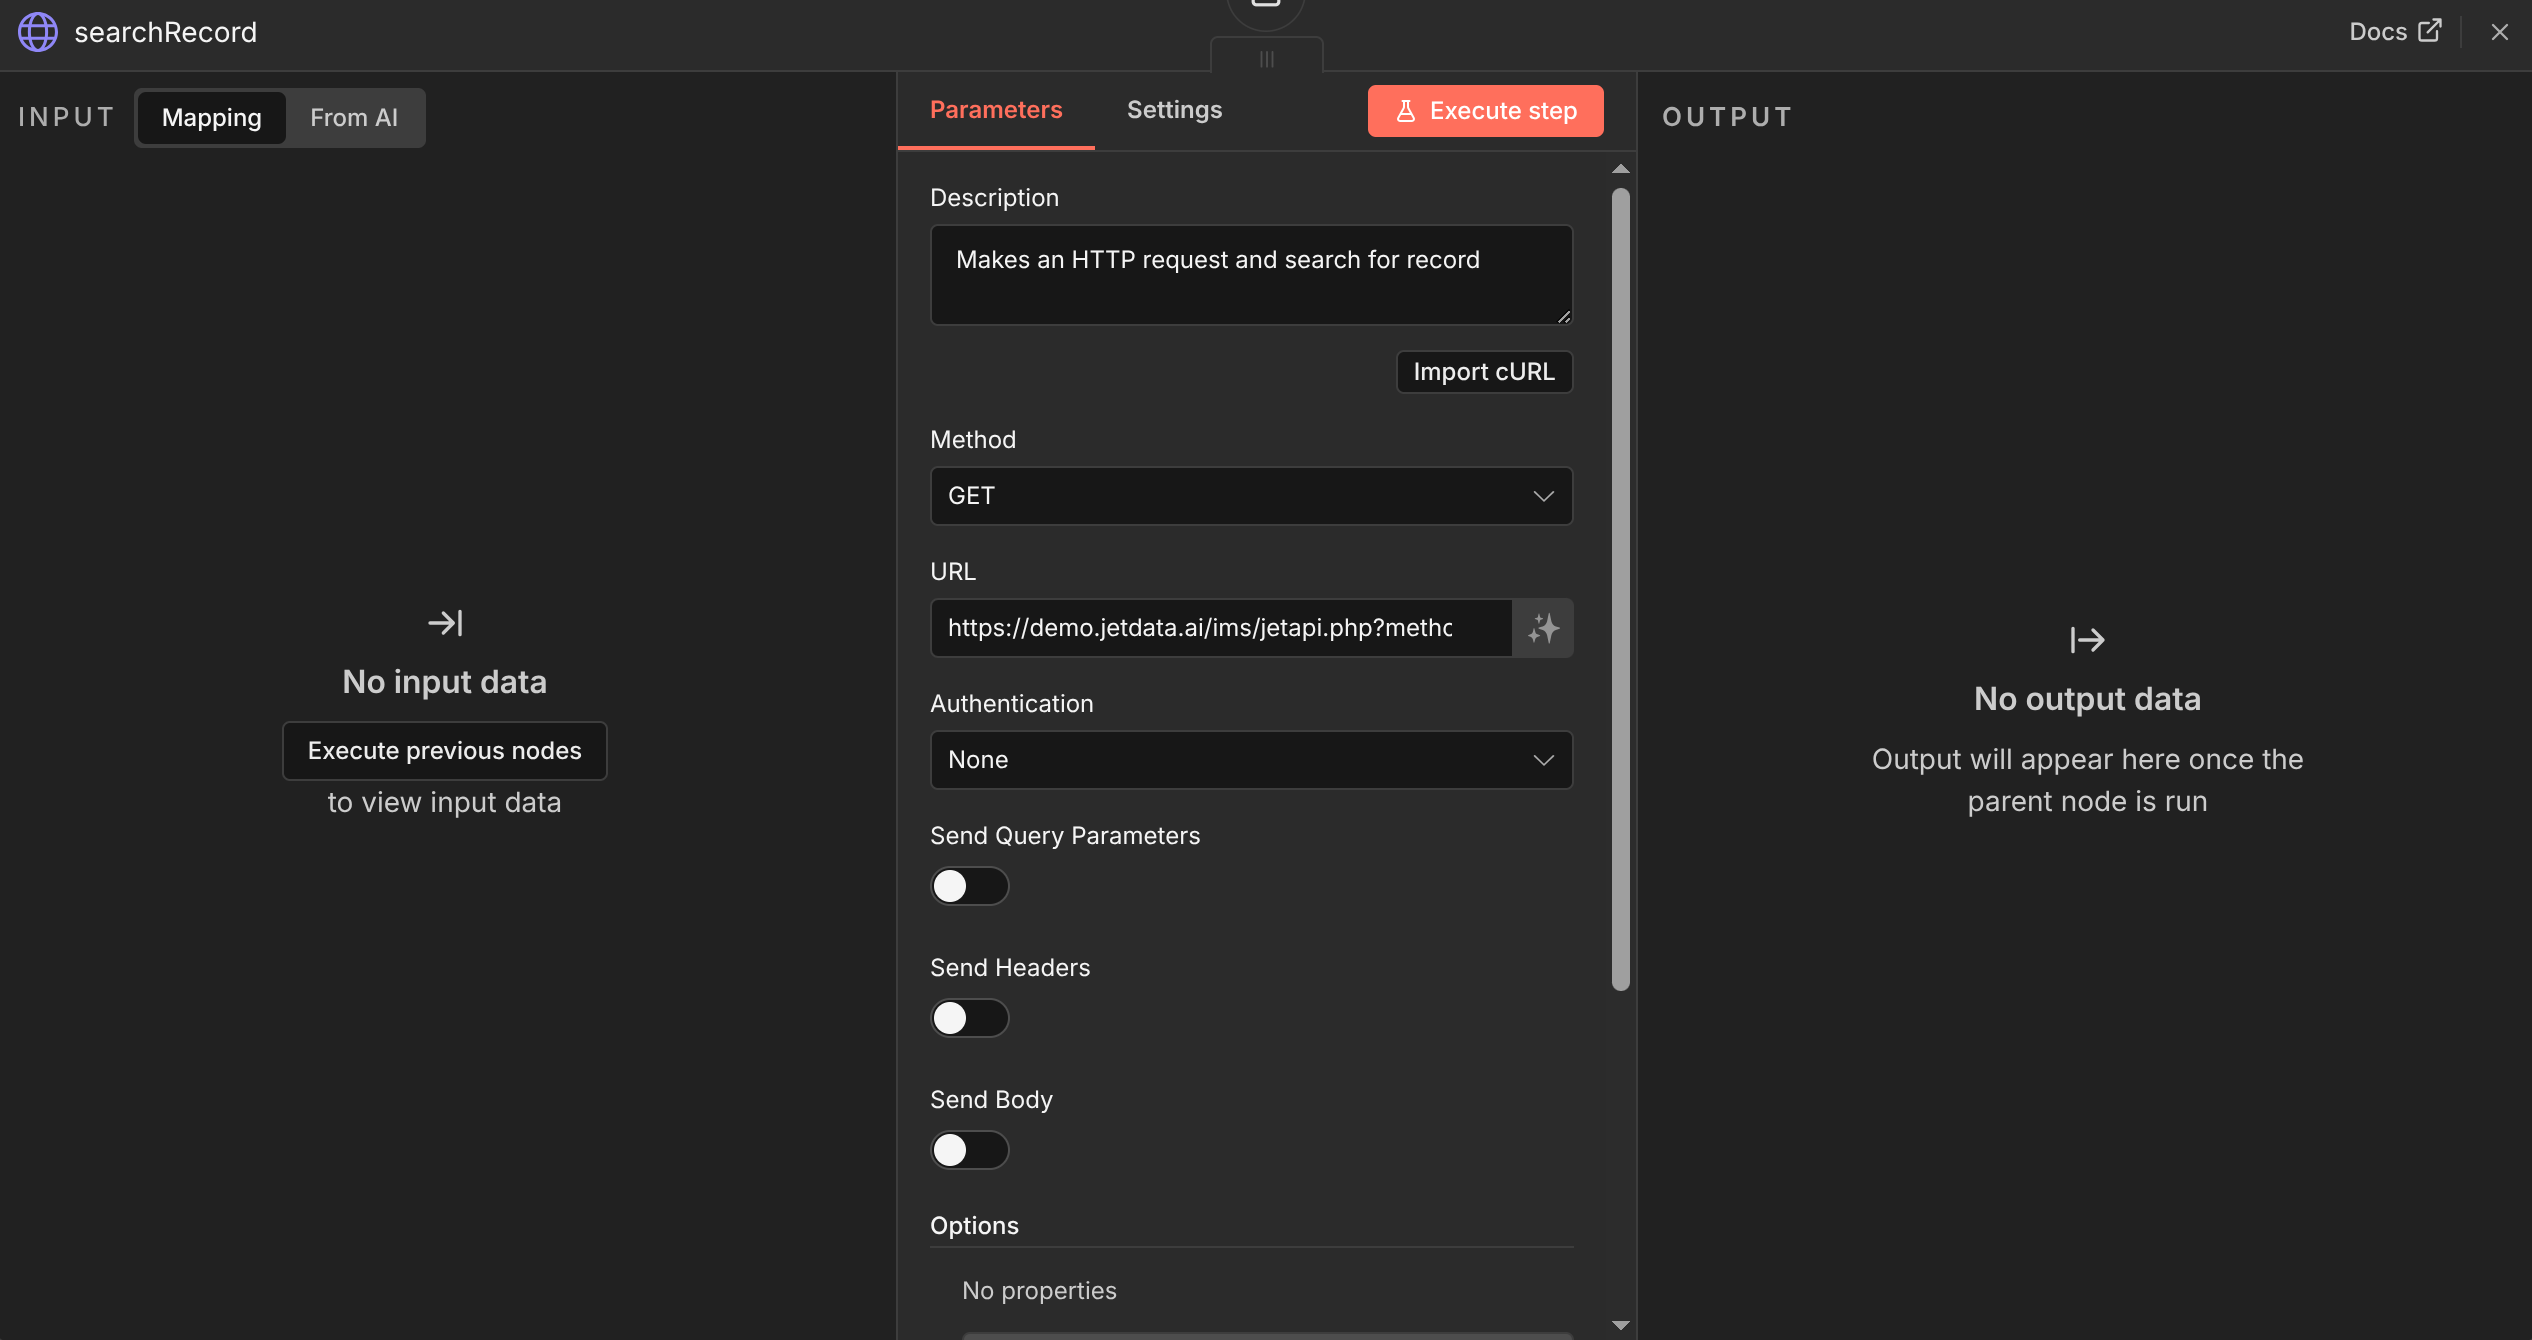 searchRecord Tool Body Parameter
And We’re Done!, now we can test the chatbot with creating a support ticket, with a simple description of the issues, and check whether the generated support ticket is logged into the backend form.
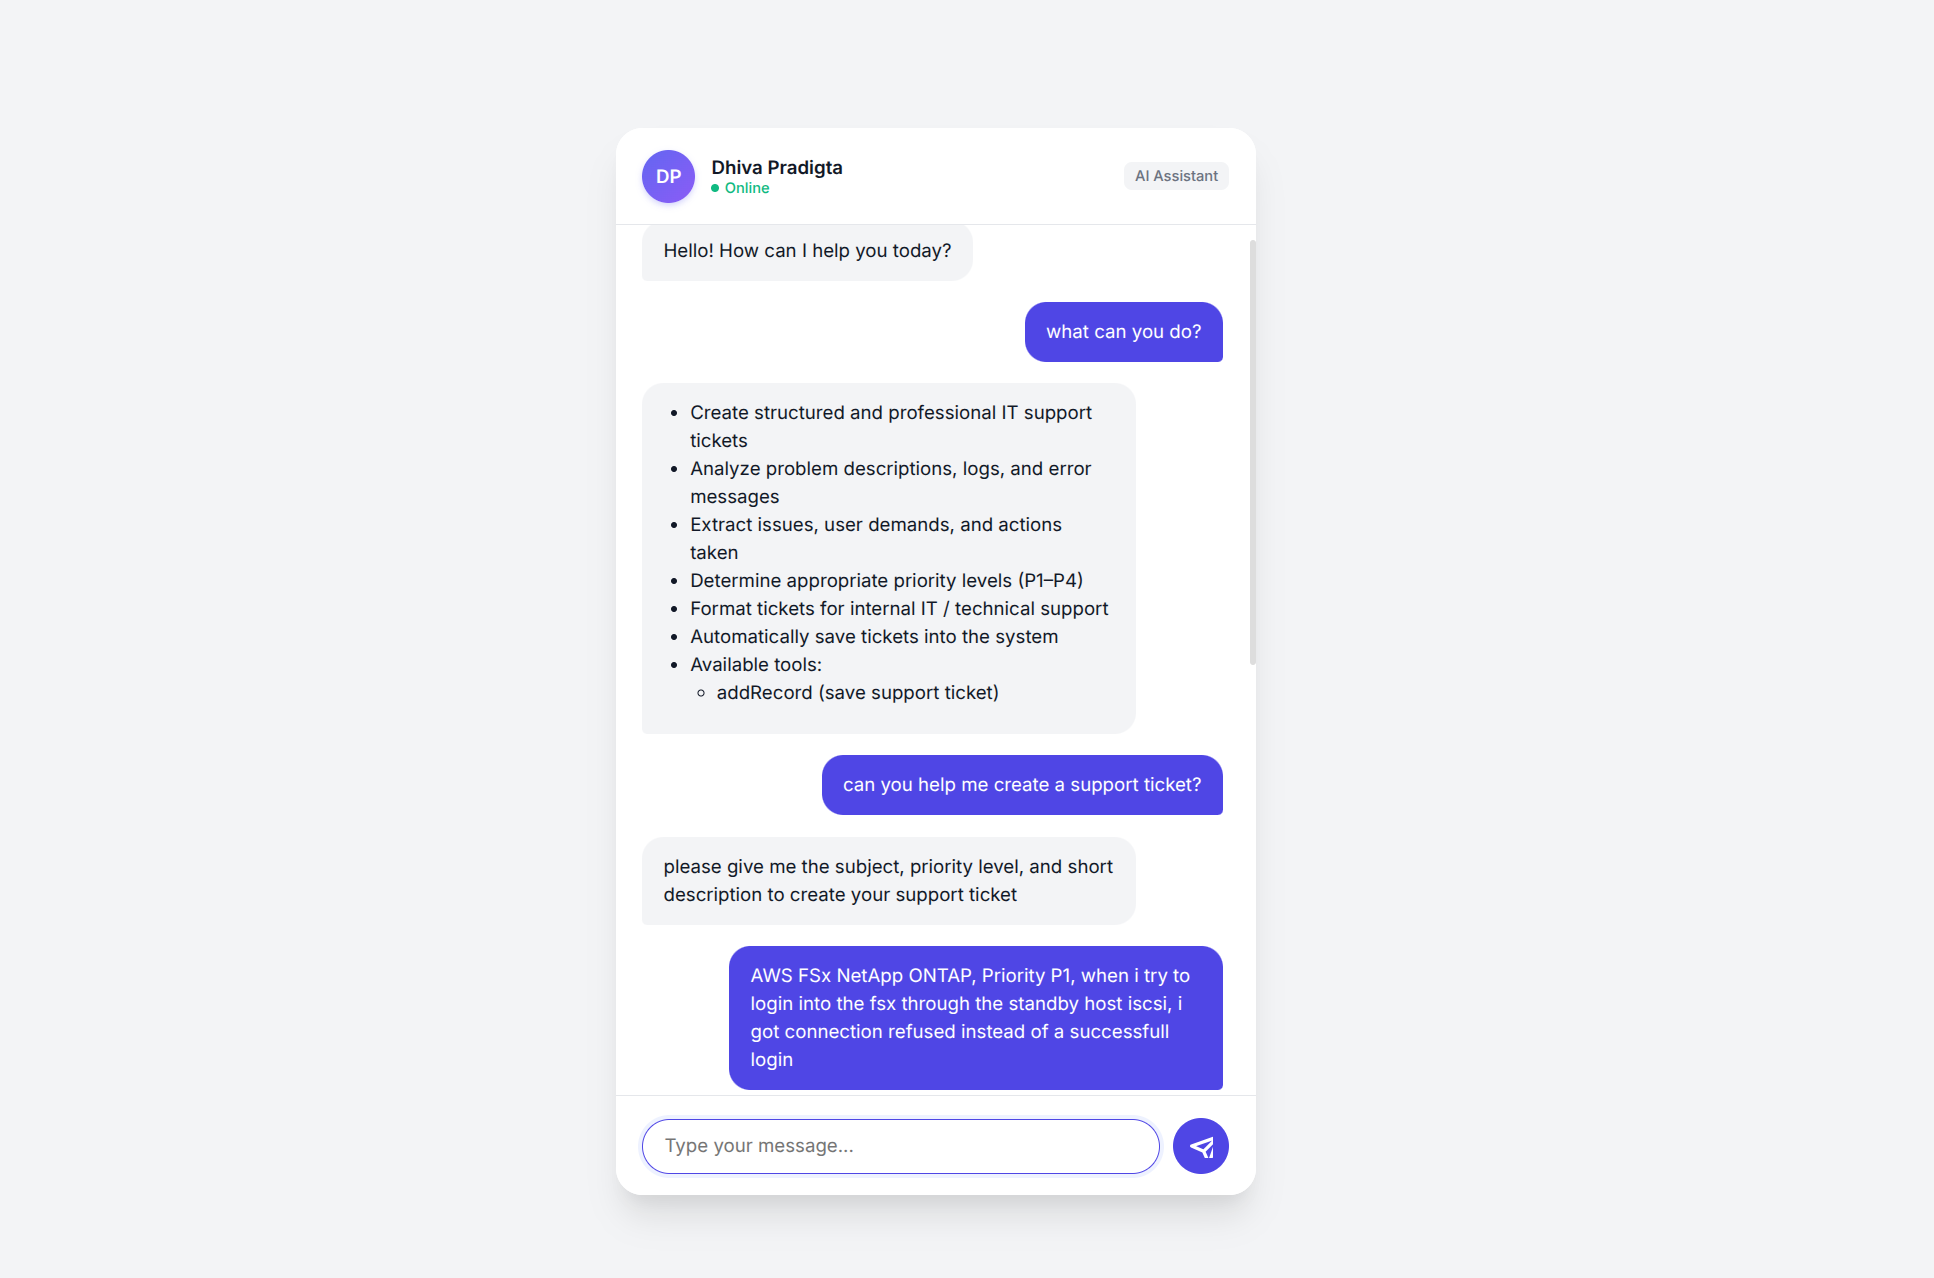 Using Support Ticket Chatbot
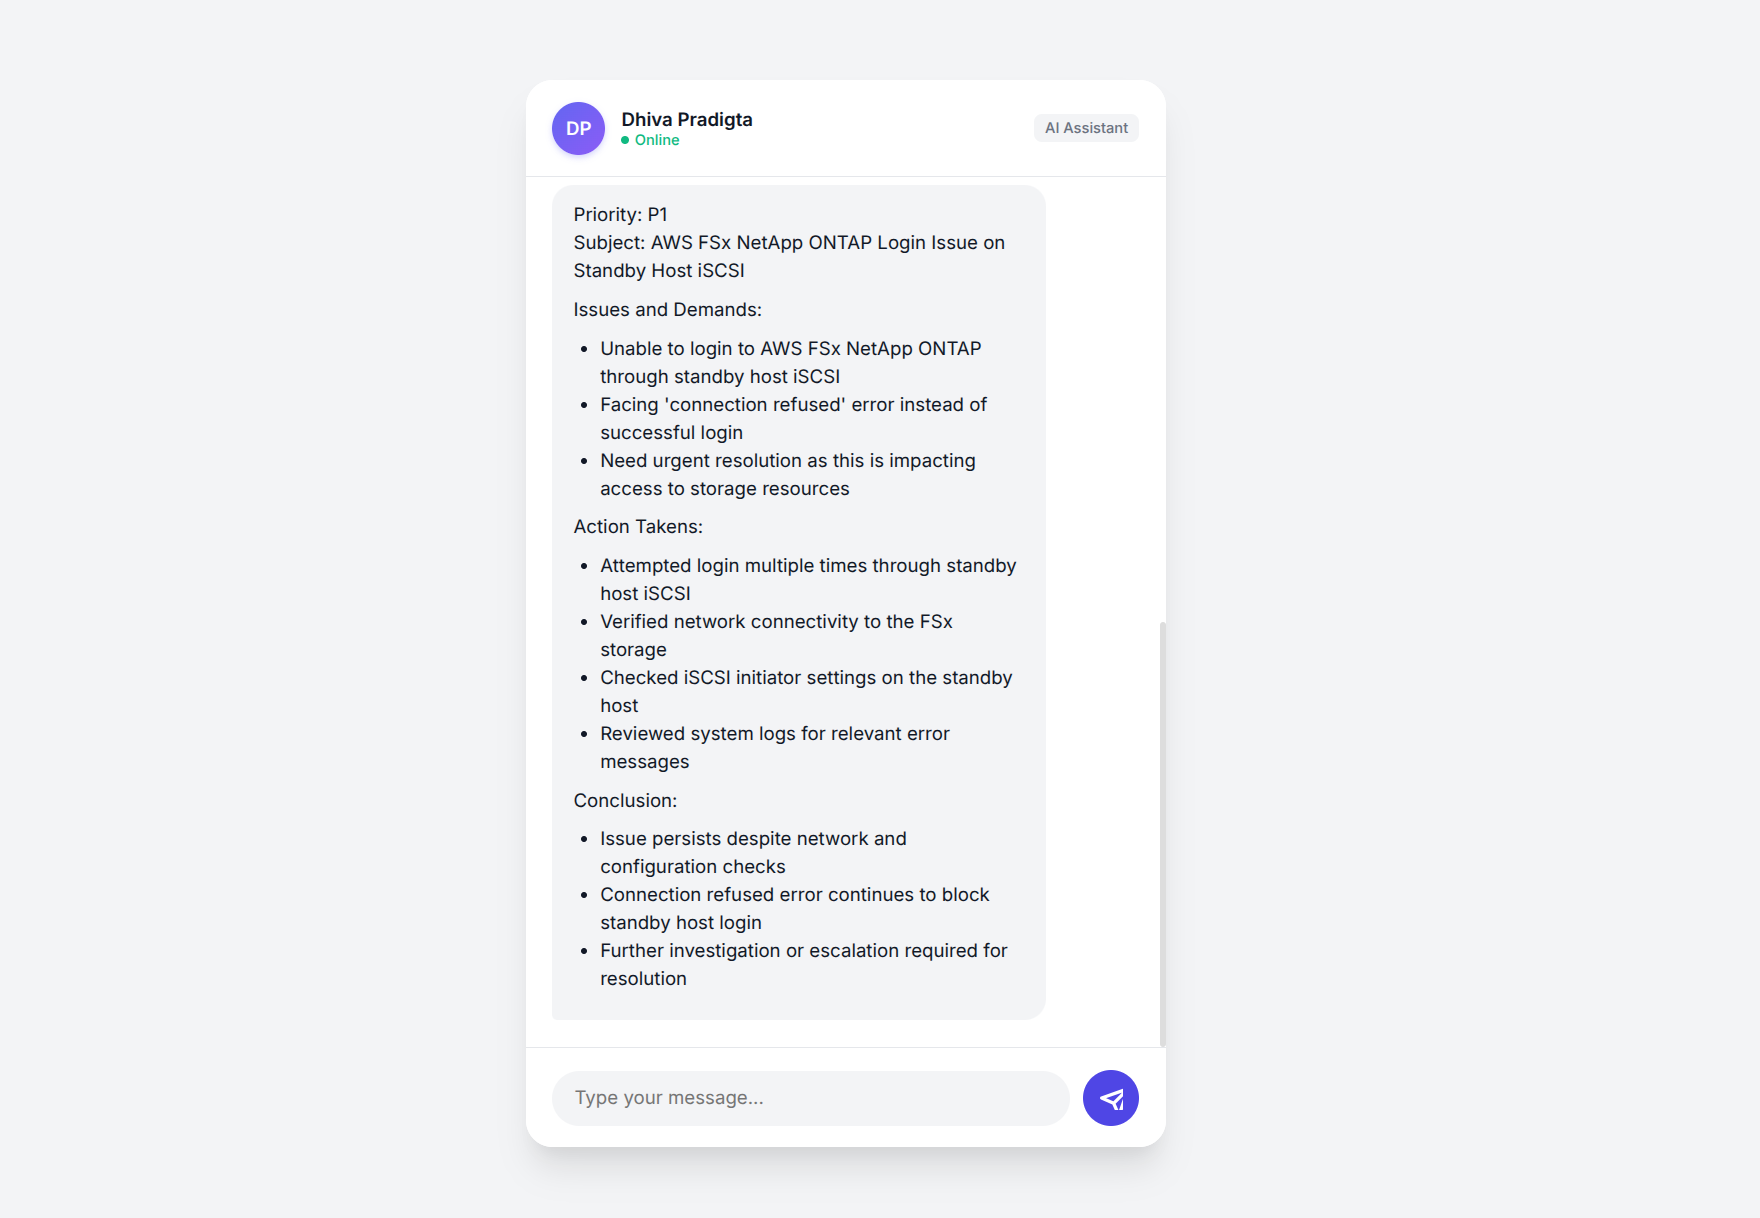 Generated Support Ticket
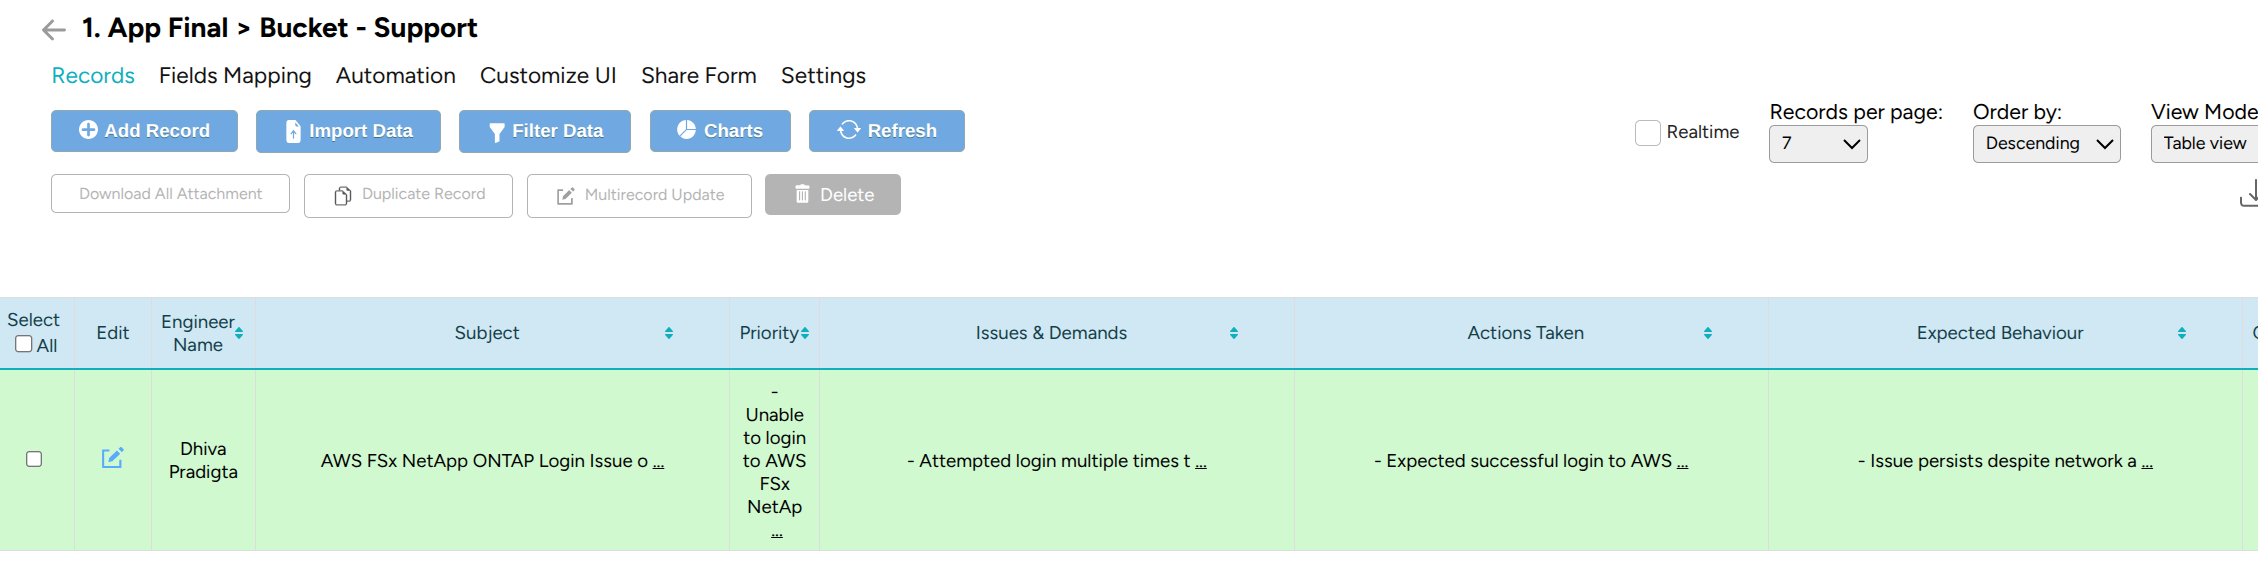 Logged Generated Support Ticket
Conclusion
I hope you find this write-up or guide helpful in some way. Thank you!